User Guide: BRIA 3 Softphone
For complete suppliers version of manual please see : http://www.counterpath.com/assets/files/189/Bria_3_for_Windows_Administrator_Guide_R3.pdf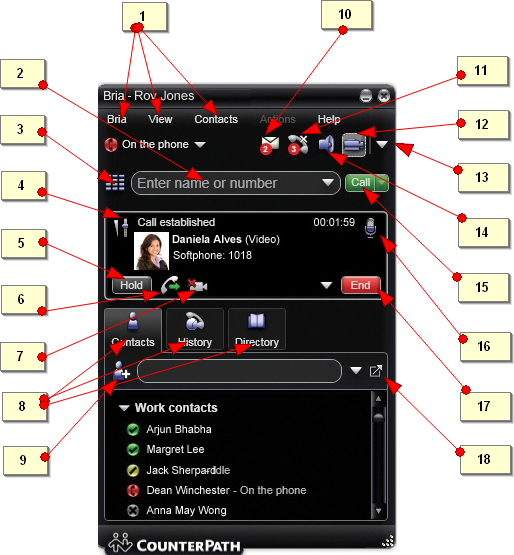
- (1) Menu:
- Bria : to adapt the settings of the softphone
- View : how Bria looks
- Contacts : to manage contacts
- Actions : to perform actions depending on the current "state" of Bria
- (2) Call entry field
- (3) Showing or hiding Keypad
- (4) "Call panel" with an ongoing call
- (5) "HOLD" icon
- (6) "TRANSF" icon (it appears during a call)
- (7) Starting or stopping the Video
- (8) Showing or hiding Contacts, History or Directory
- (9) Adding a contact
- (10) Received voicemails
- (11) Missed calls
- (12) Showing or hiding Video window
- (13) Pop-up menu
- (14) Activating the "Speaker"
- (15) Making a call
- (16) "MUTE" icon
- (17) Ending a call
- (18) Detaching the windows of "Contacts", History" or "Directory"
1. How to make a call
- Click on (3) to show the on screen keypad and compose the number, or
- use your PC keyboard and click on
 (15) or Enter, or
- type the number in the "Call entry field" (2), or
- drag an entry from the "Contacts" or "History" (8) button, or
- right-click on an entry from the "Contacts" or "History" button and choose "Call" (15), or
- double-click on a contact or a previous call
2. Menus
Bria 3 offers a lot of menus to make various actions.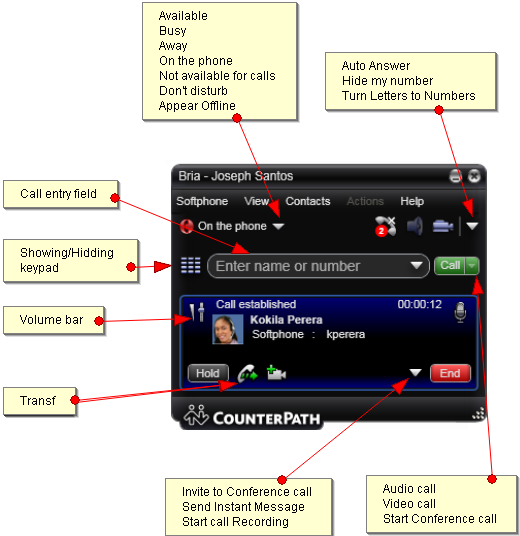
3. Answering a call
As soon as an incoming call is received, a call panel (4) appears, showing information about the call.- Click on the green button "Answer" or "Video". If you are on another call, the first call is automatically put on "Hold".
4. Hold, Resume, End
- During a call, click on "Hold"
 (15) : the call is placed in hold and music is played.
- Click on "Resume" to retrieve the call.
- Click on
 (17) to end the call.
5. Mute
- During a call, Click on
 (16) : the speaker doesn't work (a red cross appears)
6. Call transfer
A blind transfer:- During a call, click on the
 soft key (6): the call is put on hold and a call entry field appears.
- Enter the number, then click the arrow and choose "Call first" .
- Click on soft key (6) again and hang-up.
- During a call, click on the soft key (6) : the call is put on hold and a call entry field appears.
- Enter the number, then click the arrow and choose "Call first". Announce the call to the target before you click on "Transfer". If the target refuses the call, click on "Cancel" and return to the caller.
7. Redial
If the call entry field is empty, click on8. Volume adjustment
Slide the volume bar in the Call panel during a call to adjust the volume of the communication.9. Forward
You can set your softphone to forward incoming calls to a desired phone number :- 1. Access the Settings dialog by clicking on "Softphone" and choosing Account Settings...
- 2. Choose an account, click on Edit -> In the "voicemail" tab, in the Forwarding panel, select "Forward to" and enter the phone number to which you want to forward calls
- 3. Click OK - click on close
10. Call conferencing
- Click on the digits on screen keypad or use your PC keyboard to compose a number, then select "Invite to Conference Call" with the arrow next to (15).
- Make a call to the second party (and more if wanted) with the "Conference call entry field" and click on "Add" : the conference is starting.
- To hang up, click on (17) : the conference is now closed.
11. Record a call
- During a call click on the arrow nearby (17) to open the menu. Then, click on "Start Call Recording".
12. Contacts Tab
- Click on "Contacts" (8) to expand the Contact drawer.
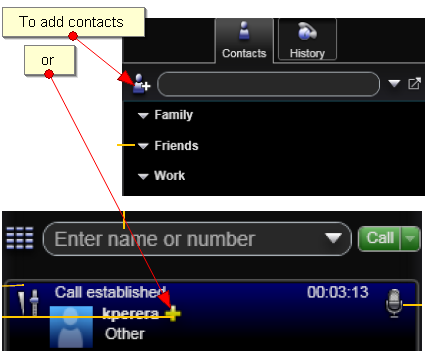 To add new contacts, click on (9), or while a call is in progress, click on + to add the current caller as a contact.
Contacts are organized into groups. Bria includes built-in groups : Family, Friends or Work. If necessary, you can add more groups.
To add new contacts, click on (9), or while a call is in progress, click on + to add the current caller as a contact.
Contacts are organized into groups. Bria includes built-in groups : Family, Friends or Work. If necessary, you can add more groups.
Importing contacts
You can import a contacts list from an external file or files:- A comma-separated file. Use this method to import from a Microsoft® Excel ® file. You will first have to set up the file. See below.
- A Microsoft® Outlook® or Microsoft® Exchange contacts list (a *.pst file).
- A vCard file (*.vcf file). A vCard is an electronic business card that is often attached to an email. The new contacts will be added to the existing contacts.
- 1. Click the Contacts menu and choose Import. The Import Contacts wizard starts.
- 2. As soon as you click Finish on the wizard, the Contacts tab in Bria 3 is updated to show the imported entries.
Setting up an Excel File for Import
- 1. Remove any introductory text or headings from the top of the file. (You can keep text at the end of the file; it will be ignored during the import.)
- 2. Insert a blank row as the first row, then insert the headings that Bria 3 will use to interpret the meaning of each column.
- display-name
- entry_id
- given_name
- surname
- emaill_address
- business_number
- mobile_number
- 3. Save the file as *.csv.
Exporting Contacts
You can export a contacts list to a comma-separated file, a pst file or a vcf file.- 1. Click the Contacts menu and choose Export. The Export Contacts wizard starts.
- 2. When you click Next, the export starts. The result is:
13. History Tab
Here you can manage the list of calls. Click on History and the calls list is displayed with their status icon:
- Outgoing attempted or established calls
- Missed calls
- Ingoing answered calls
Copyright © Escaux SA