Administrator Guide: Eyebeam 1.5 Support
This document explains how to set up an Eyebeam softphone.Table of contents
Introduction
The Eyebeam softphone 1.5 is a MS Windows compatible software client which allows you to make and receive calls using an Escaux solution. In order to install and configure it, please follow these steps:- Granting access on the Escaux UCS
- Installing and configuring Eyebeam on the PC.
Service Delivery
Preparation on Escaux UCS
Create an EyebeamAudio (SDX2) Resource for each licence.Download
To download licences and software go to http://SOP-IP/eyeBeam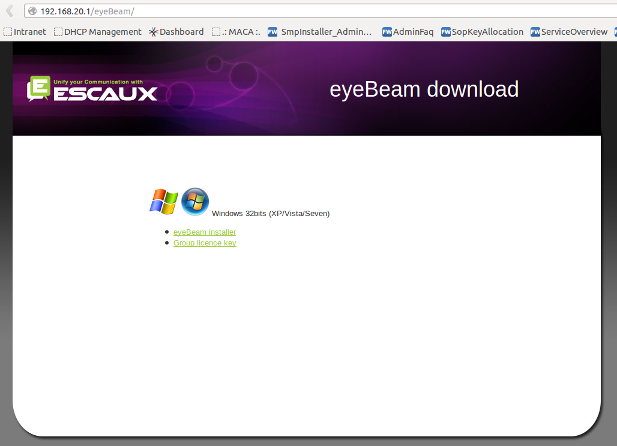
Installation
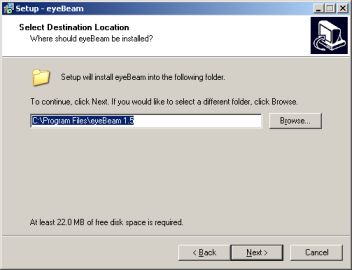
- Double click on the Installation package. Click 'Next' to launch the installation process ...

- Accept the agreement and click Next&
- Click 'Next' ...
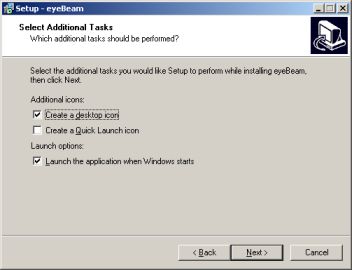
- If you would like automatically start Eyebeam when starting the computer, check 'Launch Eyebeam' and click 'Finish'.
- Click 'Next' ...
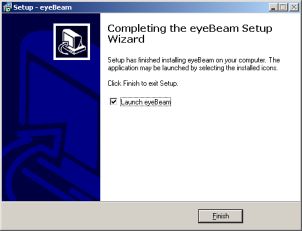
- Click 'Finish'
Provisioning
The Eyebeam softphone can be configured using two mechanisms. You can either configure it manually like any other software. Or you can use the settings file that contains information to auto-provision the Eyebeam.Manual provisioning
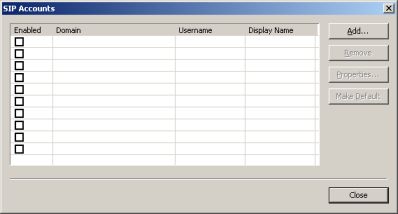
- When first starting Eyebeam, you will be presented with an overview of all accounts. Click on 'Add'.
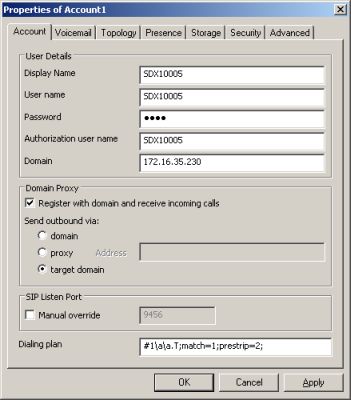
- Please fill in the following data
- Display Name: Enter your softphone resource id. This is a sequence of characters like 'SDX2aaaa'.
- User Name, Enter your softphone resource id.
- Password, Enter your pincode. (default 1234).
- Authorization User Name, Enter your softphone resource id.
- Domain: Enter the IP address of the Communicator or Escaux UCS
- Make sure 'Register with domain and receive incoming calls' is selected
- Make sure 'target domain' is selected
- Click on 'OK'
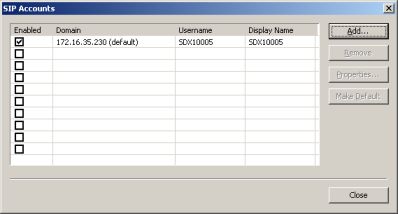
- You will see that the account is visible in the accounts list. Click on 'Close'

- If all went well, you will get the following screen. You should have the following indication: "Ready - Your number is SDX2.."
VPN
If the Eyebeam softphone is going to be used in a VPN environment, it might be advisable to choose an audio codec which consumes less bandwidth. This can be accomplished by following these steps: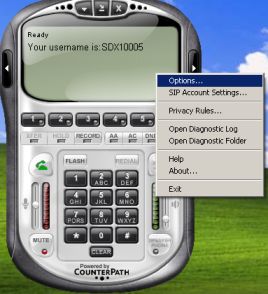
- Rightclick with the mouse over the Eyebeam softphone.
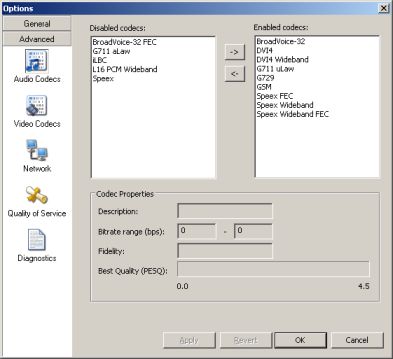
- At the bottom left, click on 'Advanced', followed by 'Audio Codecs'. You will arrive at the screen above.
- Now disable all codecs and leave only one codec left :
- G711 uLaw if there is enough bandwidth
- GSM in the other cases.
Automatic provisioning
Escaux does not support auto-provisining of the Eyebeam directly. It generates a settings file that can be fetched from our TFTP server, that contain information to provision the phone. You can create your own application that will fetch the settings file from our TFTP server, and reuse the information to generate the Eyebeam configuration. Below, is an example of an Eyebeam configuration file. The file will be named eyebeam_<hostname>.cfg. Where <hostname> is the hostname defined in the resource.[NETWORK] Name=SDX20007 Domain=172.16.35.96 Domain_1=172.16.35.96 Dialplan_1=#1\a\a.T|[0-9a-zA-Z+*#].T;match=1;prestrip=2; Registration_time_1=600 Domain_2=172.16.35.137 Dialplan_2=#2\a\a.T|[0-9a-zA-Z+*#].T;match=1;prestrip=2; Registration_time_2=600Below you will find an explanation of each parameter in the configuration file.
- Name: match the username and the Authorization name.
- Domain_1 and Domain: Contains the first domain to register to.
- Dialplan_1: Contains the dialplan to apply to the first domain to register to.
- Registration_time_1: Time before reregister to the first domain.
- Domain_2: Contains the second domain to register to.
- Dialplan_2: Contains the dialplan to apply to the second domain to register to.
- Registration_time_2: Time before reregister to the second domain.
<setting name="authorization_username" value="SDX20007"/>
<setting name="digit_map" value="#2\a\a.T|[0-9a-zA-Z+*#].T;match=1;prestrip=2;"/>
<setting name="domain" value="172.16.35.137"/>
<setting name="reregister_in_seconds" value="600"/>;
<setting name="username" value="SDX20007"/>
Active-Active support
Active-Active configuration is supported on the Eyebeam. In order to work you need to make sure that the extension in the internal directory is set on 2 SOPs, same thing goes for the resource configuration, the resource (SDX2aaaa) should be configured on SOP1 and SOP2. Two identities will have to be created on the Eyebeam phone. Both of them will use the resource name as Username and Authorization user name. Identity 1:- User name: resource name (SDX2aaaa)
- Authorization user name: resource name (SDX2aaaa)
- Domain: IP address of SOP 1.
- Dialplan: #1\a\a.T|[0-9a-zA-Z+*#].T;match=1;prestrip=2;
- Reregister every: 600
- User name: resource name (SDX2aaaa)
- Authorization user name: resource name (SDX2aaaa)
- Domain: IP address of SOP 2.
- Dialplan: #2\a\a.T|[0-9a-zA-Z+*#].T;match=1;prestrip=2;
- Reregister every: 600
Eyebeam Finetuning
PC Speaker ringing during incoming calls
- To have the PC ring at an incoming call, check the following : options - devices - Ring device : select the good one (for example "Realtek HD Audio Output") and check "Ring PC speaker as well"
Sounds fine-tuning
- In Options > Application - Zero Touch Configuration
- Uncheck - Enable Zero Touch bandwidth detection
- Uncheck - Enable status bar messages
- In Options > Devices - Headset and Speakerphone configuration
- Check - Use acoustic echo cancellation (AEC)
- Uncheck - Use auto gain control (AGC)
- Uncheck - Use noise reduction
- In Options > Network (Advanced tabs) - Speed of network
- Set to 'LAN'
- Uncheck: 'Preserve bandwidth during silence'
SIP RE-invite environement.
- In some scenario, the asterisk module is set in RE-invite mode.
- In this case, it is important to reduce as much as possible the negotiation possibilities between codecs in order to provide compatibility between phones:
- In Options > Audio Codecs (Advanced tabs) : * Disable all codecs except G711 alaw
- In Options > Video Codecs (Advanced tabs) : * Disable all codecs except H263
Copyright © Escaux SA