Administrator Guide: net.Console 3.2
- Administrator Guide: net.Console 3.2
- History
- Introduction
- Limitations, known issues and frequently asked questions
- Services enabling
- Services delivery
- Quick check list
- Functional acceptance test
- 1. Installation and login
- 2. Queue management
- 3. Basic telephony
- 4. Attended transfer
- 5. Blind transfer
- 6. Camp on
- 7. Chained call
- 8. Call parking
- 9. Directed call parking
- 10. Speedial
- 11. Directory
- 12. Keyboard shortcuts
- 13. Web Application integration
- 14. Presence
- 15. Call supervision
- 16. External number
- 17. Administration
- 18. Receptionist overview
- 19. Handset/headset control
- 20. Call history
- 21. Voicemail
- 22. Outlook integration
- Redudant net.Console acceptance test
History
- 2011-05-13 Release of net.Console 3.2.3
- 2011-05-06 Added 'Limitations and known issues' section
Introduction
net.Console is an application allowing one or several company receptionists to accept and dispatch all incoming phone calls in a user friendly and efficient manner. This document explains all the steps to follow in order to setup a professional company switchboard/reception with 3 receptionists handling all incoming calls. Throughout this document we will cover the following topics:- net.Console requirements
- SOP configuration
- net.Console module installation and configuration
- receptionist phone installation and configuration
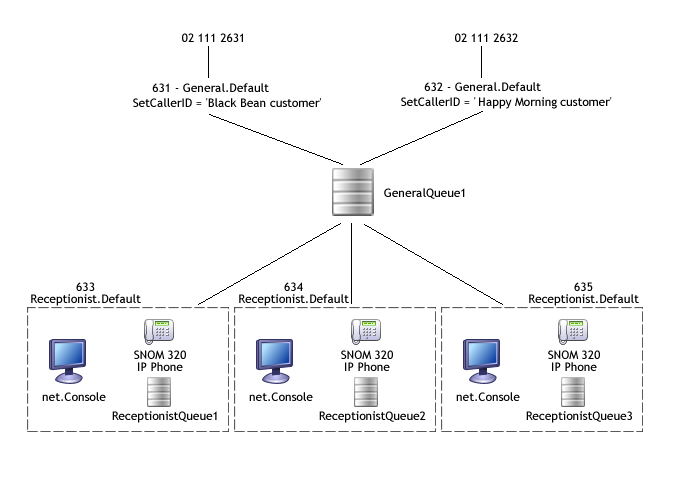
- The company has 2 public numbers:
- 02 111 2631, which is used for business customers.
- On an incoming call, the receptionist should see a warning showing this call is from a business customer and they should answer with "Black Bean Inc., how can I help you."
- This number will be internally mapped to extension 631
- 02 111 2632, which is used for the general public.
- On an incoming call, the receptionist should see a warning showing this call is from a residential customer and they should answer with "Happy Morning coffee, how can I help you."
- This number will be internally mapped to extension 632
- 02 111 2631, which is used for business customers.
- The company has 3 receptionists, all working together handling and dispatching all incoming calls
- 633 is the direct extension of Receptionist 1
- 634 is the direct extension of Receptionist 2
- 635 is the direct extension of Receptionist 3
Limitations, known issues and frequently asked questions
Call returning to the reception and fallback to reception
If in some callflow, a redirect is done to the general reception, for example in the user's callflow an action 'Redirect' is used to redirect the call to the reception after the 'CallDevices' action to the primary phone exits in the 'timeout' output, the redirect must be done to the extension associated to the general reception and not directly to the reception's callflow. If not done so, the blind transfer cannot be supervised properly and the blind transfer operation in the net.Console will times out from time to time.Blind transfer implementation
The implementation of the blind transfer in the net.Console 3 is different than the one of the net.Console 2. The implementation of the blind transfer in the net.Console 2 is a standard blind transfer which transfer the call immediately. This has the inconvenience that if a call is blind transferred is done to an extension which is busy, the external call is hanged up. The blind transfer in the net.Console 3 is actually an attended transfer which is supervised by the net.Console. It is only when the destination starts ringing that the net.Console will confirm the call transfer. If the destination is busy, the first line 1 is put on hold and the second line plays a busy tone to the receptionist.net.Console reactivity
In order to ensure ensure the stability of the application, in the net.Console 3 the receptionist is not allowed to initiate several operation. For example when the receptionist clicks on the BLIND_TRANSFER button, the net.Console will shows the glass window indicating that the processing of the operation is ongoing. In this case the processing of the call includes that time taken to get the ringing from the remote destination. If the net.Console gets slower with the time, make sure that the call history is fully deactivated on the SNOM phone. If not done, the SNOM phone will progressively slow down after dialing or transferring calls.SetCallerId action and net.Console
From the net.Console 3.2.3, it is possible to customize in the X.700 and the X.900 resource what is displayed in the line 1 overview. Please refer to the documentation of the resource for further information:Services enabling
This section describes all the steps required prior of configuring a net.Console receptionist.Requirements
Modules, resources and actions
Installation instructions
Release Notes are available in the corresponding Reference Guide:00000XXX*CLI> restart now
net.Console 3.2.3
Modules:- Asterisk-1.2 v2.29.2 or higher
- Application Management Server v3.1.1 or higher
- Unified Communication Model v1.6.1 or higher
- net.Console v3.2.3 or higher
- Watchdog v1.0.3 or higher
- SNOM Phone Support v1.11.0 or higher
- Call Management v1.4.2 or higher
- Database Schema v1.12.0 or higher
- MeshSipTrunk interface v1.01 or higher (if the net.Console is in a cluster)
- SNOM320 phone v3.2 or higher
- net.Console X.900 v1.5 or higher or net.Console X.700 v1.4 or higher
- net.Console availability v1.02 or higher
- Queue v1.10 or higher
- StartDynamicApplication v5.7 or higher
net.Console 3.2.2
Modules:- Asterisk-1.2 v2.28.10 or higher
- Application Management Server v3.1.0 or higher
- Unified Communication Model v1.6.1 or higher
- net.Console v3.2.2 or higher
- Watchdog v1.0.3 or higher
- SNOM Phone Support v1.8.0 or higher
- Call Management v1.4.1 or higher
- Database Schema v1.12.0 or higher
- MeshSipTrunk interface v1.01 or higher (if the net.Console is in a cluster)
- SNOM320 phone v3.2 or higher
- net.Console X.900 v1.4 or higher or net.Console X.700 v1.3 or higher
- net.Console availability v1.02 or higher
- Queue v1.10 or higher
- StartDynamicApplication v5.7 or higher
net.Console 3.2.1
Modules:- Asterisk-1.2 v2.28.10 or higher
- Application Management Server v3.1.0 or higher
- Unified Communication Model v1.6.1 or higher
- net.Console v3.2.1 or higher
- Watchdog v1.0.3 or higher
- SNOM Phone Support v1.8.0 or higher
- Call Management v1.4.1 or higher
- Database Schema v1.12.0 or higher
- MeshSipTrunk interface v1.01 or higher (if the net.Console is in a cluster)
- SNOM320 phone v3.2 or higher
- net.Console X.900 v1.4 or higher or net.Console X.700 v1.3 or higher
- net.Console availability v1.02 or higher
- Queue v1.10 or higher
- StartDynamicApplication v5.7 or higher
net.Console 3.2.0
Modules:- Asterisk-1.2 v2.28.10 or higher
- Application Management Server v3.1.0 or higher
- Unified Communication Model v1.6.0 or higher
- net.Console v3.2.0 or higher
- Watchdog v1.0.3 or higher
- SNOM Phone Support v1.8.0 or higher
- Call Management v1.4.0 or higher
- Database Schema v1.12.0 or higher
- MeshSipTrunk interface v1.01 or higher (if the net.Console is in a cluster)
- SNOM320 phone v3.2 or higher
- net.Console X.900 v1.4 or higher or net.Console X.700 v1.3 or higher
- net.Console availability v1.02 or higher
- Queue v1.10 or higher
- StartDynamicApplication v5.7 or higher
Other SOPs in the cluster
If you want the netConsole to have a view on other phones in the cluster, you also have to install these modules to other SOPs in the cluster :- Application Management Server v3.1.0 or higher
- Watchdog 1.0.3
Call routing
The net.Console relies on the alerting signal exchanged within the cluster. Make sure that the following version of the Meshed Sip Trunk is used:- MeshSipTrunk interface v1.1+
Callflows
The following callflows are used by the net.Console:- General.Default
- Receptionist.Default
- Takeback (the Takeback callflow will be called from a route so it doens't need to have a profile linked to it)
- takeback-netconsole3.csv: Takeback callflow
- InternalReception.Default (Optional: to call internally the reception or to return the call to the reception from the user callflow)
- DirectedParkRetreive.Default (X.900 only)
- CampOn.Default (X.900 only)
- DirectedCallParking (X.900 only)
Firewall rules
| Between... | Protocol | Port |
|---|---|---|
| SOP |
HTTP | TCP port 80 |
| SOP |
SIP | UDP port 5060 |
| SOP |
RTP | UDP port range 10000-20000. The port range can be limited through the resource configuration of certain phones. |
| PC |
SIP over TCP for the control connection | TCP port 3040 |
Operator PC requirements
Minimum requirements:- Processor: Pentium 4 @ 2.4 GHz or equivalent
- Memory: 1 GB
- Hard Drive: 4 GB Free
- Operating system: Microsoft Windows XP/Vista/7
General reception service activation
The general reception handles the external call going to the reception. Calls arrives in a shared queue which distributes the call to the different receptionist.Step 1: General Queue profile parameter creation
- Parameter Name: GeneralQueue
- Friendly Name: General queue
- Value: leave empty
- Type: QUEUE
- Owner Type: AdminVar
- Descripition: The name of the general queue to be used in the general reception callflow.
Step 2: General profile creation
- Profile Name: General
- Type: Static
- Parameter1: GeneralQueue
Step 3: Assign General.Default callflow
- Application Selector: STARTDYNAMICAPLLICATION.5.7
- Profile: General
- Status: Default
- Description: This callflow check if the net.Console service is available. Adapt the caller name in order to customize the display on the phone, then push the call to the general queue. In case of overflow, the overflow procedure is applied.
- Callflow Root: *209 (Root extension of General.default callflow on the library)
Step 4: General callflow customization
Personal reception service activation
The personal reception is a direct access to the receptionist. The call are queued and send to the receptionist when this one gets available.Step 1: Reception queue profile parameter creation
- Parameter Name: ReceptionistQueue
- Friendly name: 'Personal queue for company receptionist'
- Value: leave empty
- Type: QUEUE
- Owner Type: AdminVar
- Description: This parameter will be used in the individual receptionist callflows
Step 2: Receptionist profile creation
- Profile name: Receptionist
- Type: Static
- parameter1: ReceptionistQueue
Step 3: Receptionist.Default callflow assignation
- Application Selector: STARTDYNAMICAPPLICATION.5.7
- Profile: Receptionist
- Status: Default
- Description: This callflow checks that the net.Console service is available. If so the call is pushed to the receptionist queue.
- Callflow root: *306 (The default callflow is available on the library)
Step 4: Receptionist callflow customization
Internal reception service activation
The internal reception service is optional. It enables internal access to the general reception. A call coming from a receptionist can be pushed back to this one by doing a blind transfer to the internal reception extension. Each call handled by a receptionist is mark with the LastOperatorExt call parameter which enables to redirect the call to the last receptionist who has been in conversation with the external person.Step 1: GeneralExtension profile parameter creation
- Paramater name: GeneralExtension
- Friendly name: General reception extension
- Type: EXTENSION
- Owner Type: AdminVar
- Descr: This variable contain the extension of a general reception
Step 2: InternalReception profile creation
- Profile name: InternalReception
- Type: Static
- parameter1: GeneralExtension
Step 3: InternalReception.Default callflow assignation
- Application Selector: STARTDYNAMICAPPLICATION.5.7
- Profile: InternalReception
- Status: Default
- Description: This callflow test if the call is an intra-cluster call. If so, the call is deflected to the original receptionist otherwise it is sent to the general reception extension
- Callflow root: *308 (The default callflow is available on the library)
Takeback service activation
This operation has to be done on each sop hosting the net.Console.Step 1: Route for takeback creation
For SOP in a cluster :- Telephony Route: _*96.
- Description: Takeback
- Route Group: netconsole
- Action: MapNumber.1.10
Step 2: MapNumber action configuration
For SOP in a cluster :- Description: Takeback
- Number of front digits to strip: All
- Prefix applied to the number: *307 (takeback callflow available on the library)
- Variable: NumberToDial
Directed Park service activation (X.900 only)
- Directed Call Parking (see DirectedCallParking)
- Make sure to create the extra route in the netconsole route group
Camp on service activation (X.900 only)
- Camp On (see CampOn)
- Make sure to create the extra route in the netconsole route group
Services delivery
Adding a new general reception
Step 1: General Queue creation
- version: 1.10
- SOP1: Select the primary SOP where the general reception is located (for cluster)
- SOP2: Select the secondary SOP where the general reception is located (empty if not an Active-active configuration)
- Queue name: For example GeneralQueue1 or GeneralQueue2 (GeneralQueue2 is not reflected in the scheme below, it can be used you have two groups of receptionists which don't have to take calls from the other one). The queue name should be composed of letters and digits only, no special characters of white space permitted. Also don 't use the Queue name 'General ' !
- Music on hold: select your Music on Hold resource. In this example we select the 'default' music on hold folder.
- Ring strategy: 'rrmemory' is probably the most appropriate for a general queue. It ensures that the incoming calls are distributed evenly among the different receptionists.
- Timeout: 60
- Retry: 1
- Permanent members: must be left empty
- Join when empty policy: strict
- Leave when empty policy: strict
- Ring in use policy: no
- Device idle time: 5
Step 2: General reception extension creation
- SOP: Select the primary SOP where the general reception is located (for cluster)
- SOP2: Select the secondary SOP where the general reception is located (empty if not an Active-active configuration)
- Extension: for example 631 or 632
- First Name: The display name to be shown in net.Console and on the phone ('Black Bean customer' for extension 631 and 'Happy Morning customer' for extension 632)
- Callflow: General.Default
- Primary Phone: No Phone
- Secondary Phone: No Phone
Step 3: General reception profile paramaters
- General Queue: GeneralQueue1 for extension 631 and 632
Step 4: DDI creation
- External Number: enter the number used to call the reception from the public network, for example 21112631 and 21112632
- Internal Extension: 631 for 21112631 or 632 for 21112632
Step 5: Internal reception extension
If you use the Internal Reception service, execute the following step:- SOP: (all)
- SOP2: (none)
- Extension: 1111 or 1112, for example
- Callflow: InternalReception.Default
- Primary Phone: No Phone
- Secondary Phone: No Phone
Step 6: Internal reception profile parameters
If you use the Internal Reception service, execute the following step:- General reception extension: 631 for extension 1111 and 632 for extension 1112
Adding a new reception desk
Step 1: Personal queue creation
- version: 1.10
- SOP1: Select the primary SOP where the general reception is located
- SOP2: Select the secondary SOP where the general reception is located (empty if not an Active-active configuration)
- Queue name: ReceptionistQueue1, ReceptionistQueue2 and ReceptionistQueue3
- Music on hold: 'default'
- Ring strategy: 'ringall'
- Timeout: 60
- Retry: 1
- Permanent members: should be left empty
- Join when empty policy: strict
- Leave when empty policy: strict
- Ring in use policy: no
- Device idle time: 5
Step 2: Reception phone creation
- SOP1: Select the primary SOP where the general reception is located (for cluster)
- SOP2: Select the secondary SOP where the general reception is located (empty if not an Active-active configuration)
- MAC Address: The mac address of the phone can be found on the back of the phone
- Restriction Group: Norestrict unless a specific restriction has been created for the reception desk
- Line: 1
- SIP can reinvite: no
- Auto-answer: disabled
- Display missed calls: no
- Display dialed calls: no
- Display received calls: no
- Call waiting: off
- TimeZone: Select the time zone to be used
- Return to idle even if offhook: yes
Step 3: Takeback identity creation
- SOP1: Select the primary SOP where the general reception is located (for cluster)
- SOP2: Select the secondary SOP where the general reception is located (empty if not an Active-active configuration)
- MAC Address: The same mac address than for the reception phone
- Line: 2
- *SIP can reinvite: no
- Auto-answer: Select one of the auto-answer mode
- Display missed calls: no
- Display dialed calls: no
- Display received calls: no
Step 4: Reception user creation
- Login Name: login name to be used while login in on the net.Console,for example receptionist1@blackbean.com
- Real Name: Name to be used for display, for example 'Receptionist 1'
- Language: Select the language for this reception desk
- Level: user
Step 5: Personal extension creation
- SOP: Select the primary SOP where the general reception is located (for cluster)
- SOP2: Select the secondary SOP where the general reception is located (empty if not an Active-active configuration)
- Owner: Not used, can be anything
- Extension: for example 633, 634 and 635 in our example
- First Name and Last Name: Fill in the first name and last name which will be used as display name while calling
- Callflow: Receptionist.Default
- Primary Phone: Select here the reception phone identity previously created
- Secondary Phone: Select here the takeback phone identity previously created
Step 6: Personal extension profile parameters
- Personal queue for company receptionist: ReceptionistQueue1 for extension 633, ReceptionistQueue2 for extension 634 and ReceptionistQueue3 for extension 635
Step 7: net.Console resource creation
- SOP1: Select the primary SOP where the general reception is located (for cluster)
- SOP2: Select the secondary SOP where the general reception is located (empty if not an Active-active configuration)
- Queue1: Select the name of the general reception queue this reception desk is attached to
- Queue3: Select the name of the personal queue previously created for this reception desk
- Direct receptionist extension: Select the extension previously created for this reception desk
- Line 1 display: By default the Contact Information and the caller number are displayed. If you want to add the display information seen on the phone display this need to be customized
Step 8: permission assignation
- User: Select the user previously created for this reception desk
- Resource: Select the net.Console resource previously created for this reception desk
- Permissions: By default select all the permissions
Step 9: Desktop application installation
Open a browser and enter the following URL: http://<netConsole_SOP's_IP>/netConsole and download the msi file. Once downloaded install it on the PC of the reception desk.Quick check list
This section provides a a short list of test which can be executed in order to verify the installation. Receive incoming call on general queue and ...- verify number and caller name presentation in net.Console application
- Accept, Hangup
- Notes field
- accept, park, select entry in directory, select notes field (selected name should be filled out in notes field)
- accept a second call, select other name, click on notes field (selected name should be filled out in notes field of second parked call)
- take back first call, the notes field should be correct, park again
- take back second call, the notes field should be correct, park again
- take back first call again, the notes field should be correct, park again
- Park
- accept, park, takeback-return, hangup
- accept, park, timeout-return, hangup
- accept, park, initiate 2nd call, join
- accept, park, receive 2nd call, join
- Park test 2
- accept&park 1st call
- accept&park 2nd call
- select 2nd call for note editing or take back action
- let 1st park timeout => the second call should remain selected and active
- Blind Transfer
- accept, call target, takeback-return
- accept, call target, target accepts
- accept, call busy target, cancel popup, hangup
- accept, call busy target, confirm popup, target accepts
- Attended Transfer (AT)
- accept, initiate AT, takeback-return, hangup
- accept, initiate AT, call target, terminate, takeback-return, hangup
- accept, initiate AT, call target, talk, hangup, takeback-return, hangup
- accept, initiate AT, call target, talk, hangup, takeback-return, retry target, talk, takeback-return, hangup
- Directed Park
- accept, dirpark, undirpark, hangup
- accept, dirpark, select target, takeback-return, hangup
- accept, dirpark, select target, timeout-return, hangup
- accept, dirpark, select target, target calls *55+ext
- accept, dirpark, undirpark, dirpark, select target, target calls *55+ext
- Chain
- accept, chain, takeback-return, hangup
- accept, chain, timeout-return, hangup
- accept, chain, call target, terminate target, takeback-return, hangup
- accept, chain, call target, join, wait 60 seconds, target terminates
- accept, chain, call target, join, takeback-return
- accept, chain, call target, timeout-return, park, chain, takeback-return, join, target terminates
- Camp
- accept, camp, uncamp, hangup
- accept, camp, call target, takeback-return, hangup
- accept, camp, call target, target terminates, call goes through
- accept, camp, call target, timeout-return, hangup
- Toggle
- accept, park, call target, cancel popup, takeback-return, hangup
- call target, confirm popup, ring 10s, takeback-return, hangup
- login/logout from queue: you should see the receptionist phone appearing in the list of queue members when issuing the 'show queues' command in the asterisk console accessible via the SOP shell
- Notes field (test must be done with a physical phone establishing the 2nd call to the net.Console. If done via a softphone, the net.Console will loose focus while manipulation of the softphone ... as a result, the test is not valid)
- park call
- select parked line
- incoming call > focus should remain on selected line
- incoming call while paused/logged out > focus should remain on selected line
Functional acceptance test
1. Installation and login
1.1. Module installlation
- Add in module list netConsole module and its dependencies
- Configure each modules
- Install all the modules
1.2. Configure and install net.Console application
- Configure users as described in application note: How to setup a reception desk
- Open a browser and connect to
http://<sop ip>/netConsole
- Follow the instruction
- net.Console is up and running
- net.Console settings are correct
- net.Console directory is synchronized
2. Queue management
2.1. Login (T000001) [auto]
- net.Console is logged out: LOGIN button is red and PAUSE button is disabled
- Click on LOGIN
- net.Console state is Idle
- LOGIN buton is green
- PAUSE button is green
- General queue icon show net.Console active
- Personal queue icon show net.Console active
2.2. Logout (T000002) [auto]
- net.Console is logged in: LOGIN button is green
- Click on LOGIN
- net.Console state is Idle
- LOGIN buton is red
- PAUSE button is disabled
- General queue icon show net.Console inactive
2.3. Pause (T000003) [auto]
- net.Console is logged in
- Click on PAUSE
- LOGIN buton is green
- PAUSE button is red
- General queue icon show net.Console inactive
- Personal queue icon show net.Console active
2.4. Unpause (T000004) [auto]
- net.Console is in pause
- Click on PAUSE
- LOGIN buton is grayed out
- PAUSE button is green
- General queue icon show net.Console active
- Personal queue icon show net.Console active
2.5. Close application while logged out (T000005)
- net.Console is logged out
- close net.Console application
- call receptionist extension
- the phone is not ringing when someone calls the general reception or the receptionist (phone removed from queues)
2.6. Close application while logged in
- net.Console is Idle, logged in
- close net.Console application
- net.Console pops up a warning that the net.Console is not logged out
- confirm the action
- netConsole is closed
- the phone is not ringing when someone calls the general reception or the receptionist (phone removed from queues)
3. Basic telephony
3.1. New call in General queue (T000006) [auto]
- Call the general number
- Check that the call counter is updated in the net.Console GUI
- the phone is ringing
- ringing event is added in the 'action history'
- person icon is enabled and indicate new incoming call
- line 1 is enabled and indicates new incoming calls
3.2. Accepting a call (T000007) [auto]
- Call the general number
- the receptionist phone is ringing
- click ACCEPT
- accept is added to the 'action history'
- the net.Console state is in converstation and the counter of the general queue is updated
- line 1 indicates Converstation state
3.3. Hold call (T000008) [auto]
- reception is in conversation
- click HOLD
- the caller can hear the music on hold
- the net.Console state is on hold
- hold event is added in the 'action history'
- line 1 indicates Hold state
3.4. Unhold call (T000009) [auto]
- caller is on hold
- click HOLD
- the caller is in conversation with the receptionist
- the net.Console state is Converstation
- the unhold event is added in the 'action history'
- line 1 state is Converstation
3.5. Call hangup (T000010) [auto]
- receptionist answer call
- net.Console state is Conversation
- click HANGUP
- call is hanged up
- net.Console state is Idle
- line1 is greyed out
3.6. Call reject and queue retry (T000011) [auto]
- receptionist is ringing
- net.Console state is Ringing
- ringing event is added in the 'action history'
- click HANGUP
- call is back in the Queue
- net.Console state is Idle
- phone is ringing again (queue retry)
- call is offered again to the next available receptionist
- the new receptionist can see in the 'action history' that call has been rejected, queued and then ringing again
3.7. Unanswered call and queue retry (T000011) [auto]
- receptionist is ringing
- net.Console state is Ringing
- ringing event is added in the 'action history'
- receptionist let the phone ringing
- call is back in the Queue after the timeout configured in the Queue action
- net.Console state is Idle
- phone is ringing again(queue retry)
- call is offered again to the next available receptionist
- the new receptionist can see in the 'action history' that call has been re-queued and then ringing again
3.8. Dial an internal extension (T000012)
- net.Console state is Idle
- receptionist dial an internal extension
- receptionist hear a ringing tone
- net.Console state is NewOutgoing
- Dial added in the 'action history'
- line1 state indicates outgoing call
- the remote phone Answer
- Answer is added to the 'action history'
- line1 state is Converstation
3.9. Dial to busy number (T000014) [auto]
- net.Console state is Idle
- receptionist dial a busy extension
- line1 indicates outgoing call
- net.Console state return to Idle
- line1 return to Idle
- notification windows displays busy for the last call
3.10. Dial to congested number (T000015)
- net.Console state is Idle
- receptionist dial a congested extension (e.g. phone not registered)
- line1 indicates outgoing call
- net.Console state return to Idle
- line1 return to Idle
- notification windows indicates congestion for the last call
3.11. Dial to extension of a queueing service (T000016)
- net.Console state is Idle
- receptionist dial an extension redirecting the call to the queue service
- Dial added in 'action history'
- net.Console state is Converstation
- Answer added in 'action history'
3.12. Dial to extension while phone is ringing
- net.Console state is NewIncoming
- receptionist dial an extension
- the incoming call is pushed back to the queue
- line 1 indicates the outgoing call
4. Attended transfer
4.1. Successful Attended transfer (T000017) [auto]
- the caller is on hold
- click HOLD
- hold added in 'action history'
- line1 state is HOLD
- enter a number
- click DIAL
- line2 indicates outgoing call
- the consulted extension is ringing
- answer the consultation call
- line2 indicates converstation
- the receptionist and the consulted person are in converstation
- the net.Console state is AT Converstation
- click TRANSFER
- the caller and the consulted person are in conversation
- the net.Console state is Idle and the call is not supervised
4.2. Attended transfer with hangup from consulted (T000018) [auto]
- net.Console state is AT converstation
- line2 state is Converstation
- consulted party hangup
- net.console state is OnHold
- line1 state is OnHold
- line2 state is idle
4.3. Attended transfer with abandon of consultation call (T000019) [auto]
- net.Console state is AT conversation
- receptionist hangup
- net.Console state is OnHold
4.4. Attended transfer with abandon of caller (T000020) [auto]
- net.Console state is AT conversation
- caller abandon the call
- notfication of call abandon
- call supervision indicates line1 abandon and displays former line2 information
- net.Console state stays Converstation
- receptionist hangup
- net.Console state is Idle
4.5. Attended transfer with busy consultation call (T000021) [auto]
- net.Console state is OnHold
- receptionist dial a busy extension
- notification of busy destination
- net.Console goes to ATBusyOutgoing
4.6. Attended transfer with congested consultation call (T000022)
- net.Console state is OnHold
- receptionist dial a congested extension
- notification of congested destination
- net.Console goes to ATCongestedOutgoing
4.7. Conversion of attended transfer to a blind transfer (T000091) [auto]
- net.Console state is OnHold
- receptionist dial a internal number
- net.Console auto-dial the number
- line2 indicates outgoing call
- receptionist click TRANSFER
- the caller hears the ringing tone
- line1 and line2 are idle
- call is added to the list of supervised call
4.8. Caller abandon while consultation call in ringing (T000092) [auto]
- net.Console state is ATNewOutgoing
- caller abandon the call
- notfication of call abandon
- call supervision indicates line1 abandon and displays former line2 information
- net.Console state stays NewOutgoing
- receptionist hangup
- net.Console state is Idle
4.9. Conversion of attended transfer to a directed park (T000093) [auto]
- net.Console state is OnHold
- receptionist dial a internal number
- net.Console auto-dial the number
- line2 indicates outgoing call
- receptionist click DIRPARK
- the caller hears the music on hold
- line1 and line2 are idle
- call is added to the list of supervised call
4.10. Conversion of attended transfer to a camp on (T000094) [auto]
- net.Console state is OnHold
- receptionist dial a internal number
- net.Console auto-dial the number
- line2 indicates outgoing call
- receptionist click CAMP
- the caller hears the ringing tone
- line1 and line2 are idle
- call is added to the list of supervised call
4.11. Conversion of attended transfer to a park (T000095) [auto]
- net.Console state is OnHold
- receptionist dial a internal number
- net.Console auto-dial the number
- line2 indicates outgoing call
- receptionist click PARK
- the confirmation of call parking pops up with the park note pre-filled with the last destination
- the caller hears the music on hold
- line1 and line2 are idle
- call is added to the list of supervised call
4.12. Attended Transfer to another reception (no ringing tone)
- net.Console state is OnHold
- receptionist dial a internal number redirecting to the another reception where the call is queued
- net.Console auto-dial the number
- line2 indicates outgoing call
- line2 indicates converstation
- the receptionist hears the music-on-hold
- the receptionist clicks TRANSFER
- the caller hears the music-on-hold
4.13. Conversion of attended transfer to a camp on after a busy
- net.Console state is OnHold
- receptionist dial a internal number which reject the call with a busy cause
- net.Console auto-dial the number
- line2 indicates outgoing call busy
- receptionist click CAMP
- the caller hears the ringing tone
- line1 and line2 are idle
- call is added to the list of supervised call
5. Blind transfer
5.1. Blind transfer to an idle phone (T000023) [auto]
- net.Console state is Converstation
- the phone to be consulted is idle
- receptionist enters an internal number
- net.Console auto-dial the number
- net.Console state is Idle
- the phone is idle
- the call appears among supervised call
- the caller hears the phone ringing
- the consulted person answers the call
- the call is removed from the list of supervised call
5.2. Blind transfer supervision with caller abandon (T000024) [auto]
- a caller has been blind transferred to another number
- the caller abandons the call before the constulted person answers the call
- the call is revoved from the list of supervised call
5.3. Blind transfer supervision timeout (T000025) [auto]
- a caller has been blind transferred to another number
- the call supervision times out
- the supervision timeout is displayed in the notification window
- the call moved from the list of supervised call to the list of call in the personal queue
5.4. Blind transfer and caller abandon while ringing pending(T000026)
- net.Console state is Converstation
- receptionist enters a GSM number (which does not start ringing immediately)
- line 2 is in Converstation
- line 1 is OnHold
- the caller abandons the call
- caller abandon is indicated in the notification window
- receptionist hangs up the consultation call
- net.Console state is Idle
5.5. Blind transfer takeback (T000027) [auto]
- a caller has been blind transferred to another number
- receptionist selects the call
- receptionist clicks on TAKEBACK
- the caller and the receptionist are in conversation
- line1 state is Converstation
- 'blind transfer' is added in the 'action history'
- takeback is added in the 'action history'
- the call is removed from the list of supervised call
5.6. Blind transfer with busy from consulted party (T000028) [auto]
- net.Console state is Converstation
- the internal number to transfer to is busy and reject the call with a busy release cause
- receptionist enters the number
- net.Console auto-dial the number
- the busy call is indicated in the notification window
- the line1 is OnHold
- the line2 is Busy
- the net.Console state is ATBusyOutgoing
- the call is not in the list of supervised call
- receptionist click UNHOLD
- caller and receptionist can talk to each other
5.7. Blind transfer with congestion from consulted party (T000029)
- net.Console state is Converstation
- the internal number to transfer to is busy and reject the call with a busy release cause
- receptionist enters the number
- net.Console auto-dial the number
- the call congestion is indicated in the notification window
- the line1 is OnHold
- the line2 is Congested
- the net.Console state is ATCongestedOutgoing
- the call is not in the list of supervised call
- receptionist click UNHOLD
- caller and receptionist can talk to each other
5.8. Blind transfer coupling (T000030)
- not supported. The button should be disabled
5.9. Blind transfer to another reception
- net.Console state is Converstation
- the internal number to transfer will redirect to another reception where the call is queued
- receptionist enters the number
- net.Console auto-dial the number
- the line1 is OnHold
- line2 is in Converstation
- the net.Console state is ATConverstation
- the call is not in the list of supervised call
- receptionist click HANGUP
- caller and receptionist can talk to each other
6. Camp on
6.1. Successful camp-on (T000031) [auto]
- net.Console state is Converstation
- receptionist click on CAMPON
- receptionist enter a internal number
- net.Console auto-camp the caller on the internal number
- the net.Console state is Idle
- the phone is Idle
- the call is added to the list of supervised calls
- the caller hears a ringing tone
- the camped on extension hangs up
- the camped on extension starts ringing
- the camped on extension answer the call
- the caller is in conversation with the consulted person
- the call is removed from the list of supervised calls
6.2. Camp-on supervision with caller abandon (T000032) [auto]
- the caller camps on an extension
- the caller abandons the call
- the call is removed from the list of supervised call
6.3. Camp-on supervision timeout (T000033) [auto]
- the caller camps on an extension
- the call supervision times out
- the call is moved from the list of call supervision to the personal queue
6.4. Camp-on takeback (T000034) [auto]
- the caller camps on an extension
- the receptionist selects the call
- the receptionist clicks on TAKEBACK
- the caller and the receptionist are in Conversation
- the net.Console state is Converstation
- camp-on is added in the 'action history'
- takeback is added in the 'action history'
6.5. Camp-on coupling (T000035)
- should be disabled
7. Chained call
7.1. Successfull chained call (T000036) [auto]
- net.Console state is OnHold
- receptionist enter a internal number
- net.Console auto-dial the number
- the caller hears the music on-hold
- the net.Console state is ATNewOutgoing
- the receptionist hears the ringing tone
- the consulted person answers the call
- the receptionist and the consulted person are in converstation
- the receptionist clicks on CHAIN
- the caller and consulted person are in converstation
- the call is added to the list of supervised calls
- the phone is idle
- the net.Console state is Idle
- the consulted person hangs up
- the call moves from the list of supervised call to the personal queue
7.2. Takeback must be disabled (T000037)
- since chained call is a call in converstaion, takeback must not be allowed
7.3. Chained call coupling must be disabled (T000038)
- since chained call is a call in converstaion, coupling must not be allowed
8. Call parking
8.1. Successfull call parking (T000039) [auto]
- line1 state is Converstation
- receptionist click PARK
- a window pops up to request a park note
- receptionist enters a park note and click ENTER
- caller hears the music-on-hold
- call is added to the list of supervised call
- line1 state is Idle
8.2. Parked call supervision timeout (T000040) [auto]
- Parked call is in the list of supervised call
- The Park call supervision times out
- The call is moved from the list of supervised call to the personal queue
8.3. Parked call supervision with caller abandon (T000041) [auto]
- Parked call is in the list of supervised call
- The caller hangs up
- The call is removed from the list of supervised call
8.4. Parked call takeback (T000044) [auto]
- Parked call is in the list of supervised call
- Receptionist selects the call to handle
- Receptionist click on TAKEBACK
- the caller and the receptionist are in conversation
- The call is removed from the list of supervised call
- Line1 state indicates Converstation
- 'action history' displays information from the call taken back
8.5. Parked call coupling (T000045) [auto]
- Receptionist is in conversation
- A call has been parked by the receptionist
- Receptionist select parked call
- Receptionist click COUPLE
- caller and parked call are in conversation
- line1 is Idle
8.6. Changing park note
- select a parked call in the supervision area
- change the park notes
- press ENTER or click somewhere else
- the park note is updated
8.7. Changing park note on new incoming call
- select a parked call in the supervision area
- change the park notes
- a new call comes in
- the focus remain in the park note
- press ENTER or click somewhere else
- the park note is updated
8.9. Changing park note and supervision timeout
- netConsole is in Converstation
- select a parked call in the supervision area
- change the park notes
- the supervision timeout of this call times out
- the focus remain in the park note
- press ENTER or click somewhere else
- the park note is updated
9. Directed call parking
9.1. Successfull directed call parking (T000046) [auto]
- Receptionist is in converstation
- Receptionist click DIRPARK
- Receptionist enter an internal number
- net.Console auto-complete the directed park on this number
- The caller hears music on hold
- The call is added to list of supervised call
- Line1 is Idle
9.2. Directed parked call supervision timeout (T000047) [auto]
- Directed park call is in the list of supervised call
- The directed park call times out
- the call is redirected to the personal queue
- the call is removed from the list of supervised call
9.3. Directed parked call takeback (T000048) [auto]
- Directed park call is in the list of supervised call
- Receptionist select the call
- Receptionist click TAKEBACK
- caller and receptionist are in Converstation
- call is removed from the list of supervised call
- line1 indicates Converstation
- directed park is added to the 'action history'
- takeback is added to the 'action history'
9.4. Successful directed park retrieve (T000049) [auto]
- Directed park call is in the list of supervised call
- user1 call the directed park retreive service
- user1 and caller are in converstation
- call is removed from list of supervised call
9.5. Directed park retrieve with caller abandon (T000050)
- Directed park call is in the list of supervised call
- caller hangs up
- user1 call the directed park retreive service
- user1 gets an announcement
9.6. Directed park retreive from another SOP (T000051)
see 9.4 but from phone on another SOP 9.7. Directed parked call coupling (T000052) [auto]
- Receptionist is in conversation
- A call has been directed parked by the receptionist
- Receptionist select a directed parked call
- Receptionist click COUPLE
- caller and parked call are in conversation
- line1 is Idle
10. Speedial
The configuration file is the following10.1. Speeddial configuration (T000053)
- click CONFIGURE
- enter speedial
- click OK
- speeddial is added to speeddial area
10.2. Outgoing call via speedial (T000054)
- line1 is Idle
- Receptionist click on speeddial
- receptionist hears the ringing tone
- line1 state indicates outgoing call
- Dial is added to 'action history'
10.3. attended transfer via speedial (T000055)
- line1 is on hold
- line2 is idle
- Receptionist click on speedial
- Receptionist hears ringing tone
- line 2 indicates outgoing call
10.4. blind transfer via speedial (T000056)
- line1 is in conversation
- receptionist click on one of the speedial
- caller hears the ringing tone
- line1 is idle
- call is added in the list of supervised call
10.5. camp-on transfer via speedial (T000057)
- line1 is in conversation
- receptionist click on CAMPON
- receptionist click on one of the speedial
- caller hears the ringing tone
- line1 is idle
- call is added in the list of supervised call
10.6. directed park via speedial (T000059)
- line1 is in conversation
- receptionist click on DIRPARK
- receptionist click on one of the speedial
- caller hears the ringing tone
- line1 is idle
- call is added in the list of supervised call
11. Directory
11.1. Directory column configuration
- Right click on the directory column title
- Available columns are: first name, last name, company, extension, status, phone 1, phone 2, mobile, mail, user1, ..., user 10
- Select the the column to be displayed
11.2. Directory search field configuration
- click on CONFIGURE button
- select directory tab
- tick in the search fields to be activated
- click Apply and close the configuration Window
- the selected search field now appears in the directory
11.3. Outlook integration
- click on CONFIGURE button
- select directory tab
- configure outlook integration settings
11.4. Autodial activation
- click on CONFIGURE button
- select directory tab
- Select 'Auto-dial on single search result'
11.5. Search in main search field (T000060)
- enter a number or a name in the main search field of the directory
- check that you can search simultaneously on any field of the directory
11.6. Search by first name (T000061)
- enter a a name in the first name search field of the directory
- check that you can find a person based on its first name
11.7. Search by last name (T000062)
- enter a a name in the last name search field of the directory
- check that you can find a person based on its last name
11.8. Search by Company (T000063)
- enter a a name in the company search field of the directory
- check that you can find a person based on its company
11.9. Search by extension (T000064)
- enter a a number in the phone number search field of the directory
- check that you can find a person based on its phone number
11.10. Dial an internal extension via the directory (T000065)
- enter an internal extension in the main search field of the directory
- the directory highlights a unique entry
- the net.Console auto-dial this number
- line1 indicates outgoing call
11.11. Dial a mobile phone number via the directory (T000066)
- click on a mobile phone in the directory
11.12. Attended transfer via directory (T000067)
- line1 is on hold
- receptionist enter an extension in the main search field of the directory
- net.Console auto-dial the number
- line2 indicates outgoing call
11.13. Blind transfer via directory (T000068)
- line1 is in conversation
- receptionist enter an extension in the main search field of the directory
- net.Console auto-transfer the call to the extension
- caller hears the ringing tone
- line1 is idle
11.14. Camp-on via directory (T000069)
- line1 is in conversation
- receptionist click CAMPON
- receptionist enter an extension in the main search field of the directory
- net.Console auto-camp the call on the number
- caller hears the ringing tone
- line1 is idle
11.15. Directed park via directory (T000070)
- line1 is in conversation
- receptionist click DIRPARK
- receptionist enter an extension in the main search field of the directory
- net.Console auto-park the call for the number
- caller hears the music on hold
- line1 is idle
12. Keyboard shortcuts
12.1. Default shortcuts (T000071)
The configuration file is the following12.2. Basic telephony (T000072)
- line1 indicates new incoming
- press ENTER
- call is accepted
- press ENTER
- call is on hold
- press enter
- call is in conversation
12.2. Call parking (T000073)
- line1 indicates converstation/on hold
- press F7
- enter a park note and press ENTER
- call is parked
12.3. Blind transfer (T000074)
- line1 is in converstation
- enter a internal number
- the number is found in the directory and auto-dialed
- call is transferred
12.4. Attended transfer (T000075)
- line1 is in conversation
- press ENTER
- call is on hold
- enter an internal number
- the number is found in the directory and auto-dialed
- line2 indicates outgoing call
- consulted party answer the call
- line2 is in converstation
- press ENTER
- the call is transferred
12.4. Chained call (T000076)
- line1 is in conversation
- press ENTER
- call is on hold
- enter an internal number
- the number is found in the directory and auto-dialed
- line2 indicates outgoing call
- consulted party answer the call
- line2 is in converstation
- press F9
- the calls are chained
12.5. CampOn (T000077)
- line1 is in converstation
- press F10
- netConsole state is initCamp
- enter a number to dial
- press ALT+ENTER if call not auto-camped
- the call camps on the internal number
12.6. Directed Park (T000078)
- line1 is in converstation
- press F10
- netConsole state is initCamp
- enter an internal number
- the number is found in the directory and auto-dialed
- the call camps on the internal number
12.7. Takeback (T000079)
- receptionist select one of the supervised call
- receptionist click F5
- call is taken back
12.8. Call coupling (T000080)
- line1 is in converstation
- receptionist select one of the supervised call
- receptionist click F6
- call are coupled
12.9. Dial (T000081)
- line1 is idle
- enter an internal number
- the number is found in the directory and auto-dialed
- line1 indicates outgoing call
13. Web Application integration
Web application are to be configured on SMP > Resource > Desktop Applications > WCEXXXX > Application tabs. The url can contain resolvable parameter. Refer to the resource documentation for more information.13.1. Empty Application tab URL (T000082)
- leave application tab URL empty in the net.Console resource on SMP
- do apply-change on SMP
- restart net.Console
- embedded browser shows a blank page
13.2. Directory and callendar WEB application integration (T000083)
- enter application tab URL to access your callendar application in the net.Console resource on SMP
- do apply-change on SMP
- restart net.Console
- search for a contact in the directory
- when the entry is highlighted, the browser update the current web page with calendar of the person
13.3. Takeback and callendar WEB application integration (T000084)
- configure Web application as in 13.2
- Takeback a call in the list of supervised calls
- The callendar shows the callendar of the consulted person (directed park, blind transfer, camp on)
13.4. CRM Web application integration (T000085)
- enter application tab URL to access your CRM in the net.Console resource on SMP
- do apply-change on SMP
- restart net.Console
- call the general reception number from a phone whose caller ID is defined in the CRM
- line1 indicates incoming call
- the browser shows the contact information of the caller
13.5. Supervision timeout and callendar WEB application integration
- configure Web application as in 13.2
- wait for a call in the list of supervised calls to time out
- the receptionist phone is ringing
- The callendar shows the callendar of the consulted person (directed park, blind transfer, camp on)
13.6. Startup URL
- enter the startup URL to be displayed by the net.Console at startup in the net.Console resource on SMP
- do apply-change on SMP
- restart net.Console
- net.Console displays the startup URL
14. Presence
14.1. Phone status on net.Console startup (T000086)
- from an internal extension, call another extension
- start net.Console
- search in the directory for the two extensions
- phone status indicates busy
14.2. Phone status change notification (T000087)
- search in the directory for an internal extension
- pickup any phone and call that extension
- the phone status is updated in the directory
14.3. Extension status and custom message on net.Console startup (T000088)
- start net.Console
- extensions' status are correct
14.4. Extension status change notification (T000089)
- change the status of an extension via the API or a net.Application
- the status of this extension is updated
14.5. Phone registration on net.Console startup (T000096)
- start net.Console
- Phone's registration status are correct
14.6. Phone registration change notification (T000097)
- stop the phone of an extension
- the phone is greyed out in the internal directory
- start the phone
- the phone is enabled in the directory
14.7. Outgoing external call indication
- From any phone call an external number
- The phone is indicated as busy-external
14.8. Incoming external call indication
- Call the DDI number of an internal extension
- The phone is indicated as busy-external
15. Call supervision
15.1. Direct call to receptionist
- net.Console state is Idle
- from any phone call the receptionist extension
- from another phone call again the receptionist phone
- the first call makes ring line1 of the net.Console
- the second call appears in the personal queue supervision area
- the number calls in the personal queue is 2
15.2. Takeback from personal queue
- net.Console state is NewIncoming
- two calls are waiting in the personal queue
- receptionist select a call in the personal queue
- receptionist click TAKEBACK
- line1 is in converstation with selected call
- the number of calls in the personal queue is decremented by one
- the call in line1 has been sent back to the personal queue
15.3. Coupling with call in personal queue
- net.Console state is Conversation
- calls are waiting in the personal queue
- receptionist select a call in the personal queue
- receptionist click COUPLE
- caller is in converstation with selected call
- the number of calls in the personal queue is decremented by one
15.4. Searching for supervised calls
16. External number
16.1. Dial an external number (T000013)
- net.Console state is Idle
- receptionist dial an external extension
- receptionist hear a ringing tone
- net.Console state is NewOutgoing
- ringing added in 'action history'
16.2. Blind transfer to an external number
- net.Console state is Idle
- click on the dial field
- enter a external number
- click ENTER
- caller hears the ringing tone
- call is added in the list of supervised call
- call is answered by the external number
- call is removed from the list of supervised call
16.3. Attended transfer to an external number
- net.Console state is OnHold
- click on the dial field
- enter a external number
- click ENTER
- line2 indicates outgoing call
17. Administration
17.1. X700/X900 resource configuration
- modify any parameter on the X700/X900 resource on the SMP
- do an apply change on the SMP
- restart net.Console
- the parameters are taken into account
17.2. Adding a new receptionist
17.3. Removing a receptionist
18. Receptionist overview
18.1. Receptionist overview
- click on the receptionist overview tab
- all the logged in receptionist are displayed
19. Handset/headset control
Notes about SNOM phone behaviour:- Working with the headset requires the handset to always been hooked on.
- If headset mode is not used and handset is hooked on, the audio arrives in the speaker.
19.1. Setting headset or handset mode
- net.Console is logged out
- click on HANDSET (resp. HEADSET)
- the HANDSET (resp. HEADSET) button is enabled
- receptionist logs in
- click on HANDSET (resp. HEADSET)
- Handset-headset is locked
19.2. Accepting call in handset mode
- net.Console is in handset mode
- net.Console is logged in
- handset is hooked off
- call the receptionist extension
- line1 is ringing
- click ACCEPT
- the audio is received in the handset
19.3. Accepting call in headset mode
- net.Console is in headset mode
- net.Console is logged in
- handset is hooked on
- call the receptionist extension
- line1 is ringing
- click ACCEPT
- the audio is received in the headset
19.4. Making a call in handset mode
- net.Console is in handset mode
- net.Console is logged in
- handset is hooked off
- receptionist dial a number via net.Console
- line1 indicates outgoing call
- the audio is received in the handset
19.5. Making call in headset mode
- net.Console is in headset mode
- net.Console is logged in
- handset is hooked on
- receptionist dial a number via net.Console
- line1 indicates outgoing call
- the audio is received in the headset
19.6. Call takeback in handset mode
19.7. Call takeback in headset mode
20. Call history
20.1. Caller abandon
- Call to the General Reception
- The receptionist phone is ringing
- The caller hangs up
- The call is displayed in the Call History of the last receptionist receiving the call (duration=ringing duration, status=missed)
20.1. Call picked up by another receptionist
- Call to the General Reception
- The receptionist phone is ringing
- The receptionis does not anser
- The queue sends the call to another receptionist
- The call is answered by the second receptionist
- The call is hanged up
- The Call History of the first receptionist shows a missed call
- The Call History of the second receptionist indicates the call as received
20.2. Received calls
- Call to the General Reception
- The receptionis answers the call
- The call is hanged up
- The call is displayed in the Call History (duration=conversation duration, status=Received)
20.3. Dialed calls
- Receptionis dial a number
- The call is ansered
- The call is hanged up
- The Call History shows the call (duration= total duration of the call, status=Dialed)
21. Voicemail
22. Outlook integration
Redudant net.Console acceptance test
The net.Console redudancy is based on the Escaux active-active architecture which provides an implementation of active hot-standby redundancy scheme where a secondary SOP is always ready to take over the incoming traffic. The active-active is only supported for the net.Console X900. The main aspects are the following:- each receptionist's phone is registered on two SOPs (SOP1 and SOP2)
- each net.Console application opens a session with both SOPs
- each extension (general reception and receptionist personal extension) is configured with a primary and secondary SOP in the directory entry
- the Escaux intra-cluster routing takes care to route the call first to the primary SOP and, if congested, to the secondary SOP
- a call to the general reception or to the recepionist is rejected with a congestion release cause if none of the net.Console is in an acceptable state. The cause can be at different level:
- problem detected inside the SOP
- problem to reach the net.Console applications
- problem inside the net.Console application
- each net.Console application is active on one SOP and passive(hot-standby) on the other sop:
- Calls on the active SOP are processed normally
- Calls on the passive SOP are queued on the SOP and notification is posted to the receptionist to indicate the activation of the failover
- an extra button (SWITCH) in the net.Console application enables to switch to the passive SOP
1. Desktop application installation
1.1. installation from SOP1
- Download the msi-file from SOP1
- Install and start the application from SOP1
- net.Console is Active on SOP1 and Passive one SOP2
1.2. installation from SOP2
- Download the msi-file from SOP2
- Install and start the application from SOP2
- net.Console is Active on SOP1 and Passive one SOP2
2. Active-active Queue management
2.1. GUI start
- Start net.Console GUI
- Receptionist enters login and password
- net.Console state is LOGGEDOUT on SOP1 and PASSIVE on SOP2
- Receptionist's phone is not added to any queue
2.2. Login
- receptionist click LOGIN
- receptionist phone is added to queue on both SOP1 and SOP2
- receptionist is paused in the general queue on both SOP1 and SOP2
- receptionist is unpaused in the personal queue on SOP1 and paused on SOP2
2.3. Unpause
- receptionist click UNPAUSE
- receptionist is unpaused in the general queue and personal queue on SOP1 and paused on SOP2
2.4. Pause
- receptionist click PAUSE
- receptionist is paused in the general queue and personal queue on both SOP1 and SOP2
2.5. Logout
- receptionist click LOGOUT
- receptionist phone is removed from queues on both SOP1 and SOP2
2.6. close application
- receptionist phone is removed from queues on both SOP1 and SOP2
- both net.Console state are reset
3. Failover
3.1. Network failure with SOP1 while Ilde
- net.Console is Idle on SOP1 and Passive on SOP2
- disconnect ethernet cable from SOP1
- call the general reception number
- call is received on SOP2
- a window pops up indicating that the net.Console should switch to SOP2
- receptionist clicks on OK
- receptionist clicks on SWITCH
- the net.Console sync its state with SOP2
- the receptionist phone starts ringing
- line1 indicates incoming calls
- check that the new call history are received
3.2. Network failure with SOP1 while in Conversation on SOP1
- net.Console state is Converstation on SOP1 and Passive on SOP2
- disconnect ethernet cable from SOP1
- call the general reception number
- call is received on SOP2
- a window pops up indicating that the net.Console should switch to SOP2
- receptionist clicks on OK
- receptionist clicks on SWITCH
- the net.Console sync its state with SOP2
- the receptionist phone starts ringing
- line1 indicates incoming calls
- check that the new call history are received
3.3. Network on SOP1 while while in ATConversation on SOP1
- net.Console state is ATConverstation on SOP1 and Passive on SOP2
- disconnect ethernet cable from SOP1
- callthe general reception number
- Call is received on SOP2
- a window pops up indicating that the net.Console should switch to SOP2
- receptionist clicks on OK
- receptionist clicks on SWITCH
- the net.Console sync its state with SOP2
- the receptionist phone starts ringing
- line1 indicates incoming calls
- check that the new call history are received
3.4. Failover after SOP1 power off
- net.Console state is ATConverstation on SOP1 and PASSIVE on SOP2
- Shut down SOP1
- External call to the general reception number
- Call is received on SOP2
- a window pops up indicating that the net.Console should switch to SOP2
- receptionist clicks on OK
- receptionist clicks on SWITCH
- the net.Console sync its state with SOP2
- the receptionist phone starts ringing
- line1 indicates incoming calls
- check that the new call history are received
3.5. Restart net.Console application while SOP1 is down
- SOP1 is shut down
- stop the net.Console
- net.Console is stopped
- start the net.Console
- call the general reception
- line1 indicates incoming calls
3.6. Restart net.Console application while SOP2 is down
- SOP2 is shut down
- stop the net.Console
- net.Console is stopped
- start the net.Console
- call the general reception
- line1 indicates incoming calls
3.7. Call handling on SOP2
- SOP1 is shut down
- Play the functional acceptance test above on SOP2
4. Recovery
When switching to the secondary SOP, the recovery will not be automatic. A manual procedure is to be followed in order to repair and then reactivate the traffic on the primary SOP. The steps to reactivate the traffic on the primary SOP are the following:- Identify the cause of the switch-over
- Restart asterisk via the sop shell
- Click on Shell > Diagnostic > Telephony > asterisk console
- In asterisk console type 'restart now'
- Wait for asterisk reload via the sop shell
- Click on Shell > Diagnostic > Telephony > asterisk console
- In asterisk console type 'show queues', check that all the queues are displayed (this makes sure that the reload is complete)
- Restart the management server (java backend) via the sop shell
- Click on the Shell > Subsystem > Management Server > stop
- Click on the Shell > Subsystem > Management Server > start
- Deactivate the secondary SOP. This will release the STONITH lock on the secondary SOP wich force the primary SOP not to accept any calls. The calls will go on being handled by the Secondary SOP but the Primary can now be activated
- Click on the Shell of the secondary SOP > Subsystem > Management Server > Deactivate net.Console controller service
- Activate the primary SOP. From that point calls will be again accepted on the primary SOP and the net.Console applications will receive a notification of the switch to the primary SOP
- Click on the Shell of the primary SOP > Subsystem > Management Server > Activate net.Console controller service
- Activate the secondary SOP. This will enable the secondary SOP to activate the STONITH lock in case the primary SOP would fail again
- Click on the Shell of the secondary SOP > Subsystem > Management Server > Activate net.Console controller service
- Check the status of the net.Console on the primary SOP. It must be active.
- Click on the Shell of the primary SOP > Subsystem > Management Server > Show status net.Console controller service
- Check the status of the net.Console on the secondary SOP. It must be active.
- Click on the Shell of the secondary SOP > Subsystem > Management Server > Show status net.Console controller service
- Logout and restart each net.Console PC client
4.1. SOP1 recovery after network outage
- receptionist has several supervised calls
- line1 is in converstation
- reconnect SOP1 ethernet cable
- Call the general reception
- SOP1 is completely UP call drops on SOP1 other wise it drops on SOP2
- receptionist receives an invitation to switch
- receptionist process all the calls on SOP2
- receptionist click on SWITCH to confirm the switch to SOP1
- receptionist phone is ringing
- line1 indicates new incoming call
- check that the new call history are received
4.2. SOP1 recovery after power off
- receptionist has several supervised calls
- line1 is in converstation
- start SOP1
- Call the general reception
- Once SOP1 is completely UP call drops on SOP1 otherwise it drops on SOP2
- receptionist receives an invitation to switch
- receptionist process all the calls on SOP2
- receptionist click on SWITCH to confirm the switch to SOP1
- receptionist phone is ringing
- line1 indicates new incoming call
- check that the new call history are received
Copyright © Escaux SA