Administrator Guide: net.Console 3.4
Table of content
Introduction
net.Console is an application allowing one or several company receptionists to accept and dispatch all incoming phone calls in a user friendly and efficient manner.
This document explains all the steps to follow in order to setup a professional company switchboard/reception with 3 receptionists handling all incoming calls. Throughout this document we will cover the following topics:
- net.Console requirements
- SOP configuration
- net.Console module installation and configuration
- receptionist phone installation and configuration
If you want to have guidelines to specify a callflow for the reception, please have a look at ReceptionCallflowFramework .
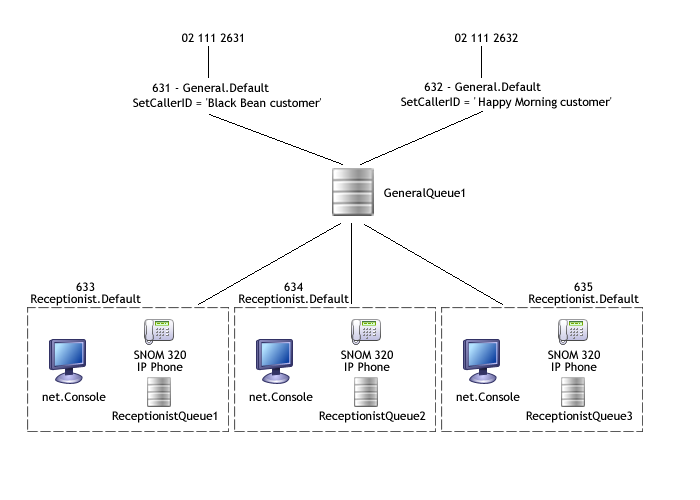
In this application note we create a phone reception solution for Black Bean Inc. a company selling coffee. This company is selling its products to the general public and also to business customers. The general public knows Black Bean Inc. by its product name which is Happy Morning. Therefor the company receptionists have to answer incoming calls with either "Welcome to Black Bean" or "Welcome to Happy Morning".
- The company has 2 public numbers:
- 02 111 2631, which is used for business customers.
- On an incoming call, the receptionist should see a warning showing this call is from a business customer and they should answer with "Black Bean Inc., how can I help you."
- This number will be internally mapped to extension 631
- 02 111 2632, which is used for the general public.
- On an incoming call, the receptionist should see a warning showing this call is from a residential customer and they should answer with "Happy Morning coffee, how can I help you."
- This number will be internally mapped to extension 632
- The company has 3 receptionists, all working together handling and dispatching all incoming calls
- 633 is the direct extension of Receptionist 1
- 634 is the direct extension of Receptionist 2
- 635 is the direct extension of Receptionist 3
Limitations, known issues and frequently asked questions
Known issues
| Description |
Internal ID |
| Calls sent to an extension and that reach VM are still shown as supervised calls in net.Console |
5443 |
| Wrong contact gets dialled if keyword+enter key typed very fast |
6479 |
| Speeddial buttons background color not shown on Windows XP Luna Theme, Vista and Seven |
4940 |
It is a known issue due to the Java version that is used. Switch your Windows theme to "classic" to get background colors.
Your password is no longer accepted after an upgrade to net.Console 3.4.x
When you upgrade net.Console to version 3.4.0 or higher, there is a small chance that your password will no longer be accepted. The authentication mechanism of Unified Communication Model is used starting from net.Console 3.4.0 but some specific passwords are not accepted if you use a version of Unified Communication Model lower than 1.9.6.
Solution: Uprade Unified Communication Model to 1.9.6
Call returning to the reception and fallback to reception
If in some callflow, a redirect is done to the general reception, for example in the user's callflow a action 'Redirect' is used to redirect the call to the reception after the 'CallDevice' action to the primary phone exits in the 'timeout' output, the redirect must be done to the extension associated to the general reception and not directly to the reception's callflow. If not done so, the blind transfer cannot be supervised properly and the blind transfer operation in the net.Console will times out from time to time.
Blind transfer implementation
The implementation of the blind transfer in the net.Console 3 is different than the one of the net.Console 2. The implementation of the blind transfer in the net.Console 2 is a standard blind transfer which transfer the call immediately. This has the inconvenience that if a call is blind transferred is done to an extension which is busy, the external call is hanged up.
The blind transfer in the net.Console 3 is actually an attended transfer which is supervised by the net.Console. It is only when the destination starts ringing that the net.Console will confirm the call transfer. If the destination is busy, the first line 1 is put on hold and the second line plays a busy tone to the receptionist.
In the version 3.3, the implementation has been improved in order to prevent missed call generation while exposing the external caller id instead of the receptionist one. This make use of a new callflow and and extra route *94. The last CallerID known for the external caller will be used for the second call. If you do a setCallerId in the callflow that one will be used (not recommended).
net.Console reactivity
In order to ensure ensure the stability of the application, in the net.Console 3 the receptionist is not allowed to initiate several operation. For example when the receptionist clicks on the BLIND_TRANSFER button, the net.Console will shows the glass window indicating that the processing of the operation is ongoing. In this case the processing of the call includes that time taken to get the ringing from the remote destination.
If the net.Console gets slower with the time, make sure that the call history is fully deactivated on the SNOM phone. If not done, the SNOM phone will progressively slow down after dialing or transferring calls.
SetCallerId action and net.Console
From the net.Console 3.2.3, it is possible to customize in the X.700 and the X.900 resource what is displayed in the line 1 overview. Please refer to the documentation of the resource for further information:
 Do not a SetCallerId in the callflow for the general number otherwize blind transfer will be impacted.
Restrictions with Polycom based net.Console
The usage of the Polycom based net.Console is limited by several restrictions:
- Active-active configuration not supported
- The Polycom API is slower than the Snom one. The polycom is therefore not suitable for intensive usage of the net.Console
- You can't use custom softkeys for IP650 phones used by net.Console
Call history and transfer to busy destination
In the new Call History available in the 3.3.1, a call which is transferred generates only one call history entry. Nevertheless, if the destination is busy or congested, two entries are still generated.
net.Console client connectivity timeout and SOP resources cleanup
If the net.Console desktop application looses connection to a SOP, then its resources on that SOP will be cleanup up after a timeout of 10 minutes. Concretely, this means that if e.g. the PC running net.Console crashes, all resources of this net.Console (like parked calls, personal queue...) will be deleted after 10 minutes. If, on the other hand, one can re-login with a net.Console, using the same username as the crashed one, all resources will remain present and visible in the new net.Console.
Bandwidth consumption of the net.Console
The net.Console offers the supervision of the call handled by the net.Console. For example after parking or doing a blind transfer, the call will be displayed in the supervision area. Also all the calls waiting in the general or person queue can be displayed. In order to maintain the list of supervised call up-to-date the SOP will send updates each time something in the list of supervised call changes. The bandwidth for this traffic can be computed as follow:
- A: Number of new calls per seconds entering the queue
- B: Number of call returning to the reception
- C: Average call duration including the duration of the call after a call transfer
The number of updates per seconds is provided by the following rule:
The size in byte of the update is provided by the following rule:
If we take an examples of 30 calls per minutes (A=0.5), a call returning factor of 40% (B=0.4) and a mean call duration of 3 minutes (C=180), we have:
- Number of updates per seconds: 2.6
- Size of the updates: 18000 bytes
- Bandwidth: 46800 bytes/s = 374700 bit/s
Beside the traffic the usual 87kbit/s is to be added for the voice traffic.
In conclusion for a big setup with 20 receptionists a bandwidth of 500 kbit/s is to be foreseen during the peak hour.
Active-Active configuration
The active-active configuration requires two dedicated SOPs running exclusively net.Console. This feature is also only available for the X.900. To configure it please contact ESCAUX.
Citrix support
Please refer to the Virtual Desktop Infrastructure Application Note
Phone status ordering in the Directory
It is not possible to order the contacts in the directory by primary or secondary phone status. This could impact the reactivity of the client in case of large directory with frequent phone status changes.
Call History - Accept/Hangup
When you pickup the call with Enter or the Mouse you will see ACCEPT in the Call History.
If you pickup the call with your handset, you will not see ACCEPT in the Call History.
These 2 examples are the same for HANGUP.
Service enabling
This section describes all the steps required prior of configuring a net.Console receptionist.
Recommendations
Installation instructions
Release Notes are available in the corresponding Reference Guide:
Application Management Server has to be restarted after module installation of one of the following modules:
- Application Management Server
- Unified Communication Model
- Call Management
- net.Console
This can be done through the SOPShell :

Navigate to: Subsystems > Management Server > Start/Stop
Navigate to: Diagnostics > Telephony > asterisk console
00000XXX*CLI> restart now
After installing the net.Console module, the msi installation is to be downloaded and reinstalled on all the PC where the net.Console client has been installed. The installer is available via the following url http://<SOP IP>/netConsole.
By default, each reception desk has its dedicated login. Nevertheless, it is possible to provide the possibility to use the same login on different reception desk. For this the net.Console must be installed on the PC with the X.700 or X.900 identifier fixed. For this use the following procedure:
- Download the net.Console installer from the SOP and put it, for example in the root folder 'c:\'
- On Widows go to
Navigate to: START > RUN
- In the command prompt execute the following command:
c:> netConsole.msi RESOURCE=WCE9XXXX
where the identifier WCE9XXXX must be the x.900 resource defined for this reception desk.
- Provide the permission to all required the users to use this resource in
Navigate to: SMP > Resources > Permission
Reference configuration for net.Console 3.4.0
This section describes what is used during our Quality Assurance testing. It is recommended to align to the setup which might contains important bug fixes.
Modules:
- Asterisk-1.2 v2.32.2 or higher
- In order to prevent ringing tone issue during blind transfer, set 'In-band ringing' to 'yes' in the
module parameters
- Application Management Server v3.3.3 or higher
- Unified Communication Model v1.9.6 or higher
- If you do not need to synchronize the extension's parameters and status among your cluster, it is recommended to set the parameter 'Profile Synchronization' to 'no'.
- net.Console v3.4.0 or higher
- Watchdog v1.0.3 or higher
- Snom Phone Support v1.8.0 or higher. Only necessary in case of a Snom based net.Console
- Polycom Phone Support v4.0.1 or higher. Only necessary in case of a Polycom based net.Console
- Do not forget to upgrade the SetRingTone Action to the version 1.20 or higher in order to have the Takeback function working properly
- Call Management v1.6.0 or higher
- Database Schema v1.21.0 or higher
- VMXML module v1.3.0 or higher
Resources:
- MeshSipTrunk interface v1.01 or higher (if the net.Console is in a cluster)
- Snom320 phone v3.3 or higher (for the Snom based net.Console)
- PolycomIP650 v4.5 or higher (for the Polycom based net.Console)
- net.Console X.900 v1.6 or higher or net.Console X.700 v1.3 or higher
- net.Console availability v1.02 or higher
- Queue v1.10 or higher
Actions:
- StartDynamicApplication v5.8 or higher for all the extensions of the SOP or cluster
- this is important in order to prevent blind transfer calls to busy destinations
Callflows:
- Takeback Callflow v2.1.1 (see bellow)
- This is required for the Polycom based net.Console in order in order to use the Action SetRingTone compatible with the Polycom firmware 4.x
- Blind Transfer Callflow v1.0.2 (see bellow)
- This will prevent showing 'unknow' caller number to the transferee when the caller name is empty which can causes some phone, typically the Cisco phone, to reject the call.
Callflows
The following callflows are used by the net.Console
- General.Default
- This callflow is customer specific and should matches the following requirement
- In an Active-Active configuration the callflow must start with a CheckResourceGroupAvailability on the net.Console probe and execute the Congestion with the option answer='no' and the timeout ='No Tone'.
- For the Polycom based net.Console, a SetRingTone to '1' (default ring tone) must be done in order to make sure not to send the call with the auto-answer ring tone
- The call must be queued in the General Reception Queue
- Receptionist.Default
-
- In an Active-Active configuration the callflow must start with a CheckResourceGroupAvailability on the net.Console probe and execute the Congestion with the option answer='no' and the timeout ='No Tone'.
- For the Polycom based net.Console, a SetRingTone to '1' (default ring tone) must be done in order to make sure not to send the call with the auto-answer ring tone
- The call must be queued in the Personal Reception Queue of the concerned receptionist
- The fallback in case no one answer the queue must be a redirect to the general reception
- Internal reception
- This callflow will be linked with the profile InternalReception.Default
- This callflow is optional and applicable only in a SOP cluster environment. The purpose is to provide the possibility for a user who has received a call from the reception to send back the call to the receptionist who transferred the call. The callflow checks if the call is an intra-cluster call. If this is the case a SIP REFER is sent to the remote SOP and the call is redirected there to the new destination. If the SOP is the home SOP of the net.Console, to call is redirected to this extension. Otherwise the same process is recursively done from SOP to SOP up to the net.Console SOP or to a SOP where the initial call is not coming from another SOP.
- Internal Reception Callflow v1.0.0
- Takeback
- Supervised blind transfer
- Camp on
- This callflow will be linked with the profile CampOn.Default
- For X.900 only
- Camp On Callflow v1.5.0
- This version works support the SOP cluster environment and take into account both primary and secondary phone
- Directed Park Retrieve
- Directed Call Parking
Other SOPs in the cluster
If you want the netConsole to have a view on other phones in the cluster, you also have to install these modules to other SOPs in the cluster :
- Application Management Server module v3.1.0 or higher
- Watchdog module v1.0.3
- Call Management module v1.3+
- Asterisk-1.2x module v2.28.7+
Call routing
The net.Console blind transfer implementation relies on the alerting signal exchanged within the cluster. Make sure that the following version of the Meshed Sip Trunk is used:
- MeshSipTrunk interface v1.1 or higher
In order to prevent call being transfer to busy extension, make sure that you use the following version of STARTDYNAMICAPPLICATION on EACH of your profiles where you transfer to :
- STARTDYNAMICAPPLICATION V5.8 or higher
Firewall rules
| From |
To |
Protocol |
Destination port(s) |
Explanation |
| SOP (1) |
Phone |
TCP |
HTTP (80) |
API requests to phone |
| SOP |
Phone |
UDP |
SIP (5060) |
SIP signaling |
| Phone |
SOP |
SIP |
SIP (5060) |
SIP signaling |
| SOP |
Phone |
UDP |
10000-20000 |
RTP traffic. The port range can be limited through the resource configuration of certain phones |
| Phone |
SOP |
UDP |
10000-20000 |
RTP traffic. The port range can be limited through the resource configuration of certain phones. |
| Client |
SOP |
TCP |
SIP over TCP (3040) |
Control connection |
| SOP (1) |
Client |
TCP |
SIP over TCP (3040) |
Control connection |
(1) For active/standby architectures, consider the active and standby IP addresses
Operator PC requirements
Minimum requirements:
- Processor: Pentium 4 @ 2.4 GHz or equivalent
- Memory: 1 GB
- Hard Drive: 4 GB Free
- Operating system: Microsoft Windows XP/Vista/7/8
Note: Microsoft Windows 8 does not support plug-ins in the Start screen and therefore net.Console will not run in the Start screen. You will have to switch to the Desktop screen to run net.Console.
General reception service activation
The general reception handles the external call going to the reception. Calls arrives in a shared queue which distributes the call to the different receptionist.
Step 1: General Queue profile parameter creation
Navigate to: SMP > Callflow Studio > Global Parameters
- Parameter Name: GeneralQueue
- Friendly Name: General queue
- Value: leave empty
- Type: QUEUE
- Owner Type: AdminVar
- Description: The name of the general queue to be used in the general reception callflow.
Step 2: General profile creation
Navigate to: SMP > Callflow Studio > Profiles
- Profile Name: General
- Type: Static
- Parameter1: GeneralQueue
Step 3: Assign General.Default callflow
Navigate to: SMP > Callflow Studio > Callflow Assignment
- Application Selector: STARTDYNAMICAPLLICATION.5.7
- Profile: General
- Status: Default
- Description: This callflow check if the net.Console service is available. Adapt the caller name in order to customize the display on the phone, then push the call to the general queue. In case of overflow, the overflow procedure is applied.
- Callflow Root: *209 (Root extension of General.default callflow on the library)
Step 4: General callflow customization
Navigate to: SMP > Callflow Studio > Callflow Assignment
Personal reception service activation
The personal reception is a direct access to the receptionist. The call are queued and send to the receptionist when this one gets available.
Step 1: Reception queue profile parameter creation
Navigate to: SMP > Callflow Studio > Global parameters
- Parameter Name: ReceptionistQueue
- Friendly name: 'Personal queue for company receptionist'
- Value: leave empty
- Type: QUEUE
- Owner Type: AdminVar
- Description: This parameter will be used in the individual receptionist callflows
Step 2: Receptionist profile creation
Navigate to: SMP > Callflow Studio > Profiles
- Profile name: Receptionist
- Type: Static
- parameter1: ReceptionistQueue
Step 3: Receptionist.Default callflow assignation
Navigate to: SMP > Callflow Studio > Callflow Assignment
- Application Selector: STARTDYNAMICAPPLICATION.5.7
- Profile: Receptionist
- Status: Default
- Description: This callflow checks that the net.Console service is available. If so the call is pushed to the receptionist queue.
- Callflow root: *306 (The default callflow is available on the library)
Step 4: Receptionist callflow customization
Navigate to: SMP > Callflow Studio > Callflow Assignment
Internal reception service activation (optional)
The internal reception service is optional. It enables internal access to the general reception. A call coming from a receptionist can be pushed back to this one by doing a blind transfer to the internal reception extension. Each call handled by a receptionist is mark with the LastOperatorExt call parameter which enables to redirect the call to the last receptionist who has been in conversation with the external person.
Step 1: GeneralExtension profile parameter creation
Navigate to: SMP > Callflow Studio > Global parameters
- Parameter name: GeneralExtension
- Friendly name: General reception extension
- Type: EXTENSION
- Owner Type: AdminVar
- Descr: This variable contain the extension of a general reception
Step 2: InternalReception profile creation
Navigate to: SMP > Callflow Studio > Profiles
- Profile name: InternalReception
- Type: Static
- parameter1: GeneralExtension
Step 3: InternalReception.Default callflow assignation
Navigate to: SMP > Callflow Studio > Callflow Assignment
- Application Selector: STARTDYNAMICAPPLICATION.5.7
- Profile: InternalReception
- Status: Default
- Description: This callflow test if the call is an intra-cluster call. If so, the call is deflected to the original receptionist otherwise it is sent to the general reception extension
- Callflow root: The imported callflow for the internal reception (see requirements)
Takeback service activation
This operation has to be done on each sop hosting the net.Console.
Step 1: Route for takeback creation
For SOP in a cluster :
Navigate to: SMP > Call Routing > Extra-Cluster Routing
Navigate to: SMP > Call Routing > Routes
- Telephony Route: _*96.
- Description: Takeback
- Route Group: national or any route group available in NoRestrict
- Action: MapNumber
Step 2: MapNumber action configuration
For SOP in a cluster :
Navigate to: SMP > Call Routing > Extra-Cluster Routing
Navigate to: SMP > Call Routing > Routes
- Description: Takeback
- Number of front digits to strip: All
- Prefix applied to the number: The imported callflow for the takeback (see requirements)
- Variable: NumberToDial
Supervised blind transfer service activation
This operation has to be done on each sop hosting the net.Console.
Step 1: Route for supervised blind transfer creation
For SOP in a cluster :
Navigate to: SMP > Call Routing > Extra-Cluster Routing
Navigate to: SMP > Call Routing > Routes
- Telephony Route: _*94.
- Description: Supervised blind transfer
- Route Group: national or any route group available in NoRestrict
- Action: MapNumber
Step 2: MapNumber action configuration
For SOP in a cluster :
Navigate to: SMP > Call Routing > Extra-Cluster Routing
Navigate to: SMP > Call Routing > Routes
- Description: Supervised Blind Transfer
- Number of front digits to strip: All
- Prefix applied to the number: The imported callflow for the supervised blind transfer (see requirements)
- Variable: NumberToDial
Directed Park service activation (X.900 only)
- Directed Call Parking (see AppNoteDirectedCallParking)
- Make sure to create the extra route in the NoRestrict route group
Camp on service activation (X.900 only)
- Camp On (see AppNoteCampOn)
- Make sure to create the extra route in the NoRestrict route group
Receptionist Restriction Group (optional)
When dialing from the net.Console, the net.Console needs to supervised the dialed call. If the receptionist dials a number which cannot be routed by the usual 'NoRestrict' restriction group, the net.Console will timed out on the DIAL command instead of indicating the failure of the dialing. To prevent this, the phone of the receptionist can be put in a dedicated restriction group which redirects unroutable calls to a dedicated callflow.
Step 1: Receptionist restriction group creation
Navigate to: SMP > Call Routing > Route Groups & Restriction Groups
- Route Group Name: Receptionist
- Type: RestrictionGroup
Step 2: NoRoute route group creation
Navigate to: SMP > Call Routing > Route Groups & Restriction Groups
- Route Group Name: NoRoute
- Type: RouteGroup
Step 4: NoRestrict inclusion
Navigate to: SMP > Call Routing > Restriction Groups Configuration
- Restriction Group: Recepionist
- Includes Route Group: NoRestrict
- Precedence: 100
Step 5: NoRoute inclusion
Navigate to: SMP > Call Routing > Restriction Groups Configuration
- Restriction Group: Recepionist
- Includes Route Group: NoRoute
- Precedence: 200
Step 6: NoRoute callflow creation
Navigate to: SMP > Callflow Studio > Callflows
- Route extension: Select an extension, for example *400
- Description: NoRoute
- Action: Congestion.1.01
Edit the callflow and set the following parameter for the Congestion action:
- Answer: No
- Timeout: no tone
Step 7: Route for the NoRoute route group
This is to be done on net.Console dedicated SOP
Navigate to: SMP > Callflow Studio > Callflows > Extra-cluster routing
- Telephony Route: _.
- Description: Default route for call from reception
- Route Group: NoRoute
- Action: MapNumber.1.12
Step 8: Default route properties
This is to be done on net.Console dedicated SOP
Navigate to: SMP > Call Routing > Extra-cluster routing
- Manipulate number: 'Keep same Number'.
- Add prefix: The NoRoute callflow, for example *400 create above
- Variable: Leave empty
- Restriction group: NoRestrict
Service delivery
Adding a new general reception
Step 1: General Queue creation
Navigate to: SMP > Resources > Queues
- version: 1.10
- SOP1: Select the primary SOP where the general reception is located (for cluster)
- SOP2: Select the secondary SOP where the general reception is located (empty if not an Active-active configuration)
- Queue name: For example GeneralQueue1 or GeneralQueue2 (GeneralQueue2 is not reflected in the scheme below, it can be used you have two groups of receptionists which don't have to take calls from the other one). The queue name should be composed of letters and digits only, no special characters of white space permitted. Also don 't use the Queue name 'General ' !
- Music on hold: select your Music on Hold resource. In this example we select the 'default' music on hold folder.
- Ring strategy: 'rrmemory' is probably the most appropriate for a general queue. It ensures that the incoming calls are distributed evenly among the different receptionists.
- Timeout: 60
- Retry: 1
- Permanent members: must be left empty
- Join when empty policy: strict
- Leave when empty policy: strict
- Ring in use policy: no
- Device idle time: 5
All incoming calls will arrive in this queue.
Step 2: General reception extension creation
Navigate to: SMP > Directory > Internal Directory
- SOP: Select the primary SOP where the general reception is located (for cluster)
- SOP2: Select the secondary SOP where the general reception is located (empty if not an Active-active configuration)
- Extension: for example 631 or 632
- First Name: The display name to be shown in net.Console and on the phone ('Black Bean customer' for extension 631 and 'Happy Morning customer' for extension 632)
- Callflow: General.Default
- Primary Phone: No Phone
- Secondary Phone: No Phone
This extension will be used to map the external number to the internal extension. It will also be used in input of the internal reception extension.
Step 3: General reception profile parameters
Navigate to: SMP > Directory > Internal Directory
- General Queue: GeneralQueue1 for extension 631 and 632
Step 4: DDI creation
Navigate to: SMP > Call Routing > Incoming Number Mapping
- External Number: enter the number used to call the reception from the public network, for example 21112631 and 21112632
- Internal Extension: 631 for 21112631 or 632 for 21112632
Step 5: Internal reception extension
If you use the Internal Reception service, execute the following step:
Navigate to: SMP > Directory > Internal Directory
- SOP: (all)
- SOP2: (none)
- Extension: 1111 or 1112, for example
- Callflow: InternalReception.Default
- Primary Phone: No Phone
- Secondary Phone: No Phone
This extra extension for the general reception enables any user to push back a call to the last receptionist who handled was in conversation with the external person. If this extension is not defined the general reception extension can be used to make an internal call to the general reception.
Step 6: Internal reception profile parameters
If you use the Internal Reception service, execute the following step:
Navigate to: SMP > Directory > Internal Directory
- General reception extension: 631 for extension 1111 and 632 for extension 1112
Adding a new reception desk
Step 1: Personal queue creation
Navigate to: SMP > Resources > Queues
- version: 1.10
- SOP1: Select the primary SOP where the general reception is located
- SOP2: Select the secondary SOP where the general reception is located (empty if not an Active-active configuration)
- Queue name: ReceptionistQueue1, ReceptionistQueue2 and ReceptionistQueue3
- Music on hold: 'default'
- Ring strategy: 'ringall'
- Timeout: 60
- Retry: 1
- Permanent members: should be left empty
- Join when empty policy: strict
- Leave when empty policy: strict
- Ring in use policy: no
- Device idle time: 5
This queue will be used to queue calls that are sent directly to the receptionist's extension.
Step 2: Reception phone creation
For the Snom based net.Console, do the following.
Navigate to: SMP > Resources > IP Phones
- SOP1: Select the primary SOP where the general reception is located (for cluster)
- SOP2: Select the secondary SOP where the general reception is located (empty if not an Active-active configuration)
- Outgoing Extension: Leave blank
- MAC Address: The mac address of the phone can be found on the back of the phone
- Restriction Group: Norestrict unless the restriction group Receptionist has been created
- Line: 1
- SIP can reinvite: no
- Auto-answer: disabled
- Display missed calls: no
- Display dialed calls: no
- Display received calls: no
- Call waiting: off
- Web access security: Leave all three fields (Login, User password, Admin password ) empty
- TimeZone: Select the time zone to be used
- Return to idle even if offhook: yes
For the Polycom based net.Console, do the following.
Navigate to: SMP > Resources > IP Phones
- SOP1: Select the primary SOP where the general reception is located (for cluster)
- SOP2: Select the secondary SOP where the general reception is located (empty if not an Active-active configuration)
- Outgoing Extension: Leave blank
- MAC Address: The mac address of the phone can be found on the back of the phone
- Restriction Group: NoRestrict unless the restriction group Receptionist has been created
- SIP can reinvite: no
- Callist-received: Disabled
- Callist-placed: Disabled
- Callist-missed: Disabled
- Call waiting: Disabled
- Allow Push Message: All
- Push URL: Leave empty (the default value will be used)
- Login: Leave empty (the default value will be used)
- Password: Leave empty (the default value will be used)
You can't use custom softkeys for IP650 phones used by net.Console.
This phone identity will be logged into the general and personal queue in order to receive new calls.
Step 3: Auto-answer activation for the Takeback
For the Snom based net.Console, a specific auto-answer line is to be configured on the SNOM phone.
Navigate to: SMP > Resources > IP Phones
- SOP1: Select the primary SOP where the general reception is located (for cluster)
- SOP2: Select the secondary SOP where the general reception is located (empty if not an Active-active configuration)
- Outgoing Extension: Leave blank
- MAC Address: The same mac address than for the reception phone
- Line: 2
- *SIP can reinvite: no
- Auto-answer: Select one of the auto-answer mode
- Display missed calls: no
- Display dialled calls: no
- Display received calls: no
This phone identity will be used to take back a call from the supervision area or from the personal queue.
For the Polycom based net.Console , the auto-answer is to be done via a SetRingtone action in the Takeback calllfow, the general reception callflow and the personal reception callflow.
Step 4: Reception user creation
Navigate to: SMP > Directory > Users
- Login Name: login name to be used while login in on the net.Console,for example receptionist1@blackbean.com
- Real Name: Name to be used for display, for example 'Receptionist 1'
- Language: Select the language for this reception desk
- Level: user
Step 5: Personal extension creation
Navigate to: SMP > Directory > Internal Directory
- SOP: Select the primary SOP where the general reception is located (for cluster)
- SOP2: Select the secondary SOP where the general reception is located (empty if not an Active-active configuration)
- Owner: Not used, can be anything
- Extension: for example 633, 634 and 635 in our example
- First Name and Last Name: Fill in the first name and last name which will be used as display name while calling
- Callflow: Receptionist.Default
- Primary Phone: Select here the reception phone identity previously created
- Secondary Phone: Select here the takeback phone identity previously created, for a Snom based net.console, and put the same identity than the primary phone identity for the Polycom based net.Console
Step 6: Personal extension profile parameters
Navigate to: SMP > Directory > Internal Directory
- Personal queue for company receptionist: ReceptionistQueue1 for extension 633, ReceptionistQueue2 for extension 634 and ReceptionistQueue3 for extension 635
Step 7: net.Console resource creation
Navigate to: SMP > Resources > Desktop Applications
- SOP1: Select the primary SOP where the general reception is located (for cluster)
- SOP2: Select the secondary SOP where the general reception is located (empty if not an Active-active configuration)
- Queue1: Select the name of the general reception queue this reception desk is attached to
- Queue3: Select the name of the personal queue previously created for this reception desk
- Direct receptionist extension: Select the extension previously created for this reception desk
- Line 1 display: By default the Contact Information and the caller number are displayed. If you want to add the display information seen on the phone display this need to be customized
Please refer to the Resource Reference guide for specific configuration options :
Step 8: Permissions assignation
Navigate to: SMP > Resources > Desktop Applications
- User: Select the user previously created for this reception desk
- Resource: Select the net.Console resource previously created for this reception desk
- Permissions: By default select all the permissions
Step 9: Desktop application installation
Open a browser and enter the following URL: http://<netConsole_SOP's_IP>/netConsole and download the msi file. Once downloaded install it on the PC of the reception desk.
Service acceptance
A user acceptance test document can be found here. It provides a list of use case and describes the expected result.