Administrator Guide: vSOP
Table of contents
- Administrator Guide: vSOP
- Table of contents
- Overview
- Features
- Benefits
- Building a host from vmware template
- Architecture
- Installation procedure VSOPhost 5.0.0
- Installation procedure
- vSOP Export/import procedure
- Change your vSop ID
- Transfer a VSOP from HOST A to HOST B
- Upgrade procedure
- Monitoring
- Running the communication server (Asterisk 1.8) on vSOPs
- Troubleshooting
- If the vSOP does not start properly
- If it isn't possible to reassign a previously used vLAN ID to a new vSOP
- Profile parameters for the sop.config are now longer available
- Verify the memory usage of all vSOPS
- VLAN bridge type
- Change memory for a vsop live
- Usefull commands
- Debug startup of VSOP
- Apply CPU limit on a VSOP
- Verify CPU limit of a VSOP
- Fix CPU for the host
- Get amount of threads per container
- Adding disk to host running on vm-ware
- Limitations
Overview
vSOP is a new resource type which enables to host several SOPs in a physical SOP.
Features
- Security
- Each customer is isolated in a completely isolated context.
- vSOPs are based on mainstream technologies.
- It is already used by more than 200 hosting services giving root access.
- Real-time
- The resources (Memory, CPU, Disk) are isolated between vSOPs.
- The vSOP performances are equivalent to native performances.
- Scalability
- It is possible to host up to 20 vSOPs per host with RTP processing. The target is to be able to host at least 50 vSOPs per host
- Cost effective
- A modest hardware platform can support dozens of vSOP.
- Flexible networking
- vSOPs support bridged interface with a layer 2 isolation. They also support VLANs, and it is possible to define several Ethernet interfaces per vSOP.
- Support
- The vSOP are supported from SOP Baseline 2.0 (Baseline 3.0 recommended).
Benefits
With the vSOP, it is possible to deploy the same communication service either in the cloud or on premise. Using vSOPs also allows to fit different use cases with a single technology:- Unified Communication As A Service (UCAAS)
- Other Communication services
- Combine several functions on a single hardware to protect real-time resources
- Labs
- a strong security of integration compared to multi-tenant solutions,
- regular telephony features, including auto-provisioning,
- Unified Communication,
- Call center.
- Enterprise SBC: In this case, it provides extra SBC feature such as protocol fixing, transcoding, …
- Fixed Mobile Unification
Building a host from vmware template
Follow this documentArchitecture
The vSOPs (guests) are contained in a physical SOP (the host SOP). The vSOP is a normal SOP, i.e. it has a SOP key and behaves like a regular SOP for all mechanisms (SMP connection, modules installation, …). Network interfaces (eth0 and eth1) are emulated and seen as normal network interfaces by the vSOP.States
When a vSOP resource is created in the SMP, the vSOP is considered to be in his initial state. Their initial state is CREATED. The following state diagram describes the several possible states for a vSOP, and the transitions between these states. A vSOP can have the following states:
- CREATED : the vSOP is defined but no SOP has been installed on it.
- INSTALLED : like CREATED but the SOP baseline has been installed. The vSOP has not been started yet, or the vSOP has been shut down.
- RUNNING : like INSTALLED but the vSOP is running.
Installation procedure
Dependencies when running a vsopHost on a Vmware cluster
When running a vsop host with vsop on it you will need to adapt the following security settings on the VM-ware switch ( DvPg)- Promiscuous mode Accept
- MAC address changes Accept
- Forged transmits Accept
- Teaming and failover
- Active uplinks Uplink 1
- Standby uplinks Uplink 2
- Vsophost playbook in the deployment server should have VLAN bridge type = macvlan
Dependencies Escaux
Modules
- vSOP Support Module v1.0.1
- SOP Base Module v1.1.7
- Shell Module v1.13.2+
Resources
- VirtualSOP Resource v1.0.4+
Baseline
- Host must be a SOP installed with Baseline 2.0.6+
- Baseline 3 is required for vSOP Support Module v1.3.0+
Preparing your host
The host SOP is a normal SOP, installed with Baseline 2.x or Baseline 3.x (recommended). There is nothing special here, the host SOP uses the same kernel, the same installation process is used as the regular SOPs. In this guide, that the host SOP was installed properly according to what is specified in the SOP installation guide. By default, the network of the host SOP has the following configuration:- eth0 is unconfigured. It is often used in .1Q trunking mode to offer per vSOP a VLAN as eth0 virtual interface.
- eth1 is bridged. This interface is often used for the SMP connections for the host and the vSOPs.
Module
Install the modules listed under the dependencies section.Resource
For each vSOP you want to host you need to create a vSOP resource. We recommend to provision your host with all the resources you are planning to use, even if you do not need them immediately.- Guest eth0. This parameters indicates to the guest, how its eth0 interface should be connected to the host.
- VLAN on host eth0,
- Bridged on host eth0,
- Private bridged on host eth0,
- Bridged on host eth0 for VMware,
- VLAN on host eth1,
- Bridged on host eth1,
- Bridged on host eth1 for VMware,
- Private bridged on host eth1.
- Private network with NAT.
- Guest eth0 VLAN ID. Indicate here the VLAN Id, if you chose VLAN on host eth0 or VLAN on host eth1 on the dropdown above.
- Guest eth1. This parameters indicates to the guest, how its eth1 interface should be connected to the host.
- None - There will be no eth1 interface on the guest.
- VLAN on host eth0,
- Bridged on host eth0,
- Bridged on host eth0 for VMware,
- Private bridged on host eth0,
- VLAN on host eth1,
- Bridged on host eth1,
- Bridged on host eth1 for VMware,
- Private bridged on host eth1.
- Private network with NAT.
- Guest eth1 VLAN ID. Indicate here the VLAN Id, if you chose VLAN on host eth0 or VLAN on host eth1 on the dropdown above.
- CPU share (optional, default=1024) By default, CPU shares are fairly distributes between vSOPs (a specific vSOP can take all CPU but if 2 vSOPs want to take the whole CPU, the CPU is evenly shared between the 2 vSOPS regardless of their load). It is possible however to give more CPU to a specific vSOP by, for example, doubling the CPU shares for this vSOP
- Physical Memory Limit (RAM) (optional) Expressed in bytes or suffix with M, G for megabytes, gigabytes, E.g. 256M. You can leave blank for no limit.
- Virtual Memory Limit (RAM+swap) (optional) Expressed in bytes or suffix with M, G for megabytes, gigabytes, E.g. 256M. You can leave blank for no limit.
- VLAN: Your vSOP will be able to communicate with other devices on that vlan.
- Bridge: Your vSOP will be able to communicate with all the devices connected to the bridge, this means all the devices accessible from the host interface, as well as all the VSOPs on the host.
- Bridge for VMware: This option still requires the VMware port interface to be configured in promiscuous mode. note: On specific vmware install, the flags "Forged Transmits" and "MAC address changes" could be necessary.
- Private Bridge: Your vSOP will be able to communicate with all the devices accessible from the host interface, but it will not be able to communicate with the host interface and other vSOPs on that host.
- Private network with NAT: Your vSOP will be isolated in a private network on the vSOP host. Outgoing communication is still possible, but any requests to the outside will be natted and the source address will be the address of the vSOP host. To avoid network overlap with existing customer subnets, the subnet is always 192.0.2.240/28 where the default gateway and DNS server is at 192.0.2.254.
- VLAN IDs: On the same physical host, each vlan id can only be used by one vSOP at a time. More than one vSOP using the same vlan id will not work.
- Multiple physical interfaces on the same LAN is generally not supported.
Preparing your guest(s)
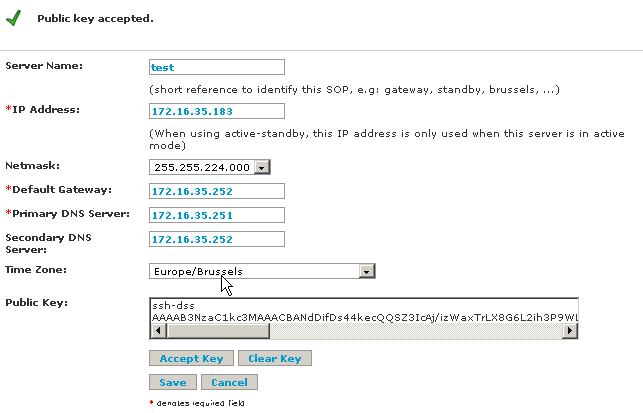
You will need to repeat this step for every guest that you want to host. Connect to the SMP web interface of the guest.- IP Address
- Netmask
- Default Gateway
- VSOP Container
Starting your vSOPs on your host
- Apply the changes on your host
- Connect to your host SOP shell.
vsop. The following commands are available (replace VSOP_ID by your resource name, not your sopkey):
| Command | Action |
|---|---|
vsop list |
list vSOPs, their resource IDs, state, name,... |
vsop install VSOP_ID |
install the new specified vSOP. |
vsop install-nocache VSOP_ID |
install the new specified vSOP with a new OS image. |
vsop uninstall VSOP_ID |
uninstall the specified vSOP. |
vsop start VSOP_ID |
start the specified vSOP. |
vsop start-interactive VSOP_ID |
start the specified vSOP in interactive mode. |
vsop console VSOP_ID |
launch the console for the specified vSOP. |
vsop stop VSOP_ID |
stop the specified vSOP. |
vsop stop-force VSOP_ID |
force the specified vSOP to stop. |
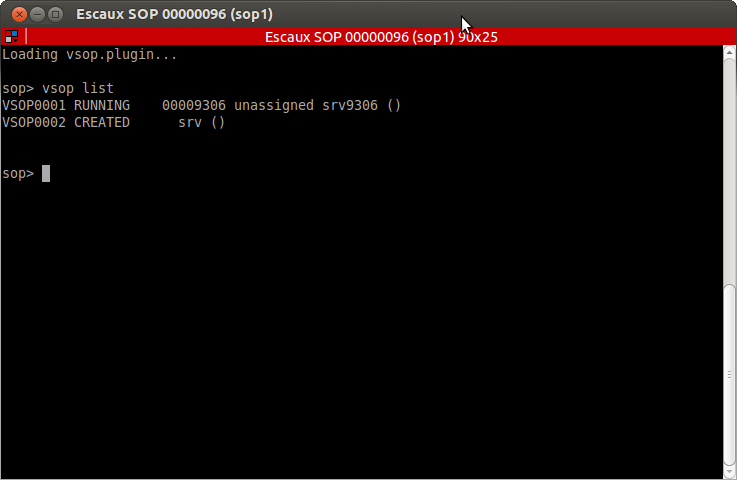
- Check that the vSOPs you created are present in the list when you issue the command
vsop list.
root@00000094:~# vsop list VSOP0001 RUNNING 00009401 unassigned srv9401 (vsop9401) … VSOP0007 RUNNING 00009408 ade srv9408 (2) VSOP0008 RUNNING 00009409 ade srv9409 (3) VSOP0009 RUNNING 00009410 ade srv9410 (4) VSOP0010 CREATED 00009415 ade srv9415 (test) …
- Type
vsop install VSOP_IDwhere you replace VSOP_ID by your resource name (not your sopkey). This will install the vsop.
root@00000094:~# vsop install VSOP0010
Checking cache in /var/cache/lxc/escaux/rootfs-i386 ...
Copy /var/cache/lxc/escaux/rootfs-i386 to /var/lib/lxc/VSOP0010/rootfs ...
Copying rootfs to /var/lib/lxc/VSOP0010/rootfs ...hostname=00009415
smpboot=smp-boot.trunk.smp003.escaux.com
Generating public/private dsa key pair.
Your identification has been saved in /etc/ssh/ssh_host_dsa_key.
Your public key has been saved in /etc/ssh/ssh_host_dsa_key.pub.
The key fingerprint is:
30:05:03:7f:7c:15:9a:4b:4f:43:d7:d8:ba:30:e6:9c root@00000094
The key's randomart image is:
…
ssh-dss
…
http://smp-boot.trunk.smp003.escaux.com/publishkey.php
Tue Nov 29 09:49:43 2011: publish ok
key already in authorized_keys
Accepting keys of following ssh routers: 172.16.6.2
Generating locales...
  en_US.UTF-8... done
Generation complete.
 Removing any system startup links for /etc/init.d/ondemand ...
   /etc/rc2.d/S99ondemand
   /etc/rc3.d/S99ondemand
   /etc/rc4.d/S99ondemand
   /etc/rc5.d/S99ondemand
- accept the SOP key published in the SMP
- When the install is complete you can start the vSOP by issuing the command
vsop start VSOP_IDwhere you replace VSOP_ID by your resource name.
root@00000094:~# vsop start VSOP0010
- Your vSOP should be running now. You can check that by issuing
vsop listcommand again.
root@00000094:~# vsop list
…
VSOP0009 RUNNING    00009410 ade srv9410 (4)
…
- At this point, you can install modules (via a template) and apply change as a normal SOP.
Troubleshooting
If the vSOP does not start properly
- Ensure you have restarted your host after the installation.
- Use the command
vsop start-interactive VSOP_ID(where you replace VSOP_ID by your resource name) to see the console. It is probably because the network parameters are not well configured. For example, 2 vSOPs cannot run with the same VLAN assigned. The network module must specify a eth1 configuration, even if you don't plan on using it. Tou can specify 1.1.1.1 as IP and 255.255.255.255 as netmask if you don't want to use eth1. - Use the command
vsop console VSOP_ID(where you replace VSOP_ID by your resource name) to emulate a physical console on the vSOP. To quit the console, use Ctrl-a D. - Use the commands
vsop stop VSOP_IDorvsop force-stop VSOP_ID(where you replace VSOP_ID by your resource name) to stop the vSOP.
If it isn't possible to reassign a previously used vLAN ID to a new vSOP
- Be sure that every other vSOP doesn't need that vLAN ID anymore and that the following commands are executed on the Host machine:
- Use the command
ifconfig -ato find the exact name of the interface previously created for that vLAN ID (i.e. vlanXY) - Use the command
vconfig rem vlanXYto remove that vLAN from the list of available interfaces in order to be able to reuse it
Profile parameters for the sop.config are now longer available
- Take a snapshot of the soprep
- Export the vSOP via the directory bulk
- Enable the service creation mode
- Rename the parameter set TemplateVSOP to vSop
- And set the source to template
- Disable the service creation mode
- Remove the global parameter ESCAUX_PARAMETER_IMPLEMENTATIO
- Export the SOP via the directory bulk
- Add the system task MigrateProfileParameters
- Version: 1.1.0 (DEV)
- Destination source: Template
- Run the task
- Check the profile parameters
- Export the SOP and check with the previous export
- Export the vSOP and check with the previous export
Verify the memory usage of all vSOPS
cat /cgroup/lxc/VSOP*/memory.memsw.usage_in_bytes
root@00017573:/data# cat /sys/fs/cgroup/memory/lxc/VSOP0003/memory.memsw.limit_in_bytes
VLAN bridge type
The VLAN bridge type configuration. This determines how a VSOP that is configured to use a VLAN is connected to the network. The default is 'veth'. Possible values:: 'veth', 'macvlan' Using macvlan requires less resources. macvlan is also the only way that works well for vSopHosts in a vmware environmentveth verification
brctl show
macvlan verification
 ip link show type macvlan
 ip a
Change memory for a vsop live
root@00017076:~# lxc-cgroup -n VSOP0001 memory.memsw.limit_in_bytes 50192M
root@00017076:~# lxc-cgroup -n VSOP0001 memory.limit_in_bytes 48192M
Usefull commands
- lxc-top
- lxc-top --sort m
- lxc-info vsop0003
Debug startup of VSOP
root@00017573:~# lxc-start --logfile stash-lxc2.log --logpriority DEBUG -dn VSOP0003
Apply CPU limit on a VSOP
root@00013215:/data/lxc/VSOP0001# lxc-cgroup -n VSOP0005 cpu.cfs_period_us 100000 ; lxc-cgroup -n VSOP0005 cpu.cfs_quota_us 400000 To put the CPU limit on a VSOP on unlimited:echo -1 > /sys/fs/cgroup/cpu/lxc/YOUR-VSOP/cpu.cfs_quota_us
Verify CPU limit of a VSOP
cat /sys/fs/cgroup/cpu/lxc/VSOPB273/cpu.cfs_quota_us
cat /sys/fs/cgroup/cpu/lxc/VSOPB273/cpu.cfs_period_us
Fix CPU for the host
Check the numbers of CPU (cat/proc/cpuinfo) If you would have 8 core root@00013215:/cgroup/lxc# echo 750000 > cpu.cfs_quota_us This will allow lxc to use a maximum of 750000 sec cpu time. And will leave the host with a dedicated time in the CPU This way your host has dedicated CPU time even if all vsop want to take everythingGet amount of threads per container
root@00037098:/data/transit# cat list-vsop-37098 | while read ; do echo $REPLY ; vsop exec $REPLY – ps -eLf|wc -l ; done > PID-usage-TOTAL
root@00017146:~# vsop list | awk -F " " '{print $1}' > /data/transit/allvsopid
root@00017146:~# cat /data/transit/allvsopid |  while read ; do echo $REPLY ; vsop exec $REPLY -- ps -eLf|wc -l ; done  > /data/transit/pid-per-vsop
Adding disk to host running on vm-ware
show disk on the systemroot@00017574:~# fdisk -l 2>/dev/null | egrep '^Disk' | egrep -v 'dm-|type|identifier'Disk /dev/sda: 50 GiB, 53687091200 bytes, 104857600 sectors Disk /dev/mapper/SOP-SWAP: 1 GiB, 1073741824 bytes, 2097152 sectors Disk /dev/mapper/SOP-TMP: 5 GiB, 5368709120 bytes, 10485760 sectors Disk /dev/mapper/SOP-MAIN: 1 GiB, 1073741824 bytes, 2097152 sectors Disk /dev/mapper/SOP-SOP1: 9 GiB, 9663676416 bytes, 18874368 sectors Disk /dev/mapper/SOP-SOP2: 1 GiB, 1073741824 bytes, 2097152 sectors Disk /dev/mapper/SOP-DATA: 32.5 GiB, 34917580800 bytes, 68198400 sectorsForce a scan
root@00017574:~# cat scan.sh
#!/bin/bash
for host in `ls /sys/class/scsi_host/`;do
echo "- - -" >/sys/class/scsi_host/${host}/scan;
done
Recheck with the first command the disk is added
Limitations
The vSOPs come with a few limitations:- when restarting the network interfaces on the HOST, which is automatically done when reinstalling the network module on the HOST, the VSOP's will lose their network connectivity. In order to establish a connectivity again, a restart of every VSOP's running on this HOST must be performed.
- the SOP Shell is only supported from the customer LAN if there is a route for port 22 between the customer LAN and the vSOP.
- It only runs from Baseline 2.0.
- It does not support telephony cards.
- It is currently not possible to destroy a vSOP on the host SOP.
- It is not compatible with an active-standby setup.
- On the same physical host, each vlan id can only be used by one vSOP at a time. More than one vSOP using the same vlan id will not work.
- Communication Server 2.x can be run on a vSOP, but without dahdi. Thus, the conference room feature is not available.
Baseline 5 systemd-cgtop
Copyright © Escaux SA