User Guide: net.Buzz 3.5
This User Guide is valid for the net.Buzz 3.5 Integration v.3
Preface
Copyright
Copyright © ESCAUX 2004 - 2023
Confidentiality
The information contained in this document should be treated as confidential and should only be shared with ESCAUX customers. Under no circumstances and under no form should any part of this document be transferred to third parties.
Scope of this Document
The purpose of this document is to allow the end user to understand and use the ESCAUX net.Buzz application.
Login / exit
One the net.Buzz has started, you might be requested to login. To do so, fill out the following fields:
- Login server
- Username
- Password
Your IT administrator will be able to provide you the correct settings.
If you wish net.Buzz to remember your login information, select the 'Remember login information" check box. If you wish to login automatically the next time you launch the application, select the 'Log in automatically' check box.
If you'd like to exit the application, go to 'Softphone' then 'Exit' or right-click on the net.Buzz icon in the system tray and click 'Exit'.
Main window
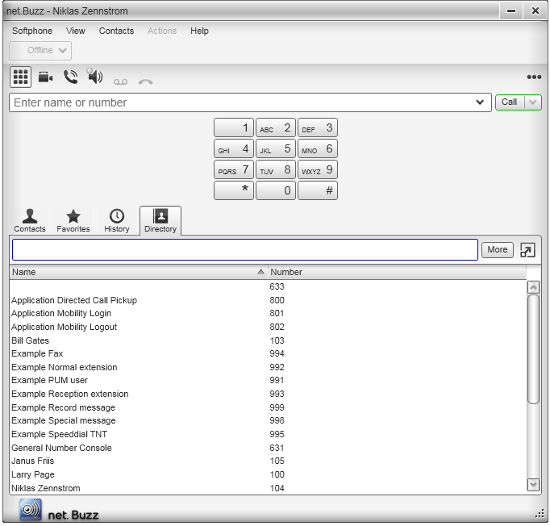
When idle, the net.Buzz main window looks like
Calls, transfers, ...
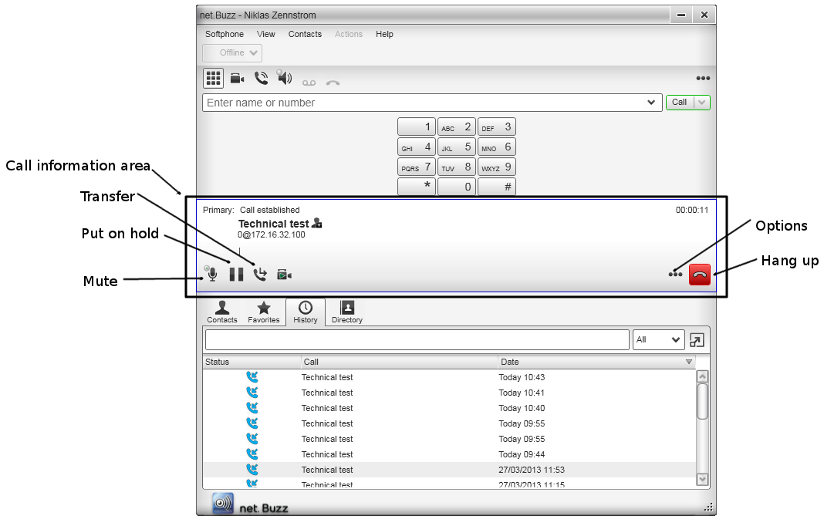
When a call is established, the net.Buzz main window looks like
Placing/Receiving a voice call
| If you'd like to... |
Then ... |
To terminate the call |
| Dial the number manually |
If the dialpad is not visible,click the Show/Hide dialpad button. |
Click on the red 'End Call' button. |
| Click the numbers on the dialpad to enter the phone number. |
| Click the Call button or press Enter. |
| Call someone present in the directory |
Double click on the contact in the 'Directory' tab. |
Click on the red 'End Call' button. |
| Call the mobile phone of someone present in the directory |
Right click on the person, then 'Call' -> 'Mobile' |
Click on the red 'End Call' button. |
| Redial |
When the call entry field is empty, click the Call button, or click the arrow in the call entry field and select a recent call. |
Click on the red 'End Call' button. |
| Put a call on hold |
Push the 'Put on hold' button. |
|
| Put a call off hold |
Push the 'Put off hold button. |
|
Placing/Receiving a video call
| If you'd like to... |
Then ... |
To terminate the call |
| Dial the number manually |
If the dialpad is not visible,click the Show/Hide dialpad button. |
Click on the red 'End Call' button. |
| Click the numbers on the dialpad to enter the phone number. |
| Click the Video Call button on the right of the Call Entry field. |
| Redial |
When the call entry field is empty, click the Video Call button on the right of the Call Entry field. |
Click on the red 'End Call' button. |
| Or, to redial another recent call, redial like a voice call then click on the "Start sending your video" button. |
| Put a call on hold |
Push the 'Put on hold' button. |
|
Transferring a call
| If you'd like to... |
Then ... |
| Do a basic (unattended) transfer |
Click the Transfer button.The call is put on hold and a call entry field appears. |
| Type a name or number, or drag a contact into the field. |
| If the button does not show 'Transfer now', click the down arrow and select 'Transfer now'. |
| Then click 'Transfer Now'. |
| Do a attended transfer |
Click the Transfer button. The call is put on hold and a call entry field appears. |
| Type a name or number, or drag a contact into the field. |
| If the button does not show 'Call first', click the down arrow and select 'Call first'. |
| Then click 'Call first' |
| When the other person answers, the 'Transfer Now' button is enabled, you can click on it and the call will be transferred. |
Conference Call
Starting a Conference Call
| If you'd like to start a conference call |
Then ... |
| From the dashboard |
Enter the number or address by typing, or drag a contact or history item, or select from the redial list. |
| Then choose 'Start Conference Call' on the right of the Call Entry field. |
| A new call entry field appears and you can enter the number of the third party for the conference. |
| From an established call |
Click on the '. . .' button and 'Invite to Conference Call'. |
| A new call entry field appears and you can enter the number of the third party for the conference. |
| From two established calls |
Click on the '. . .' button of the active call and select 'merge calls'. |
Managing the Conference
| If you'd like to... |
Then ... |
| Add More Participants |
Right-click on a contact or history item and choose 'Add to Conference Call'. |
| In the conference call panel, click on the '. . .' button and 'Invite to Conference Call'. A new call entry field appears and you can enter the number of the third party for the conference. |
| Add in a separate call that is not part of the conference call |
In the call panel for the individual call, click the '. . .' button and choose 'Merge Calls'. This call is added to the conference call. |
| Remove a Participant |
Click the down arrow beside a participant name and choose Separate. |
| The call becomes a separate call. |
| End the Conference |
Choose 'End conference' from the conference menu (red button). |
| Suspend the Conference |
Choose Hold from the conference menu. All participants are put on hold. |
| Speak to one participant separately |
Put the conference on hold, separate the one participant from the conference, take that person off hold. When done, merge the participant back into the call. |
Voicemail
When you have voicemail messages, the voicemail icon appears at the top of the phone (the icon may include a number). You can click the icon to automatically connect to voicemail and listen to your messages
Speeddials, Busy Lamp Feature and Chat
In the Contacts tab, you can add specific contacts so that you can quickly dial a number, check if a buddy is on the phone or start a chat session.
| If you'd like to... |
Then ... |
| To add a new contact |
Right click on a Group and select 'Add contact to Group'. If you want to enable the chat or the BLF for this contact. Fill-in a softphone number and press enter. Then select the softphone number in the presence field |
| To check if a contact is busy |
A Icon is shown in front of the contact. The grey icon indicates that the phone is not registered. The green icon indicates that the contact is idle. The red icon indicates that the contact is busy. |
| To chat with a contact |
Click on the contact and then click on 'Instant Message'. A new chat window will be open |
User preferences
Choose Softphone > Preferences. The Preferences window appears. The Preferences panels let you control the way that you work with net.Buzz.
| The panel |
let you... |
| Application |
This panel lets you set your preferences for general GUI behavior. |
| Alerts & Sounds |
The tabs on this panel let you control the Call Alerts box and lets you assign sounds. |
| Privacy |
You can control how contacts and other people can contact you by phone or IM. |
| Devices |
net.Buzz automatically detects devices at each startup, and selects the most appropriate device for each purpose. If you do not like this selection, you can override it on this panel. |
| If you override a selection, it will apply the next time you start net.Buzz, unless the device is no longer available, in which case net.Buzz will again select the device to use. |
| Shortcut Keys |
You can enable shortcut keys to several functions. |
| Audio Codecs |
Change the settings on this tab only if advised to do so by your system administrator. |
| Video Codecs |
Change the settings on this tab only if advised to do so by your system administrator. |
| Directory |
Change the settings on this tab only if advised to do so by your system administrator. |
| Calls |
These settings let you configure how you want auto answer to handle incoming calls, when Auto Answer is enabled. |
| Files & Web tabs |
Change the Recording folder for downloaded files. |
Custom ringtones / sounds
The following characteristics are important to ensure the net.Buzz application can correctly handle the ringtones / sounds:
- .wav format
- 16bit bitrate
- 44100hz samplerate
Known issues