Fusion 4: Provisioning Guide
- Prerequisites
- How to add a user
- How to add a General Reception
- How to add a receptionist to a general reception
- How to add a CallQueuer
- How to add an IVR
- How to configure a service availability
- How to add a short number
- How to add a conference bridge
- How to add a physical fax
- How to add a virtual fax
- How to add direct dial-in (DDI) numbers
- How to customize the fleetmanager
Prerequisites
This guide assumes you already installed Fusion according to the Fusion Installation Guide.How to add a user
Manual provisioning
To add a user, you must first execute the 3 following steps:- Add a phone
- Add a login (user)
- Add the extension
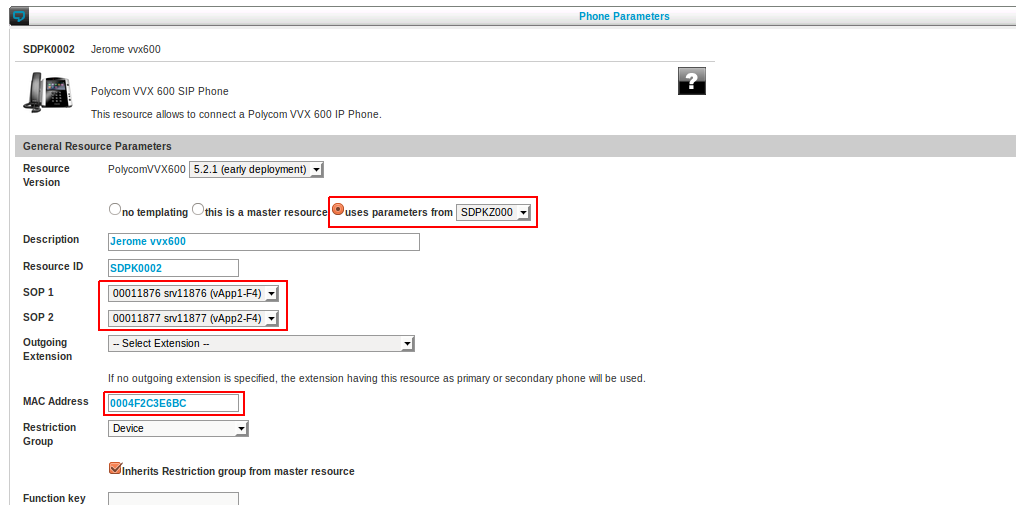
Step 1: Add a phone
- SOP 1 and SOP 2 (only for clusters): this should contain the server(s) the phone will be registered to
- MAC address: the MAC address of the phone (leave empty if you want to use the How to configure Polycom VVX internet phones)
- Select the correct value for Uses parameter from
Step 2: Add a user and set his role
- Login name
- Password
- Language
-
 Only choose the languages that are in the format "language(country)"
-
- Level: User
| White | Green | Blue | Purple | Red | ||||||
| User | User | Fleet | User | Fleet | User | Fleet | User | Fleet | User | |
| Status change | |
|
|
|
|
|
|
|
|
|
| Call forward | |
|
|
|
|
|
|
|
|
|
| First action | When I’m on the phone | |
|
|
|
|
|
|
|
|
| When my assistant calls | |
|
|
|
|
|
|
|
|
|
| Status configuration | |
|
|
|
|
|
|
|
|
|
| Ringing settings | |
|
|
|
|
|
|
|
|
|
| Second action | |
|
|
|
|
|
|
|
|
|
| Privacy settings | |
|
|
|
|
|
|
|
|
|
| Important numbers | |
|
|
|
|
|
|
|
|
|
| Personal menu settings | |
|
|
|
|
|
|
|
|
|
| Polycom settings | Speeddials | |
|
|
|
|
|
|
|
|
| Internet Phone | |
|
|
|
|
|
|
|
|
|
| Ring tones | |
|
|
|
|
|
|
|
|
|
| ConnectMe settings | End point configuration reset | |
|
|
|
|
|
|
|
|
| Feature set | |
|
|
|
|
|
|
|
|
|
| Supervised extensions | |
|
|
|
|
|
|
|
|
|
| Phone remote control | |
|
|
|
|
|
|
|
|
|
| Security settings | |
|
|
|
|
|
|
|
|
|
| My queues | Queues | |
|
|
|
|
|
|
|
|
| Queues status change | |
|
|
|
|
|
|
|
|
|
| External call | Call restriction | |
|
|
|
|
|
|
|
|
| Route group | |
|
|
|
|
|
|
|
|
|
| Shared DDI Category | |
|
|
|
|
|
|
|
|
|
| Caller ID number | |
|
|
|
|
|
|
|
|
|
| Hooks | |
|
|
|
|
|
|
|
|
|
Step 3: Add an extension and set the profile parameters
- SOP 1 and SOP 2 (only for clusters): this should be identical to the phone it is linked to
- Owner: select the user that has been created in the above step
- Extension: users' extensions are preferably 4 digits long. You can go up to 6 digits but not shorter than 3 digits as it might interfere with speeddialing on certain phone types. Make sure your extensions don't start with the outside line access code (typically 0 in Belgium)
- First name & last name: the first and last name of the user
- E-mail: (optional) the e-mail address of the user (used for voicemail to e-mail)
- Mobile number: (optional) the mobile number of the user in +E.164 format (ex: +32475123456) (used for call forward to mobile)
- Department, office & group: (optional) the department, office and group of the user (used for pick-up)
- Profile: select Template-User
- Primary phone: the user's primary phone resource
- Secondary phone: (optional) the user's secondary phone resource
 Open the profile parameters of the extension. For help on the profile settings, click on the interrogation mark icon that is available on the right upper part of the profile parameters page:

Provisioning via the FlexAdmin
Flex Administration is available for the Directory since SMP Application 5.5 when Parameter sets are used. It can be used to add users in a more automated way than manually. For more information on how to use this feature, open the SMP administration guide here, and go the the Using Flex Administration section of the document.Using ZeroConf
The ZeroConf allows to autoprovision the MAC address of a unconfigured phone.- SOP: the sokey of the SOP on which the task must be active
- Run automatically continuous
- ZeroConf extension: ##88
How to add a General Reception
The general reception handles the external call going to the reception. Calls arrives in a shared queue which distributes the call to the different receptionists.Step 1: Add a General Queue
- Queue name: for example GeneralQueue1 or GeneralQueue2 (GeneralQueue2 is not reflected in the scheme below, it can be used when you have two groups of receptionists which don't have to take calls from one another). The queue name should be composed of letters and digits only, special characters or white spaces are not allowed. Also don 't use the Queue name 'General ' !
- Music on hold: select your Music on Hold resource. In this example we select (set in callflow).
- Ring strategy: rrmemory is probably the most appropriate for a general queue. It ensures that the incoming calls are distributed evenly among the different receptionists.
- Timeout: 60
- Retry: 1
- Permanent members: must be left empty
- Join and leave when empty policy: select loose when using Communication Server (available from Fusion 3.0.5).
- Ring in use policy: select No
Step 2: Add a General reception extension
- Extension: for example 1000
- Profile: select Template-CallQueuer profile
- Primary Phone: leave empty, no Phone
- Secondary Phone: leave empty, no Phone
- General reception profile parameters
- Group name: select the resource Queue ID of the General Queue (ex: AQA00001)
- Use of net.Console: select Polycom phones only if you will use a Polycom IP650 or select Snom phones only if you will use net.Console in combination with a Snom phone.
How to add a receptionist to a general reception
A receptionist will be able to handle the call via the net.Console application. Notes:- The receptionist must be located on the same SOP than the General Reception
- active-active mode is not supported
Step 1: Add a Receptionist queue
- Queue name: For example ! ReceptionistQueue1, ReceptionistQueue2. The queue name should be composed of letters and digits only, no special characters of white space permitted.
- Music on hold: select your Music on Hold resource.
- Ring strategy: rrmemory
- Timeout: 60
- Retry: 1
- Permanent members: must be left empty
- Join and leave when empty policy: select loose.
- Ring in use policy: no
Step 2: Create a Reception phone
net.Console requires a Polycom IP650 phone. Create the phone based on master resource SDP8Z000.Step 3: Add a Reception extension
- Extension: 1001 for example
- Profile: Template-Receptionist-Green profile
- Primary Phone: the phone id created in step 1
- Secondary Phone: the phone id created in step 1 (for Polycom phone it must be filled in twice)
- Internal reception profile parameters
- Queue for the receptionist: select the resource Queue ID of the receptionist (ex: AQA00002)
- Reception number: enter the general extension (ex: 1000)
Step 5: Add a net.Console resource
- User: select the user created for this reception desk
- Resource: select the net.Console resource created for this reception desk
- Permissions: by default select all permissions
Step 6: net.Console application installation
Open a browser and enter the following URL: http://<netConsole_SOP's_IP>/netConsole and download the msi file. Once downloaded install it on the PC of the reception desk.How to add a CallQueuer
Step 1: Add a queue
Step 2: Add the CallQueuer extension
- SOP 1 and SOP 2 (only for clusters): this should be identical to the queue it is linked to
- Owner: leave empty
- Extension: users' extensions are preferably 4 digits long. You can go up to 6 digits but not shorter than 3 digits as it might interfere with speeddialing on certain phone types. Make sure your extensions don't start with the outside line access code (typically 0 in Belgium)
- First name & last name: add a description of the call queuer
- E-mail: leave empty
- Mobile number: leave empty
- Department, office & group: leave empty
- Profile: Template-CallQueuer
- Primary phone: leave empty
- Secondary phone: leave empty
How to add an IVR
An IVR enables to create an interactive voice menu to route the call to different extensions.- SOP 1 and SOP 2 (only for clusters): leave empty
- Owner: leave empty
- Extension: users' extensions are preferably 4 digits long. You can go up to 6 digits but not shorter than 3 digits as it might interfere with speeddialing on certain phone types. Make sure your extensions don't start with the outside line access code (typically 0 in Belgium)
- First name & last name: add a description of the IVR
- E-mail: leave empty
- Mobile number: leave empty
- Department, office & group: leave empty
- Profile: Template-IVR
- Primary phone: leave empty
- Secondary phone: leave empty
How to configure a service availability
The service availability enables to configure the different time check used in the Call Queuer and the IVR. You can for example configure the holiday in it- SOP 1 and SOP 2 (only for clusters): leave empty
- Owner: leave empty
- Extension: users' extensions are preferably 4 digits long. You can go up to 6 digits but not shorter than 3 digits as it might interfere with speeddialing on certain phone types. Make sure your extensions don't start with the outside line access code (typically 0 in Belgium)
- First name & last name: add a description of the Service Availability
- E-mail: leave empty
- Mobile number: leave empty
- Department, office & group: leave empty
- Profile: Template-ServiceAvailability
- Primary phone: leave empty
- Secondary phone: leave empty
How to add a short number
You can configure a short number to reach an existing extension.- SOP 1 and SOP 2 (only for clusters): leave empty
- Owner: leave empty
- Extension: user's extensions are preferably 4 digits long, they should be maximum 6 digits but not less than 3 digits as it might interfere with speeddialing on certain phone types. Make sure your extensions don't start with the outside line access code (typically 0 in Belgium)
- First name & last name: add a description of the directory entry
- E-mail: leave empty
- Mobile number: leave empty
- Department, office & group: leave empty
- Profile: Template-ShortNumber
- Primary phone: leave empty
- Secondary phone: leave empty
How to add a conference bridge
A conference enables to provide an extension on which several person can communicate Together.- SOP 1 and SOP 2 (only for clusters): select a sopkey for sop1 and sop2
- Owner: leave empty
- Extension: users' extensions are preferably 4 digits long. You can go up to 6 digits but not shorter than 3 digits as it might interfere with speeddialing on certain phone types. Make sure your extensions don't start with the outside line access code (typically 0 in Belgium)
- First name & last name: add a description of the directory entry
- E-mail: leave empty
- Mobile number: leave empty
- Department, office & group: leave empty
- Profile: Template-Conference
- Primary phone: leave empty
- Secondary phone: leave empty
How to add a physical fax
Physical faxes can be connected to an analog telephony adapter (ATA) in order to carry faxes on the Voice over IP network.Step 1: Add an ATA
Step 2: Add a fax extension
- SOP 1 and SOP 2 (only for clusters): select a sopkey for sop1 and sop2
- Owner: leave empty
- Extension: users' extensions are preferably 4 digits long. You can go up to 6 digits but not shorter than 3 digits as it might interfere with speeddialing on certain phone types. Make sure your extensions don't start with the outside line access code (typically 0 in Belgium)
- First name & last name: add a description of the directory entry
- E-mail: leave empty
- Mobile number: leave empty
- Department, office & group: leave empty
- Profile: Template-Fax
- Primary phone: set the phone ID of the Cisco SPA created in step 1.
- Secondary phone: leave empty
How to add a virtual fax
Virtual faxes enable to receive faxes by email. The Virtual faxes settings must be configure in the SOP Settings. If they are changed the Fax Server module need to be reinstalled in order to apply the new configuration.Step 1: Adding IAXmodems
- Example: Resource ID name IIA00001 to IIA00004
- User: iaxmodem1 for the first IncomingIAXTrunk, increase the last digits for the following IncomingIAXTrunk resources. Example: iaxmodem1 to iaxmodem4. If you have several fax servers running in the same cluster, start always with iaxmodem1 for each sop.
- Secret: iaxmodem
- Incoming Context: NoRestrict
- First Codec to use: (ulaw or alaw). Only use one codec. Choose the codec that will avoid transcoding along the way.
- Register: no
- SOP 1 and SOP 2 (only for clusters): select a sopkey for sop1 and sop2
- Owner: leave empty
- Extension: users' extensions are preferably 4 digits long. You can go up to 6 digits but not shorter than 3 digits as it might interfere with speeddialing on certain phone types. Make sure your extensions don't start with the outside line access code (typically 0 in Belgium)
- First name & last name: add a description of the directory entry
- E-mail: leave empty
- Mobile number: leave empty
- Department, office & group: leave empty
- Profile: Template-Fax-Virtual
- Primary and secondary phone: leave empty
How to add direct dial-in (DDI) numbers
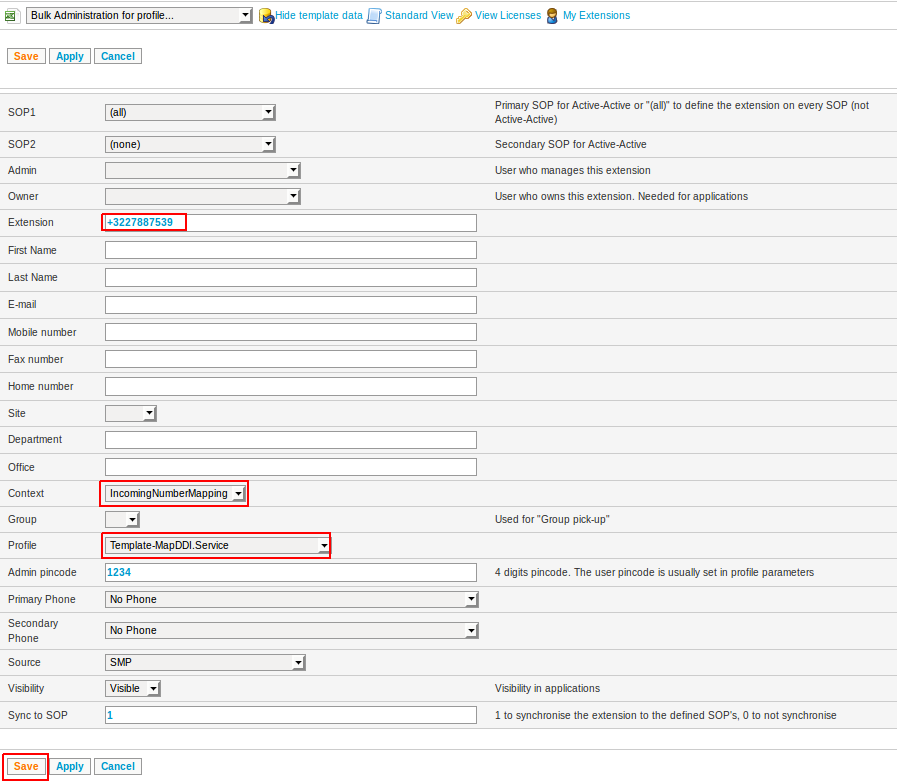
Direct dial-in allows you to link an external number to an internal number (user, IVR, ...). This is an N-to-1 relation (multiple external numbers can end up on the same internal number) To create a new mapping between an external number and an extension, create the external number as directory entry and press save.
 - SOP 1 and SOP 2: leave empty
- Owner: leave empty
- Extension: DDI number formatted in +E164
- First name & last name: the first and last name of the user
- Profile: Template-MapDDI
- Primary phone: must be empty
- Secondary phone: must be empty
- Context IncomingNumberMapping
 Open the profile parameters of the extension and fill in all fields

Copyright © Escaux SA