Ip Phone Cisco 7940/7960 English
1. Introducing the Cisco IP Phone 7940 and 7960
The Cisco IP Phone 7940/7960 is a full-feature telephone that provides voice communication over an IP network. These phones function much like a traditional analog phone, allowing you to place and receive telephone calls. These phones also support features such as network call forwarding, redialing, speed dialing, transferring calls, placing conference calls, and accessing voice mail.
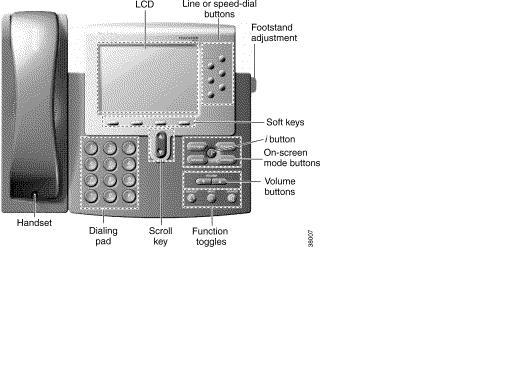
- LCD screen : The IP Phone "desktop" which displays the time, date, your phone number, caller ID, line/call status and the soft key tabs.
- Line or speed dial buttons : Opens a new line, speed dials the number on the LCD screen, or ends a call. Note The Cisco SIP IP Phone model 7940 has two lines; the model 7960 has six lines.
- Footstand adjustment : By pushing on the foostand adjustment, the angle of the phone base can be adjusted.
- Contextual Soft keys : Soft key functions change depending on the status of the phone (for example, whether you are on a call or the phone is not in use). The key's current function is shown on the LCD screen.
- i button : Displays online help for a phone key or function.
- On-screen Mode buttons : Provide access to the voice mail system (when available), call histories, directories (when available), phone settings such as contrast and ring type, and network configuration and status information.
- Volume buttons : Increases or decreases the volume for the currently active voice receiver: handset, headset, or speakerphone. The volume keys also control the ringer volume (if on-hook), and the contrast of the LCD.
- Function toggles : Toggles the headset, mute, and speaker functions on and off.
- Scroll key : Enables you to move among different soft key options displayed on the LCD screen.
- Dialing pad : Press the dial pad buttons to dial a phone number. Dial pad buttons work exactly like those on your existing telephone.
- Handset : Lift the handset and press the dial pad numbers to place a call, review voice mail messages, answer a call, and so forth.
2. Installing the Phone and Connecting to the Network
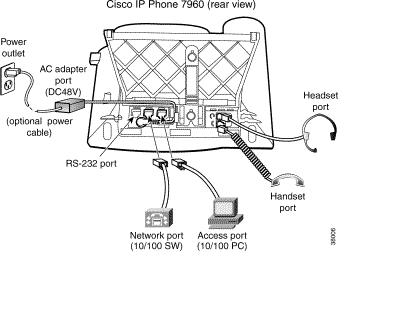
- Step 1 Connect an Ethernet cable to the network port (middle port) on the phone.
- Step 2 Connect the handset and headset to their respective ports.
- Step 3 Connect an Ethernet cable from your desktop computer to the access port on the IP phone (optional). You can connect your computer to the phone to enable your computer to access the network via the IP Phone. Your company might choose this option if you do not have multiple Ethernet ports in your workspace.
- Step 4 Connect the power plug to the DC48V AC adapter port (optional). Ensure that the cord passes through the retainer clips to the right of the 10/100 PC port. The Cisco IP Phone 7940/7960 can be powered by an external power source, a switching module, or a power patch panel.
- Step 5 Adjust the footstand to the height that makes using the display and buttons most comfortable for you.
- Push in the footstand adjustment knob.
- Adjust the footstand to the desired height.
After theCisco IP Phone 7940/7960 has power connected to it, the phone begins its startup process. Once completed, the main LCD screen appears, displaying the phone's extension (or directory number), soft keys, and the current date and time. If the phone does not successfully start up, contact your system administrator for help.
3. Using the Cisco IP Phone 7940/7960
Your Cisco IP Phone 7940/7960 provides features you might not have had before on an office phone. However, you can learn how to use many of these features by simply exploring the available options.
Read these sections to learn about the Cisco SIP IP Phone's features and related tasks:
3.1 Getting Started
The Cisco IP Phone 7940/7960 includes several features to help you familiarize yourself with it. Use these features to help you:
- Accessing Online Help : The Cisco IP Phone 7940/7960 currently does not include detailed online help for most phone keys and functions; however, network statistics for an active call can be provided.
- Press the i button twice quickly during an active call to view network statistics about the active call.
Tip : When accessing the Cisco IP Phone 7940/7960 options, note the number listed next to the option. You can simply enter this number using the dialing pad to quickly access a feature.
3.2 How to Use the Handset, Speakerphone, and Headset
You can place and answer calls with the handset, speakerphone, or a headset. These sections describe their use and how to adjust the volume of the call:
- Using the Handset
- To place and answer calls with the handset, simply lift the handset. To change from handset to speakerphone, press SPEAKER and hang up the handset.
- Using the Speakerphone
- To place and answer calls using the speakerphone, press SPEAKER. You can use the speakerphone with all Cisco IP Phone 7940/7960 features. To change from speakerphone to handset, lift the handset.
- Using the Headset
- To place and answer calls using the headset, plug the approved headset into the back of the phone base and press HEADSET.
- Adjusting the Handset, Speakerphone, and Headset Volume : To increase or decrease the volume of your handset, headset, or speakerphone, press the up or down volume button. The volume buttons adjust the volume for the currently active voice receiver.

If when you type in a number, you see letters on your screen, than probably you have pushed by accident on the "URL/Number" softkey (appears at the bottom of the screen, after having hooked off). Push again on this button -> this button will rename to "URL", and it will work.
3.3 Customizing Phone Settings
You can change various settings on your Cisco IP Phone 7940/7960 to ensure that the ringer volume, ring sound, and LCD contrast are set appropriately for you. These sections describe the changes you can make:
3.3.1 Adjusting the Ringer Volume
To change the volume used by the ringer:
- Step 1 Press the volume key to hear a sample ring.
- Step 2 While the ring plays, press the up or down volume key to adjust the volume to the desired level.
3.3.2 Changing the Ringer Sound
To change the sound used by the ringer:
- Step 1 Press the settings button.
- Step 2 Select Ring Type from the Settings menu.
- Step 3 Press the Select soft key.
- Step 4 To scroll through the list of ring types, press the scroll key. Press the Play soft key to hear the selected ring type.
- Step 5 When you find the ring you want, press Select and then press the OK soft key.
3.3.3 Changing the LCD Contrast
To improve the readability of the LCD, change the amount of contrast:
- Step 1 Press the settings button.
- Step 2 Select Contrast from the Settings menu.
- Step 3 Press the Up or Down soft keys or the volume keys to set the desired intensity of the display.
- Step 4 Press the OK soft key to accept your changes.
3.3.4 Making Telephone Calls
These sections describe how you can place, answer, or otherwise manage a telephone call:
3.4.1 Placing a Call Using a Telephone Number
You can place a call with the Cisco IP Phone 7940/7960 in any of the following ways:
- Lift the handset and dial the number and press the Dial softkey or pound (#) key
- Press a line button and dial the number and press the Dial softkey or pound (#) key
- Press the Newcall soft key and dial the number and press the Dial softkey or pound (#) key
- If using a headset, press HEADSET and dial the number and press the Dial softkey or pound (#) key
- To use the speakerphone, press SPEAKER and dial the number and press the Dial softkey or pound (#) key
3.4.2 Answering a Call
You can answer a call using the handset, headset, or speakerphone.
- To use the handset, lift the handset.
- To use a headset, press HEADSET, and press the line button of the incoming call.
- To use the speakerphone, press the Answer soft key or the SPEAKER button.
3.4.3 Ending a Call
To end a call:
- If using the handset, hang up the handset.
- If using the headset, press the Endcall soft key. This method also works for all speaker modes.
- If using the speakerphone, press SPEAKER.
3.4.4 Muting a Call
While on a call, you can mute the handset, headset, or speakerphone, preventing the party you are speaking to from hearing what you or someone else in the room is saying.
- To mute a call, press MUTE.
- To disengage mute, press MUTE again.
3.4.5 Placing a Call on Hold
While on a call, you can place the call on hold, so that the caller cannot hear you and you cannot hear the caller. You can answer other calls while a call is on hold.
- To place a call on hold, press the Hold soft key.
- To return to the call, press the Resume soft key. If multiple calls are on hold, use the scroll key to select the desired call before you press Resume.
- If multiple calls on multiple lines are on hold, press the line button for the line to which you want to switch and use the scroll keys to select the desired call before you press Resume.
3.4.6 Transferring a Call with consultation
To transfer a call to another phone:
- Step 1 Press the more soft key followed by the Transfer soft key. This places the call on hold.
- Step 2 Dial the number to which you want to transfer the call.
- Step 3 When it rings on the other end, press Transfer again, or when the party answers, announce the call and press Transfer.
- Step 4 Hang up if the party accepts the call.
If the party refuses the call, return to the original call and press the Resume soft key.
3.4.7 Blind Call Transfer
In an unattended transfer, you transfer the caller to another number without talking to the party who is to receive the call. The caller is transferred to the new party without verifying that the new party is there or willing to receive the call.
- Step 1 During a call, press the more soft key, then the Blndxfr soft key. This places the call on hold.
- Step 2 Dial the number to which you want to transfer the call.
- Step 3 Hang up.
3.4.8 Redialing the Last Number Dialed
To redial the most recently dialed number, lift the handset and press the Redial soft key. Alternatively, you can simply press Redial to activate the speakerphone or headset.
3.4.9 Making Calls from the Directory
The Cisco IP Phone 7940/7960 maintains a directory of calls you miss, receive, and place. You can use this directory to locate numbers you want to redial. You can also use a corporate directory to quickly locate and call co-workers in your company.
These sections describe what you can do with the directory:
Viewing or Dialing Missed Calls
If your phone display indicates you have missed calls, you can use the Missed Calls option on the Directory menu to view call history and call back the missed call.
- Step 1 Press the directories button.
- Step 2 Press the Select soft key to select Missed Calls from the Directory menu. The call history for missed calls is displayed on the LCD.
- Step 3 If desired, click the Dial soft key to speed dial a number from the missed call list.
You might need to use the Editdial soft key to add digits to the front of the number. For example, if the call was from an outside, long-distance caller, you might need to add the digits "91" to the front of the number.
- Step 4 Press the Exit soft key twice to exit the Directory menu.
Viewing or Dialing Received and Placed Calls
The Cisco IP Phone 7940/7960 keeps a history of all calls you make and receive, including the caller ID, time, and date of the call. You can use this information to redial a party.
- Step 1 Press the directories button.
- Step 2 Use the scroll key to select the desired call history option: Missed Calls, Received Calls, Placed Calls, or Personal Directory.
- Step 3 Press the Select soft key to display the call history list.
- Step 4 If desired, press the Dial soft key to speed dial a number from the call history list.
You might need to use the Editdial soft key to add digits to the front of the number. For example, if the call was from an outside, long-distance caller, you might need to add the digits "91" to the front of the number.
- Step 5 When you are finished, press the Exit soft key twice to exit the Directory menu.
3.4.10 Using Call Forwarding
Call Forwarding for the Cisco IP Phone 7940/7960 is handled via the CFWALL softkey on the phone.
- Step 1 Press the CFWDALL softkey
- Step 2 Enter the number to which all calls need to be forwarded
- Step 3 Press Accept. The phone now indicates the number to which all calls are forwarded.
- To deactivate Call Forwarding, simply press the CFWDALL softkey again.
3.4.11 Making Conference Calls
The Cisco IP Phone 7940/7960 supports conference calls, enabling you to talk with multiple calling parties.
These sections describe how to make conference calls with the phone:
Placing a Conference Call
To turn a call into a conference call:
- Step 1 During a call, press the Confrn soft key. This will automatically select a new line and place the other party on hold.
- Step 2 Place a call to another number.
- Step 3 When the call connects, press Confrn again to add this party to the conference call.
Conference Call Tips
- Once the conference call initiator disconnects the call is terminated.
- To place a conference call on hold, press the Hold soft key. The other parties can not talk among themselves. To avoid disrupting the other callers, consider muting the call instead. To mute the call, press the MUTE button.
- To place a conference call on speakerphone, press SPEAKER. Press MUTE to mute the speakerphone. The conference parties cannot hear you but you can hear them.
- The phone only allows three parties in a conference call.
- During a conference call, the use of DTMF (keypad tones) for the conference call initiator is disabled.
- Call waiting calls cannot be conferenced in, the conferencing node must establish both legs of the 3-Way conference.
3.4.12 Using Voice Mail
Voice mail allows you to access messages left by callers when you are unavailable to take their call. Voice mail is an optional feature configured by your system administrator.
Accessing Voice Mail
To access voice mail, press the messages button and follow the voice instructions.
- The LCD displays a text message indicating the number of voice mail messages in your mailbox.
- The red light on your handset also lights when you have a voice mail message.
3.4.13 Configuring Call Preferences
You can configure your phone to prevent unwanted incoming calls. The following options are however not supported in the current configuration of the Escaux UCS :
- Caller ID Blocking
- Blocking Anonymous Calls
Do Not Disturb
You can block incoming calls by configuring the Do Not Disturb feature. Blocked calls are logged in the Missed Calls directory (see the "Viewing or Dialing Missed Calls" section).
To configure Do Not Disturb:
- Step 1 Press the services button.
- Step 2 Select Call Preferences from the Settings menu
- Step 3 Select Do Not Disturb
- Step 4 To turn the Do Not Disturb feature on, press the Yes soft key. To turn the feature off, press the No soft key.
- Step 5 Press the Save soft key to save your selection and exit the Services menu.
3.4.14 Group Pickup
You can pickup calls received on a colleagues phone provided your phone is part of the same call group. To execute a group pickup, enter *8Dial on the keypad of your IP Phone.
4 Profile and Status management
The Escaux UCS relies on the concept of profile and status. For each user, a unique profile describes one of the roles of this user. (Call Center Agent, Receptionist, User ).
A user can have one or several profiles. For example, an employee can have a role of a normal employee but he can also fullfill the role of a call center agent when it is needed. The exact user profiles depend on the level of functionality and customisation that you have purchased with your Escaux UCS system.
Each profile has a status. Typically, an employee can be in the status office, telework or holiday for example.
- The Escaux UCS administrator is responsible for assigning profiles (roles) to each Escaux UCS user. To do so, an extension is given for each profile.
- The end-user is responsible to indicate his status for each profile and the administrator can override the status given by the end-user.
In order to facilitate the modification of each user status, the Escaux UCS proposes several interfaces to manage the status of each users profile:
- Escaux UCS web interface lets you manage your status through any web browser connected to your enterprise network.
- Escaux UCS phone interface lets you quickly manage your status through your XML enabled phone
- Escaux UCS telephony user interface lets you manage your profile through IVR prompts from any internal or external phone set (available in the future).
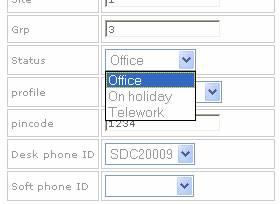
4.1 Changing the status through the web interface.
If you wish to change the status of the Profile associated with a particular extension, please select the extension in the Escaux UCS web interface, and press change.
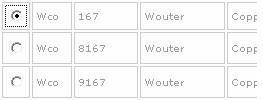
This brings the user to the next screen, offering him/her to change their status :
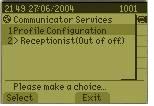
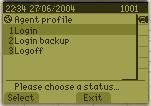
4.2 Changing the status through the phone interface.
Push on the

service button of your Cisco 7940/7960 IP phones.
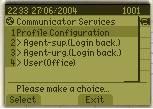
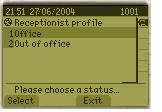
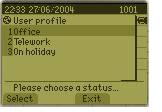
A screen appears with the list of all your profiles and the current status between brackets. You can select the profile you want to configure. You will then be able to select the new status.
When you choose a status, your status is automatically updated
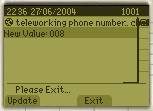
If you want to do so, the next screen enables you to change relevant parameters for this particular status. For example, a teleworker teleworking at a new location can redirect his/her phone calls to this new location or mobile phone.

If you select the teleworking phone number option, you are able to edit the indicated number.
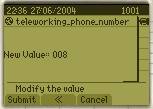
Push submits to update your changes:
5. Factory Reset Procedure
- Push on Settings key (below at the right side of the "?" key)
- Go down in the menu until the Unlock Config item and push on Select
- Enter the password : "ad" or "cisco" and push on Accept
- Then, go up in the menu and select the Network Config item
- Go down in this submenu and select Erase Configuration, then push on Yes and Save
- Do not power off the phone during its reboot
5.2 At the boot time (depending of firmware version)
- Unplug the powersupply (or the ethernet cable in the case of PoE)
- Press the # (let it pressed) and plug the powersupply (or the ethernet cable in the case of PoE) until the following message appear the the screen "Reset key sequence detected"
- Enter the following keys sequence : 0123456789*0#
- The following prompt will appear "Save network cfg 1=yes 2=no" : say yes if there is no network problems else say no to do a complete factory reset