- IP Phone - Polycom IP300
- 1. Introducing the Polycom IP Phone IP300
- 2. Basic Call Handling
- 2.1 Placing a Call
- 2.2 Answering a Call
- 2.3 Call Hold and Resume
- 2.4 Microphone Mute
- 2.5 General Key Use
- 2.6 Local Conferencing
- 2.7 Transferring a Call
- 2.8 Redial
- 2.9 Call Forwarding
- 2.10 Volume Adjustment
- 2.11 Do Not Disturb
- 2.12 Display Contrast
- 2.13 Ring Type
- 2.14 Call Lists
- 2.15 Contact List
- 2.16 Speed dials
- 2.17 Voice Mail
- 2.18 Distinctive Ringing / Call Treatment
- 2.19 Phone Reboot
- 3. Troubleshooting
- 3.3 No Ringing
- 3.4 No Audio on Headset
- 3.5 No Response from Feature Key Presses
- 3.6 Display shows �Network Link is Down�
- 4. Factory reset
IP Phone - Polycom IP300
1. Introducing the Polycom IP Phone IP300
The Polycom IP Phone IP300 is a full-feature telephone that provides voice communication over an IP network. These phones function much like a traditional analog phone, allowing you to place and receive telephone calls. These phones also support features such as network call forwarding, redialing, speed dialing, transferring calls, placing conference calls, and accessing voice mail. Here is an overview of the phone showing buttons and hardware: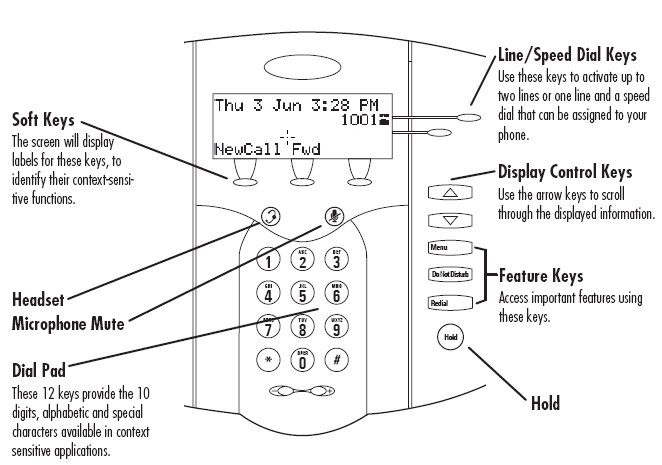
2. Basic Call Handling
This section covers basic call-handling tasks such as placing, answering, and transferring calls.2.1 Placing a Call
Using the Handset:- 1. To obtain dial tone, pick up the handset.
- 2. Dial the desired number,
- 1. With the handset on-hook, press "Menu", and choose Features, followed by Listen Mode.
- 2. Dial the desired number,
- 1. With the optional headset connected, press Newcall to obtain dial tone.
- 2. Dial the desired number,
2.2 Answering a Call
Pick up the handset. Incoming calls may be ignored by pressing the "Reject" softkey.2.3 Call Hold and Resume
During a call, press "Hold" The call will be placed on hold and this will be indicated on the display. Press the Resume soft key to retrieve the call. If there is an active call when a second new incoming call is received,press "Hold" to put the first call on hold. Then press "answer" to accept the second call. See hereunder "Multiple calls on hold" to switch from one line to the other. Multiple Calls on Hold If multiple calls are on hold on a single line key, use the arrow keys to switch between the calls then press the Resume soft key to retrieve the desired call.2.4 Microphone Mute
During a call, press the Mute button. The LED on the phone lights up and a flashing microphone on the display indicates that the other party (parties) cannot hear you. Microphone Mute applies to handset and headset modes. You can still hear all other parties while Mute is enabled. To turn off Microphone Mute, press the Mute button again.2.5 General Key Use
To navigate through menus and to enter data, these are useful tips:- 1. Use the arrows or the Next and Prev soft keys to scroll through lists.
- 2. Many soft keys can only be accessed by pressing the More soft key.
- 3. The "MENU" key can be pressed to quickly exit from any menu.
- 4. To enter text using the dial pad, press the number keys one or more times. For example, for �A� press �2� and for �C� press �222�. When in text entry mode the display title will show whether keys will generate numbers (1), upper-case (A) or lower-case (a) characters and the 1/A/a soft key can change this.
2.6 Local Conferencing
A conference may be created with two other parties using the phone�s local conferencing feature.- 1. Place a call to the first party.
- 2. Press the Conf soft key to obtain a new line (the active call is placed on hold).
- 3. Dial the number of the second party or use the arrow keys to access speed dial numbers or the missed call list, or use the Features menu to access placed and received call lists.
- 4. When the second party answers, press the Conf soft key again to join all parties in the conference, or press the Split soft key to put the first call on hold and keep the second call as the active call.
2.7 Transferring a Call
- 1. During a call, press the Trnsfr soft key (the active call is placed on hold).
- 2. Press the Blind soft key if a blind transfer (without consultation) is required.
- 3. Dial the number to which you want to transfer the call or use the arrow keys to access speed dial numbers or the missed call list, or use the Features menu to access placed and received call lists. From one of these lists press the Dial soft key. (This step completes a blind transfer.)
- 4. Press the Trnsfr soft key again after consulting with the new party to complete a consultative transfer or press the Split soft key to put the first call on hold and keep the second call as the active call.
2.8 Redial
Press the "Redial" button to dial the last call placed from your phone. To redial another previously dialed number, press the Menu soft key, and select Features, Call Lists, then Placed Calls. You will see a list of previously placed calls. Choose the number you wish to redial and press Dial.2.9 Call Forwarding
Calls may be Forwarded (Diverted) to another extension as follows:- 1. Press the Fwd soft key from the phone�s idle display.
- 2. (Optional) If multiple lines are in use, select which line to forward.
- 3. Enter a number or URL to forward all future calls to.
- 4. Press the Enable soft key to confirm Call Forwarding.
- 1. Press the Fwd soft key from the phone�s idle display.
- 2. (Optional) If multiple lines are in use, Select which line to disable Call Forward.
- 3. Press the Disable soft key.
2.10 Volume Adjustment
Press the volume keys to adjust receiver volume during a call. Pressing these keys in idle state adjusts the ringer volume. To conform to regulatory requirments, handset and headset volume will return to a preset level after each call. Hands-free volume settings will be maintained across calls.2.11 Do Not Disturb
Press the "Do not disturb" button to prevent the phone from ringing on incoming calls. A flashing icon and text on the display indicates that Do Not Disturb is on. Calls received while Do Not Disturb is enabled are logged in the Missed Call list. To turn off Do Not Disturb, press the "Do not disturb" button again2.12 Display Contrast
To adjust the contrast on the display to a comfortable level:- 1. Press the "Menu" button. Select Settings followed by Basic, Contrast.
- 2. Press the Up or Down soft keys (or volume keys) to increase or decrease the display contrast.
- 3. Press the Ok or Cancel soft keys to accept or cancel changes.
- 4. Press the "Menu" button or the Exit soft key to return to the idle display.
2.13 Ring Type
Many ring types are available. Users can select different rings to distinguish between lines or to have a different ring from their neighbor�s phone. To change the incoming ring:- 1. Press the "Menu" button. Select Settings followed by Basic, Ring Type.
- 2. (Optional) If multiple lines are used, first select which line to change.
- 3. Using the arrow keys, highlight the desired ring type. Press the Play soft key to hear the selected ring type.
- 4. Press Select to change to the selected ring type.
- 5. Press the "Menu" button or the Exit soft key to return to the idle display.
2.14 Call Lists
A local list of calls missed, received, and placed is maintained by the phone (up to 100 for each). Press the "Menu" button. Select Features followed by Call Lists. Select Missed, Received, or Placed Calls as desired. Call information will be displayed. Choose:- 1. Edit to amend the dial string if necessary.
- 2. Dial to return the call.
- 3. Exit to return to the previous menu.
- 4. Info to view information about the call.
- 5. Save to store the contact to the Contact Directory.
- 6. Clear to delete the call from the list.
2.15 Contact List
In addition to a directory of missed, placed, or received calls, the phone can store a local directory of 200 or more contacts*. Users can add, delete, edit, dial, or search for any contact in this list through just a few key strokes. To add or edit a contact:- 1. Press the "Menu" button, select Features and Contact List.
- 2. Press Add to enter another contact into the phone�s database or press Edit to edit an existing entry.
- 3. To move between fields when editing, use the Next or Prev soft keys. Enter first and/or last name from the keypad. Press the 1/A/a soft key to select between numeric and upper/lower case alphanumeric modes.
- 4. Enter the Contact number. This is a required field and it must be unique (not already in the directory).
- 5. Speed Dial Index, Ring Type and Divert Contact may be left blank.
- 6. Use the arrows or the Change soft key to switch between Enabled and Disabled settings for the last four fields.
- 7. Press Save to confirm or Cancel to abandon the changes, then press Exit to return to the idle display.
- 1. Press Search from the Contact List menu.
- 2. Using the dial pad, enter the first few characters for First or Last names.
- 3. Press Search to search for contacts.
- 4. Successful matches can be dialed from the resulting screen.
2.16 Speed dials
Pre-assigned numbers can be associated with speed dial entries for rapid automated dialing. If a line key is unassigned to a line, it can act as a speed dial key for the first speed dial entry. Other speed dial entries can be viewed from the idle display by pressing the arrow UP . To remove a Speed Dial entry:- 1. Press the "Menu" button, select Features and Contact List.
- 2. Scroll to the desired entry and press Edit.
- 3. Delete the Speed Dial Index number using the and then the Delete soft keys.
- 4. Press Save and Exit to return to the idle display.
- 1. Press the "Menu" button, select Features and Contact List.
- 2. Press the Add soft key to enter John�s contact details (see Contact Directory) or highlight John�s existing directory entry and press Edit.
- 3. Enter Speed Dial Index as �1�. This assigns John to the first speed dial entry.
- 4. Press Save to confirm or Cancel to abandon the change then press Exit to return to the idle display.
2.17 Voice Mail
Received messages will be indicated by a flashing Message Waiting Indicator LED on the front of the phone and optionally a visual notification on the display. Individual line indicators reflect voice messages left on that line (useful if multiple lines are in use). A stutter dial tone in place of normal dial tone is used to indicate that one or more voice messages are waiting at the message center. To listen to voice messages:- 1. Press 8500
- 2. Follow voice prompts to listen to messages.
2.18 Distinctive Ringing / Call Treatment
Users can set distinctive incoming ringing tones for contacts in their local directory. This allows identification of a contact by a specific ring tone. To set a distinctive ring for a local contact:- 1. Press the "Menu" button, select Features,Contact List.
- 2. Using the arrow keys, scroll through the directory to choose a contact.
- 3. Press Edit and scroll down using the Next soft key to Ring Type.
- 4. Enter a number corresponding to one of the ring types available (press then the Delete soft key to remove an existing value).
- 5. Press the Save soft key or Cancel to abandon the change.
2.19 Phone Reboot
Periodically, the phone may require a user reboot. Reasons for this include accepting a new configuration or new software. To reboot the phone: Simultaneously press and hold the Do Not Disturb, Hold, and Volume keys for more than 3 seconds3. Troubleshooting
3.1 No Dial-Tone
Verify power is correctly applied to the Soundpoint® IP 300/301 SIP phone:- Check that the display is illuminated.
- Make sure the LAN cable is inserted properly at the rear of the phone (try unplugging and re-inserting the
- If using in-line powering, check that the switch is supplying power to the phone (contact your system administrator).
- Switch between handset, headset (if present) or hands-free to see if dial tone is present on these other paths.
- If dial tone exists on one of these, connect a different handset or headset to isolate the problem.
3.2 No Display, Incorrect Display or Bad Contrast
Verify power is correctly applied to the Soundpoint® IP 300/301 SIP phone:- As �No Dial-Tone� above.
- Follow the instructions in this User Guide to adjust the contrast to a darker level.
- Reboot the phone to obtain a default level of contrast (follow the instructions in this User Guide).
- Place a call to the phone under investigation. Check that the display indicates incoming call information.
- Lift the handset. Ensure dial tone is present and place a call to another extension or number. Check that the display changes in response.
3.3 No Ringing
Verify incoming ring setting and volume level:- Adjust the ringing level from the front panel using the volume up/down keys.
- Check that the Ring Type selected in the Settings menu is not the Silent Ring.
- As �No Display� above.
3.4 No Audio on Headset
Verify correct connections:- Ensure the headset is plugged into the jack marked Headset at the rear of the phone.
- Ensure the headset amplifier (if present) is turned on and/or the volume is correctly adjusted.
3.5 No Response from Feature Key Presses
Verify phone is in active state:- Make a call to the phone to check for inbound call display and ringing as normal. If successful, try to press feature keys within the call to access Directory or Buddy Status
- Press the "Menu" button, followed by System Status and Server Status to confirm line is actively registered to the server.
- Reboot the phone to attempt reregistration to the server.
3.6 Display shows �Network Link is Down�
Verify LAN cable is properly connected:- Check termination at the switch or hub (furthest end of the cable from the phone).
- Check that the switch or hub is operational (flashing link/status lights) or contact your system administrator.
- Press the "Menu" button, followed by System Status and Network Status. Scroll down to verify LAN port is Active.
- Reboot the phone to attempt reregistration with the server.
4. Factory reset
- Push on the Menu button
- select 3. Settings
- select 2. Advanced (the password is : 456)
- select 1. Admin Settings
- select 3. Reset to default
- choose 1. Reset local config
- if the first choice doesn't work, try also 2. Reset Device Settings
Copyright © Escaux SA