ESCAUX net.Desktop User Guide
- ESCAUX net.Desktop User Guide
- Preface
- 1. Introduction
- 2. Tabs area
- 3. Bottom Area
- 4. Top area
- 5. Left area
- 6. Speeddials
- 7. Quick Number
- 8. Communication window
- 9. System tray
- 10. Preferences window
- 11. Troubleshooting
Preface
Copyright
Copyright 2007, Escaux Business IP Telephony, a Escaux N.V. brandConfidentiality
The information contained in this document should be treated as confidential and should only be shared with Escaux UCS customers. Under no circumstances and under no form should any part of this document be transferred to third parties.Scope of this Document
The purpose of this document is to allow the end user to discover the main features of the net.Desktop application . This document describes concepts like:- unified directory
- visual voicemail
- presence
- integrations like Outlook and CRM
Quick howto
- Call a contact
- Create a new buddy list
1. Introduction
This chapter will give a quick overview of the different application areas in the net.Desktop application by describing the main panels of the application.1.1 Login window
When the net.Desktop client starts, the first thing you will see is the login screen. Simply enter your login and password and press ENTER. If you wish to auto-login the next time you log in, simply select the 'Auto login' check box.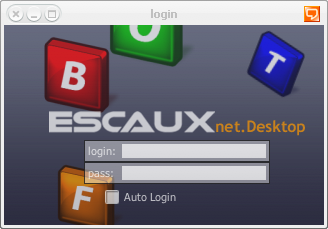
Login screen
1.2 Synchronisation window
After a succesfull login, the net.Desktop client synchronises it's internal database with all different information sources (the local Escaux UCS appliance, Outlook contacts, CRM contacts, ...). The first time the net.Desktop application is used, this can take a while - depending on the amount of information to synchronise. During this synchronisation process a 'spinner' is displayed on the net.Desktop display.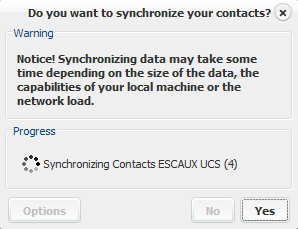
Synchronisation window
- In the Preferences panel, tap DataSources. To open Preferences, tap on the settings icon (
 ) on the main view panel.
- Select the data sources you want to synchronise: Escaux UCS, Outlook, Call History, or Voicemails.
- Choose the synchronisation you want to have at start-up by selecting one of the following from the drop down menu: Yes, Ask, No
- Select Yes to have a synchronisation after start-up.
- Select Ask to have the synchronisation screen and be able to change the synchronisation settings
- Select No if you do not want to synchronise after start-up
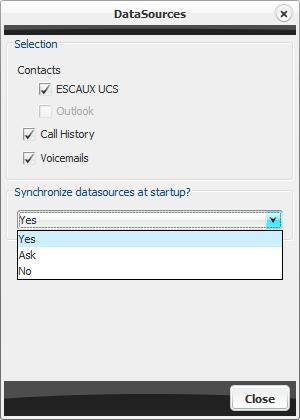
Synchronisation options
1.3 Main window
Finally you will see 2 windows appearing, a larger main window (containing the main application) and a smaller side window (containing speeddials). The first time you might also see the preferences window opening up. You can decide to minimize these windows and reposition them. These settings will then be reused the next time you log into the net.Desktop application.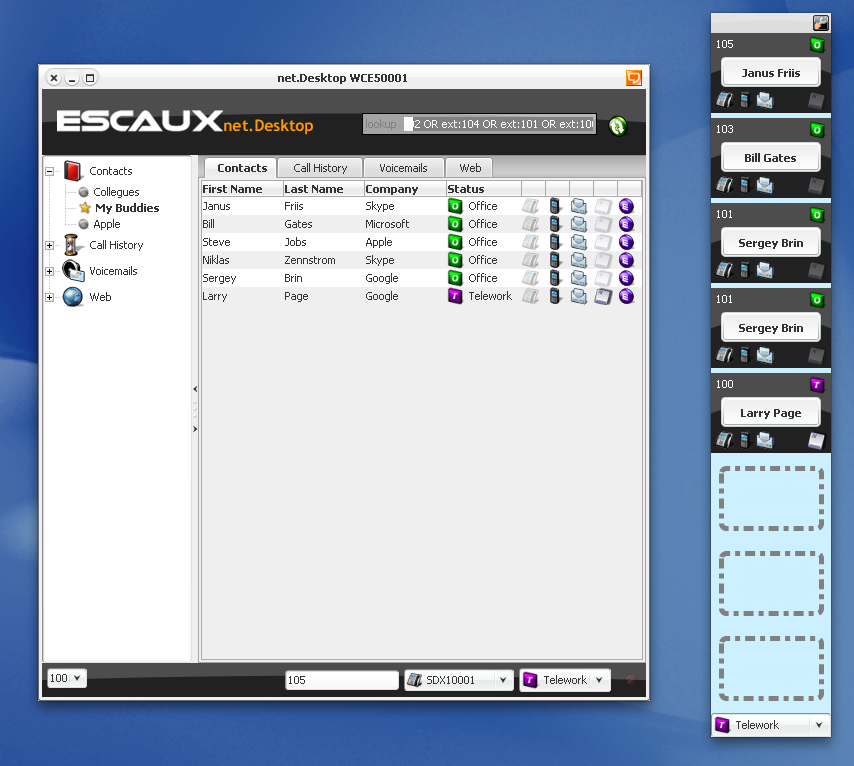
Main window and speeddials window
The tabs area, including the different application tabs
The top area, including the search box
The left area, including the navigation tree

The bottom area, containing the mailbox selector, number field, phone selector and status selector
2. Tabs area
The tabs area is the main area of the net.Desktop application and contains a series of applications, each located on a different tab sheet.2.1 Adapting the tab label style
When right-clicking on a tab you can select between different tab style modes: 'Icons&Text', 'Text Only', 'Icons only'. For the icons you can also choose between small or large icons.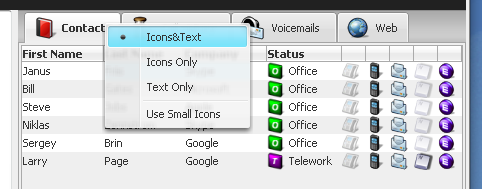
Select tab style

Icons & Text

Icons Only

Text Only

Icons & Text - small icons
2.2 Contacts Tab
This panel groups the core functionality of net.Desktop. It displays the unified directory containing all your contacts. For each of the contacts the following information is displayed:- First name
- Last name
- Department (internal contacts) or Company (external contacts)
- Status (i.e. callflow selected by the user)
- Desk phone icon showing whether the phone is idle, busy or disconnected
- Mobile phone icon
- Email icon
- Keyboard status show if the using is active at his keyboard, away for a short period (Away), away for a longer period (Extended Away) or disconnected
- Information source icon: showing what is the source of information (ESCAUX, Outlook, CRM...)

Contact details
2.2.1 Sorting the contacts
Contacts can be sorted according to any of the header fields by clicking on the column's header.2.2.2 Searching for a particular contact
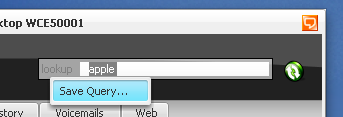
A search can be performed on any field by entering a search string in the search box located in the top area. When a search has been entered in the search box, the result can be saved. To accomplish this, simply right-click on the 'lookup' field and select 'Save Query...'. Your query will be saved and will appear in the left area navigation tree.
The top area, including the search box
2.2.3 Starting a communication with a selected contact
By clicking on the different icons in the net.Desktop Contacts list you can initiate an audio, video or email communication:- Double clicking on the desk phone icon will initiate a phone call from your phone to your contact's phone number. By selecting the correct phone (desk phone, soft phone or mobile phone) in the bottom area you can decide from which of your phones the call should be initiated. Single clicking on the desk phone icon will simply display your contact's phone number in the number box located in the bottom area.
- Double clicking on the mobile phone icon will initiate a phone call from your phone to your contact's mobile phone number. By selecting the correct phone (desk phone, soft phone or mobile phone) in the bottom area you can decide from which of your phones the call should be initiated. Single clicking on the mobile phone icon will simply display your contact's phone number in the number box located in the bottom area.
- Double clicking on the email icon opens your default mail application
- Double clicking the keyboard status icon starts a chat session (X500 version only)
- Double clicking on the information source icon opens the application and displays all your contact's details in the correspondig application (Outlook, CRM, ...)
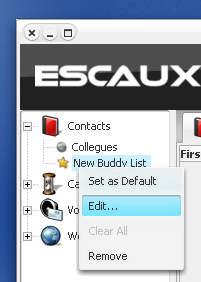
2.2.4 Defining your own buddy list
With net.Desktop it is possible to define your own buddy list. This is a list of people with whom you interact often. In order to add or remove a contact to an earlier defined buddy list, simply right-click on the contact
Add a contact to an existing buddy list
2.2.5 Getting a notification when your contact becomes available
A very useful feature of net.Desktop is the 'availability notification'. This allows you to right-click on a user's keyboard or desk phone in order to receive a notification when the user terminates his current phone call or when keyboard activity is being detected after a period of absense.
Request a notification when the contact comes online
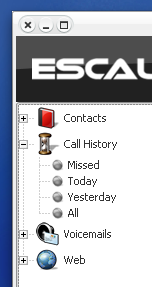
2.3 Call History
The call history pane shows all received, missed and placed phone calls. By clicking on the red, green or blue icon the user can dial the associated number.- Placed call

- Missed call

- Received call

- Call sent to voicemail

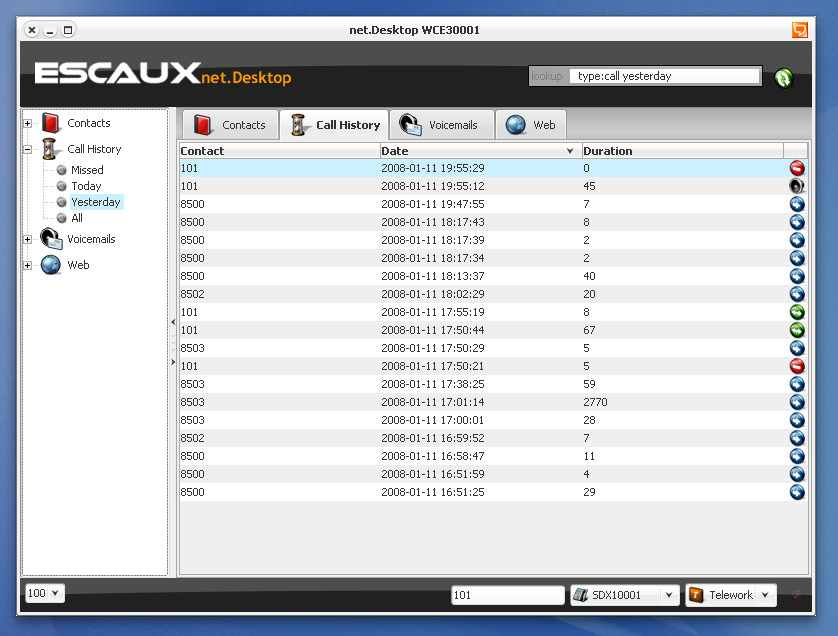
Call History
2.4 Media tab
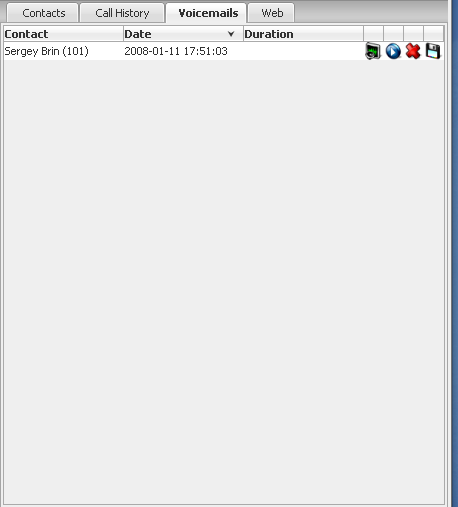
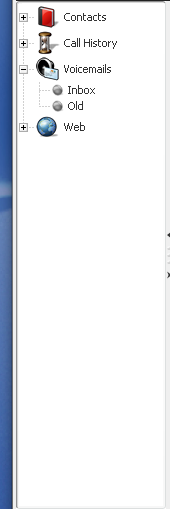
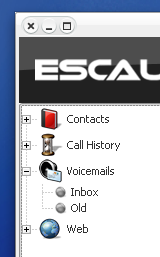
The media tab contains three types of items: voicemails, call recordings and faxes. By default you see all three types in a list. Specify a subtype by clicking on the links in the navigation tree to the left under Media.2.4.1 Voicemails
The voicemail link gives you access to your voicemails box. It allows you to discover your new messages as well as to manage them. The Inbox contains the new voicemails, the old voicemails contains the voicemails you saved previously using the Save button below.- Play voicemail
 . Click on the icon to play the voicemail with the netDesktop internal player or right-click to show a menu to playback the voicemail in the default system player
- Save voicemail
 . Moves the voicemail to the old folder.
- Delete voicemail
 . Deletes the voicemail.
2.4.2 Recordings
Recordings are treated similar to voicemails. You can select the new recordings in the navigation tree on the left. The Inbox contains the recent recordings and the old recording folder contains the voicemails you previously saved using the buttons below.- Play recording . Click on the icon to play the recording with the netDesktop internal player or right-click to show a menu to playback the recording in the default system player
- Save recording . Moves the recording to the old folder.
- Delete recording . Deletes the recording.
2.4.3 Fax
netDesktop can send outgoing faxes for you. To use this feature, first follow the configuration steps below. Note that you need to have a configured FAX Server module on the SOP.2.4.3.1 Installing a PDF printer
This step only applies to Microsoft Windows. For Mac OS X nothing is required. For Linux, install a PDF printer in a similar way.- Download and install PDF Creator from http://sourceforge.net/projects/pdfcreator
- Click Start/Programs/PDF Creator/PDF Creator
- Click Printer/Options/Auto-Save
- Check the box "Use Auto-save" and fill in a folder in the section "Use this directory for auto-save". Make sure the directory exists or create it if it doesn't exist yet.
- In netDesktop, click on the preferences icon and select the Fax tab
- Enter the same directory beneith "Directory to monitor for outgoing faxes".
- Close PDF creator.
- Close and restart Escaux netDesktop
- Test out fax behaviour by printing from any program (e.g. Microsoft Word, Internet Explorer) and select "PDF Creator" as the printer. Make sure to leave "Print to file" unchecked.
2.4.3.2 New fax window
- When a new fax is detected a popup will show to select the recipient. If you don't like to select recipient immediately you can disable the "automatically popup recipient selection on outgoing fax'" in the netDesktop preferences (Fax tab).
- Select a name from the list by clicking on the phone icon next to it, or type a query string to look for a name. You can also manually enter a fax number and click on the phone icon.
- After selecting a recipient, the fax will appear as 'new' in in Media/Fax/Outbox in the navigation tree on the left.
- If you disabled the auto popup, you can select a recipient later from the Fax Outbox by clicking on "Click to specify a recipient..."
- Click on the send icon to send the fax.
- Click on the view icon to open the fax in the default PDF viewer
- Click on the delete icon to delete the fax
2.5 Web
This tab allows you to display any web page. The following functionality is at hand:- Predefined web pages can be added by the system administrator. For example a link to the corporate intranet
- Each user can add personal web pages
- When entering a URL (e.g. http://www.escaux.com) in the search box, the corresponding website will be displayed
- When entering keywords in the search box, a matching Google search will be performed
3. Bottom Area
The bottom area allows you to control the following things:- Select your voicemail box
- Enter any number in the number field
- Select the phone from which you wish to initiate calls
- Change your status
Bottom area
3.1 Voicemail box selector
All your voicemails and audio recordings are stored on the net.ESCAUX appliance (or Escaux UCS) in a special folder. Each extension has its own folder. If you wish to control the voicemail of several extensions, this can be configured by your system administrator. As a result you will see several extensions in the Voicemail box selector.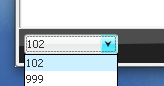
Voicemail box selector
3.2 Number field
The number field allows you to enter just any phone number. An automatic cleaning of the number will be performed. Examples:- National number 02/686.09.09 will be transformed into 0026860909
- National number +32 2.686.09.09 will be transformed into 0026860909
- International number +33 2.565.77.77 will be transformed into 0003325657777
-
 Attention: International number +33 (0)2.565.77.77 will be transformed into 00033025657777. Unfortunately there is a redundant zero between 33 and 25, so you will have to clean this manually
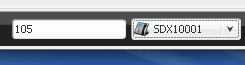
Number field
3.3 Phone selector
The phone selector allows you to select from which phone you wish to initiate the calls. Typically the dropdown list shows your desk phone, soft phone and mobile phone. When initiating a call, the net.ESCAUX system will first of all call your desk phone, soft phone or mobile phone and when you answer, the destination number is dialed.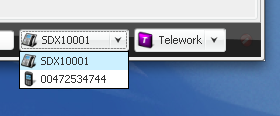
Phone selector
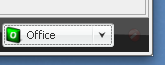
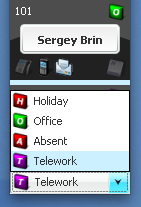
3.4 Status selector
The status panel allows you to control your intentional status. Your intentional status controls when and how people can contact you. This is not to be confused with the informational status. Where your informational status is derived or detected from your actual activity like keyboard presses, mouse movements and active phone calls and others, your intentional status is an active choice that controls what happens when someone tries to reach you by phone.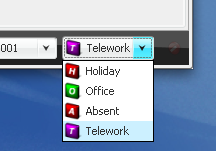
Status selector
3.5 Connectivity indicator
At the bottom right of the main window, you'll find a network indicator. In the event of connectivity loss between the net.Desktop client and the net.ESCAUX appliance (or Escaux UCS) a red icon will display.
Network connectivity OK |
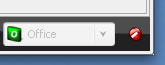
Network connectivity lost |
4. Top area
The top area contains a search box and a refresh button. i- A search can be performed on any field by entering a search string in the search box located in the top area. When a search has been entered in the search box, the result can be saved. To accomplish this, simply right-click on the 'lookup' field and select 'Save Query...'. Your query will be saved and will appear in the left area navigation tree.
The top area, including the search box
- The 'refresh' button is used to refresh the query result. When pressed in combination with the shift key, you can instruct the net.Desktop to re-synchronise the call history and voicemails.
The refresh button
5. Left area
The left area provides the tree structure of the different application windows available in the tabs area. We distinguish the following branches:|
Contacts branch 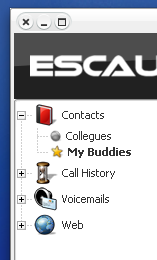
|
Call history branch
|
Voicemails branch
|
Web branch

|
5.1 Contacts branch
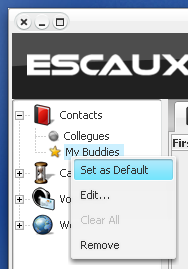
In the contacts branch you can consult, rename or delete your stored contact queries (see also chapter "2.2.2 Searching for a particular contact") but you can also create new buddy lists.5.1.1 Creating a new buddy list
Creating and populating a buddy list goes as follows: Step 1: Create a new buddy list by right-clicking on the 'Contacts' branch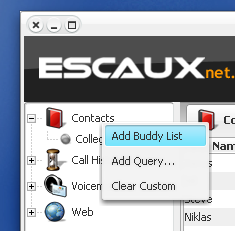
Add a new buddy list
Change buddy list name
- either drag and drop a contact from the Contacts area to the buddy list
- or right-click on a contact from the Contacts area and select the name of the buddy list to which you wish to add the contact
Add a contact to the buddy list
5.1.2 Activation of group pickup on a buddy list
net.Desktop provides you with the possibility to receive a warning when one of your buddy's phone rings. This warning will appear after 10 seconds. Upon receipt of this warning, you can decide to pickup the incoing call on your phone. To activate this functionality, right-click on your buddy list and select 'Group Pickup'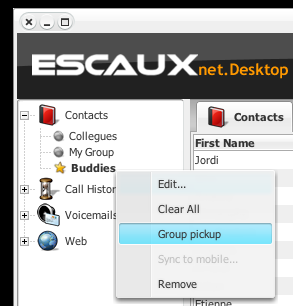
6. Speeddials
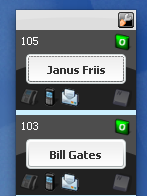
Besides the main window, the net.Desktop also displays a speeddials window. It allows you:- to display up to 8 contacts and can be positioned anywhere on your screen
- you can decide to place the speeddials window always on top
- at the bottom of the speeddials window, you find the status selector which is also available in the main window and the system tray
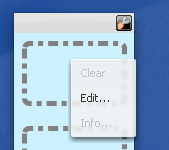
- you can add new contacts by dragging a contact towards the speeddials window
- you can also add a new contact by right-clicking inside a speeddial frame and selecting 'Edit'
Speeddials window
|

Placing the speeddials always on top
|
Change your status
|
Right-click on a speeddial area
|
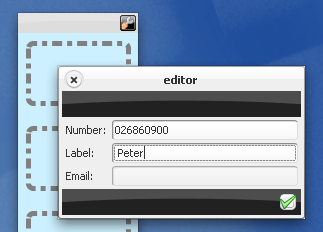
Enter contact details
|
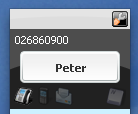
Your self-defined speeddial
|
7. Quick Number
When you press the F12 key, a small window called 'Quick Number' window will pop up. This allows you to enter a number and dial the number by pressing ENTER without having to open the main net.Desktop window.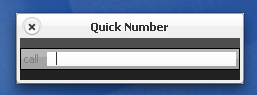
Quick Number window
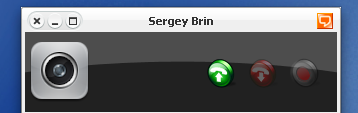
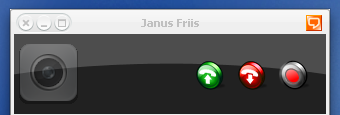
8. Communication window
Each time you initiate or receive a communication session (phone call, video call, instant messaging session, ...) a new window, called a communication window, will be opened. You can also decide to open a communication window outside an existing communication session by double clicking on a contact in the Contacts tab located in the main application window. This window contains several views which are detailed in the following chapters. On the top of the communication window you see 3 call control buttons:-
 a green dial button which allows you to call the primary extension of your contact
-
 a red hangup button, only active during an ongoing conversation, which allows you to terminate the current call
-
 a recording button, only active during an ongoing conversation
Other party supports video
|
Other party does not support video
|
8.1 Contact history
The 'Contact history' view shows you the list of the last 5 phone calls between you and your contact and also the subject of the last 5 emails you received from your contact. This last feature works with Microsoft Outlook and Apple's Mac OSX Mail.
Contact history view
8.2 Contacts
The 'Contacts' view only appears active during a conversation and allows you to display the unified directory. When double-clicking on the phone icon you can perform a blind transfer towards the selected contact.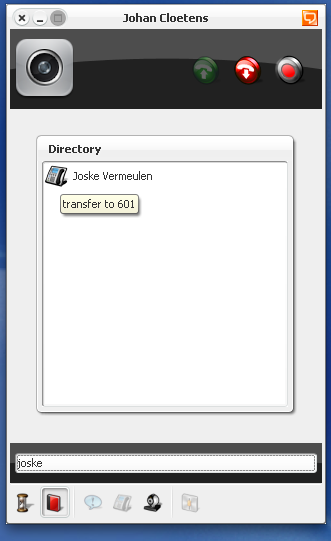
Contacts view
8.3 Chat
Feature only available in X5018.4 Dialpad
Feature only available in X5018.5 Video
In the video view the following actions are available:- initiate a video session by double clicking the local video image
- terminate a video session by double clicking the local video image
- show remote video in full screen by double-clicking the remote video image
Double click the video image to initiate the video session
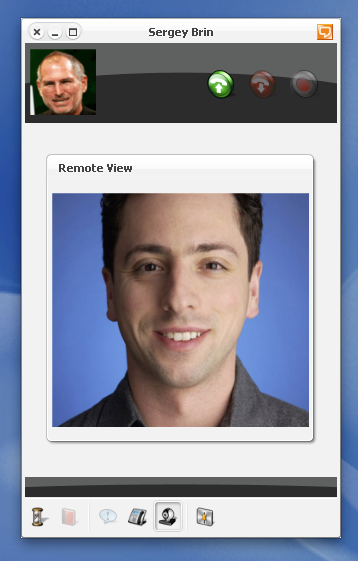
Video view showing local and remote video. Double click on the remote
video to open a full screen view.
8.6 Settings
Feature only available in X5018.7 Attended transfer
The Attended Transfer feature allows the netDesktop user to transfer an active call to another party, optionally consulting the other party first. The consultation allows the netDesktop user to be sure that the other party is available before transferring the call.Step 1: Establish call
- Make a call between a netDesktop user A and another person B
Step 2: Do consultation
- Press blue button (consult) in the top right corner of your communication window
- Person B will be put on hold
Step 3: Search for a contact
- Either enter a number or contact name
Step 4: Select a contact to consult
- Use the arrows to navigate through the entries and press enter to call the selected person its default phone
- Or click on a communication channel of a person
- Person C will be called on the chosen channel
Step 5: Hangup or transfer the call
- The Transfer choice connects (B) with (C)
- The Hangup choice reconnects (A) with (B)
- If (C) does not answer or hangs up then you return to your original conversion
- Person C will see the callerId of person B and callerName 'Attended Transfer from A'
- When Transfer is chosen before person C answers the phone, it will become a blind transfer
Current Limitations
- If the person who initiates the attended transfer hangs up, the person who is put on hold will stay on hold.
- If net.Desktop restarts during a consultation call then the communication window of net.Desktop will not show the consultation call.
- The SIP reinvite procedure cannot be enabled on the net.Desktop phone.
9. System tray
10. Preferences window
The settings of the net.Desktop application can be controlled via the preferences window. The preferences window can be opened either by double clicking in the top area of the main window or by selecting 'Preferences' in the system tray popup window.10.1 General
Definition of the different fields:- Language: select the language of your choice. A restart of the net.Desktop application is needed before the new language takes effect.
- Keyboard presence:
- Away: this timer defines after how much time you will be seen by other user as 'away'. The time is expressed in minutes.
- Extended Away: this timer defines after how much time you will be seen by other user as 'away for a longer time'. The time is expressed in minutes.
- IM: instant messaging server, login and password
- Escaux UCS Prefixes:
- PBX: prefix to reach an outside line
- Country: your country code
- International: prefix to reach an international line
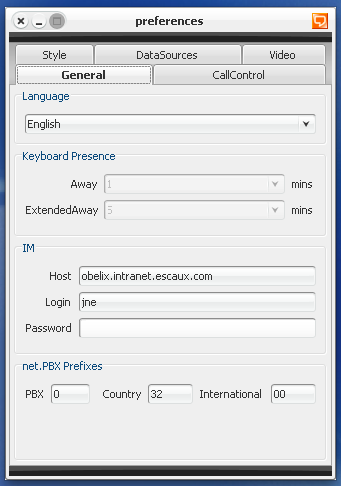
General tab
10.2 Call Control
Definition of the different fields:- Incoming
- Popup net.Desktop contact: open the communication window when receiving a call from an internal contact
- Popup Outlook contact: open the communication window when receiving a call from an Outlook contact
- Show notification: open the communication window when receiving a call from an Outlook contact
- Outgoing
- Popup net.Desktop contact: open the communication window when initiating a call from an internal contact
- Popup Outlook contact: open the communication window when initiating a call from an Outlook contact
- Misc - Close net.Desktop contact
- Manually: close the communication window manually after terminating the call
- When call ends: close the communication window automatically after terminating the call
- After inactivity of: closes the communication window after the selected amount of time
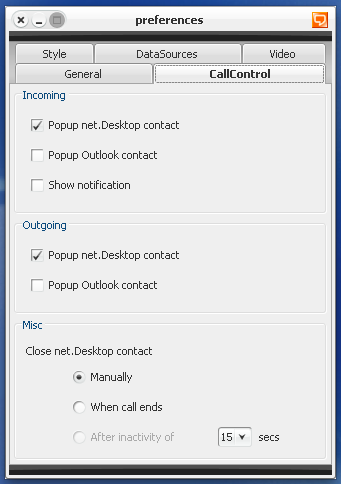
Call Control tab
10.3 Style
Definition of the different fields:- Theme: select the look and feel of your choice
- Colors:
- Global: sets the global header color
- Tables: sets the colors of the lines in the different tables
- Shortcuts:
- Contact Lookup: select the key combination to show or hide the main net.Desktop window
- Speed Dials: select the key combination to show or hide the speeddials window
- Quick Number: select the key combination to show or hide the Quick Number window
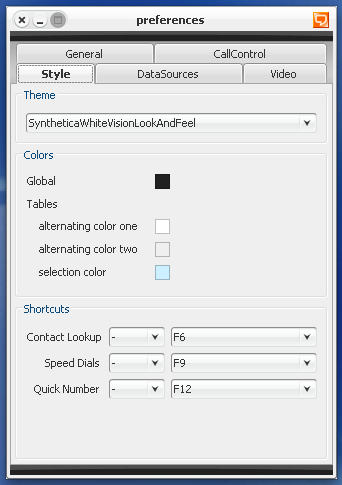
Style tab
10.4 DataSources
Definition of the different fields:- Local
- Outlook: if selected, the unified directory will also show Outlook contacts
- Thunderbird: if selected, the unified directory will also show Thunderbird contacts (unsupported feature)
- Remote
- Escaux UCS: if selected, the unified directory will also show Escaux UCS contacts
- CRM: if selected, the unified directory will also show CRM contacts
- Synchronisation
- Manually: the unfied directory is only synchronised manually via the "Synchronise Now" button
- At Login: the unfied directory is only synchronised at login
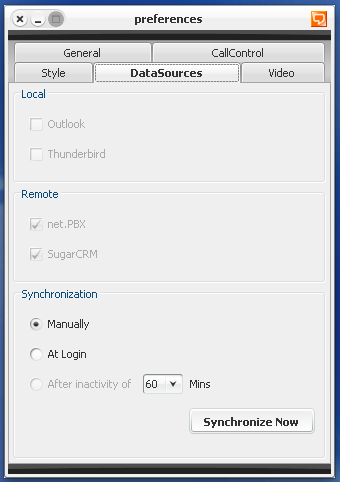
!DataSources tab
10.5 Video
Definition of the different fields:- General
- Codec: select the codec to be used for video encoding
- Prefered Bandwidth: select the default bandwidth when initiating a video communication
- Quality of Service: select the DSCP marking value
- Incoming video acceptance policy: select whether you automatically accept incoming video session requests, only after confirmation or never
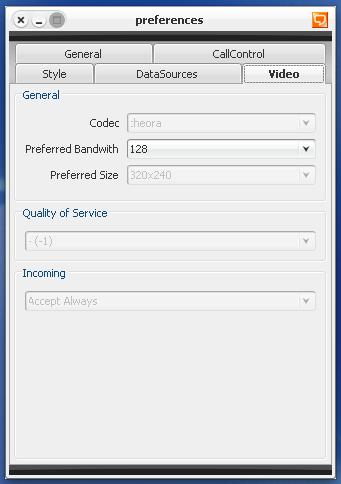
Video tab
11. Troubleshooting
11.1 Firewall
net.Desktop has several local/remote firewall requirements, please have your ICT administrator check the document SubAppNoteNetDesktop_1_5 Copyright © Escaux SA