Administrator Guide: Active-Standby redundancy v.2
Table of contents
Overview
This document describes the feature that is called "High Availability" in technical terms (as there is a module with this name) and "Active-Standby set-up" in our marketing documentation. The Active-Standby architecture is a set-up with two SOPs, first being called haMaster and the other one Clone SOP. One is active and processes the services requested by the users. The other one is ready to start working, but doesn't participate in the processing. It is an exact copy of the haMaster SOP. The configuration of the haMaster server is synced automatically to the Clone SOP at the SMP level.
In the event of a failure of the active, a switch-over procedure can be executed to let the Clone SOP take the role of the active in place of the haMaster, either temporary or permanently.
Note the difference with Active-Active set-ups: in that case, it's also possible to have two SOPs where one processes the services and the other one doesn't immediately participate. The difference is that in an Active-Active set-up, the two SOPs are independent and not clones: each SOP has its own IP address and configuration. In case one SOP goes down, the other one can take over automatically. The set-up described in this section requires a short manual intervention.
Active and standby SOPs
Let's define what are the
role of a SOP in an Active/Standby setup and their possible
states.
Role
A SOP is either an
haMaster or a
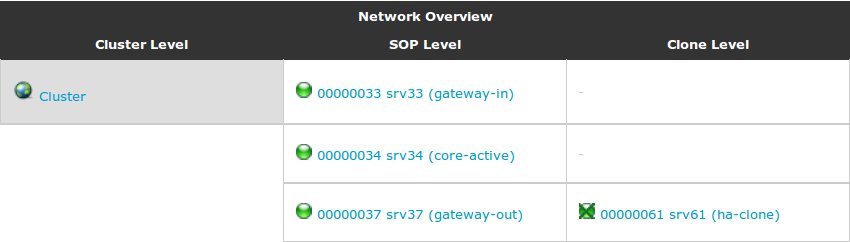
Clone SOP. This is part of the SOP definition and does not change. The haMaster is the main SOP you will configure on the SMP. The Clone SOP is an exact copy of the haMaster SOP. All changes made on the haMaster are pushed on the Clone SOP at the same time. On the SMP, the SOP under the SOP Level column is the
haMaster and the SOP under Clone Level is the
Clone.
In an Active/Standby setup a SOP can have the role of active or standby (backup). By default the haMaster SOP is the active SOP and the Clone SOP is the standby. But the roles can be inverted by a manual operations. You can see the current roles in the SOP Shell and on the SMP (see below).
States
Independently of the Active/Standby setup, every SOP has a connectivity state:
up or
down depending on the status of the connection to the SMP.
In an Active/Standby configuration you also have the High Availability status. A SOP will be either
Active or
Standby.
You have different icons for those states combinations. See the table below.
Role vs State
Roles and states are independent. Which means a
haMaster can perfectly be in
Standby mode in case an outage occured on the
haMaster and the
Clone was put as the
Active SOP.
Technical details
In order to have a redundant solution, you need 2 SOP servers (SOP_1 and SOP_2) and 3 IP addresses (IP_active, IP_standby1, IP_standby2).
- IP_active is the IP address of the active SOP, this can be either SOP_1 or SOP_2
- IP_standby1 is the standby IP address of SOP_1
- IP_standby2 is the standby IP address of SOP_2
When SOP_1 is 'active' and SOP_2 is 'standby', the IP address assigned to the Ethernet interface of SOP_1 is IP_active and the IP address assigned to the Ethernet interface of SOP_2 is IP_standby2.
When SOP_2 is 'active' and SOP_1 is 'standby', the IP address assigned to the Ethernet interface of SOP_2 is IP_active and the IP address assigned to the Ethernet interface of SOP_1 is IP_standby1.
The active SOP is also be reachable by its standby IP address. So, to reach the SOP_1 you can simply always use IP_standby1 and to reach SOP_2 always use IP_standby2.
The synchronization is done from active SOP to standby SOP every 15 seconds.
Profile status, profile parameters and the following directory are synchronized :
- /var/lib/asterisk/astdb
- /var/lib/asterisk/sounds/prompt/
- /var/lib/asterisk/moh/music-on-hold/
- /var/lib/asterisk/sounds/voicemail/
Limitations
- Voicemails are recorded on the Active SOP and are available when it comes back Active. During breakdown, they are recorded on the Secondary/Clone SOP and require manual intervention to be available when the Primary/haMaster SOP comes back Active.
- Recordings triggered in a callflow are stored on the Active SOP and are available when it comes back Active. During breakdown, they are stored on the Secondary/Clone SOP and require manual intervention to be available when the Primary/haMaster SOP comes back active.
- When using the SOP's DHCP server module, the DHCP leases are not synchronized. This might result in a small service interruption of the endpoint when the lease expires and if another IP address is assigned.
- Queued e-mails or faxes are no synchronized.
- When a switchover from the master to the clone is performed, the endpoints will need a bit of time to detect the change. For Polycom phones, this is about 2 minutes. For SNOM phones, this is about 1 minute. This delay is dependent on the network infrastructure and conditions.
- PUM status, profile parameters, audio prompts, voicemails are not synchronized real-time, but on regular intervals. If a switchover is done shortly after a modification and before the synchronization has been performed, this change will not be present on the standby SOP.
- CDR's are not synchronized between active and standby sop (but can be synchronized from both SOPs to SMP)
- When a SOP is disconnected from the SMP (red ball), the HA status cannot be known.
Technical limitation:
- Switching to Active or Standby mode can only be done using the local console or via SSH on the Standby IP address
Requirements
- Two sops, one declared as clone of the other (to be done by ESCAUX)
Service enabling
Modules installation
Follow these steps to configure 2 SOPs as an Active-Standby High Availability pair.
1. On the haMaster, add the
High Availability module in version 2.5.6 or higher. Configure the module as following:
- SOPKEY 1 (default active): enter the SOPKEY (8 digits) of the haMaster.
- Standby IP 1: enter the standby IP of the haMaster.
- SOPKEY 2: enter the SOPKEY (8 digits) of the clone.
- Standby IP 2: enter the standby IP of the clone.
2. On the haMaster,
add the SSH Peer Connectivity module
3. Install all the modules
Post-installation
This procedure is not required if the SOP is running Baseline 2 and High Availability >= 2.6.0

After you have installed an Active-Standby pair you have to switch the Clone SOP Standby to activate the function.
In case a module, which launches unwanted processes on the Standby (like DHCP or Asterisk), is reinstalled, you have to execute the same procedure.
Once you have installed all the modules or in case a module is reinstalled, change the Clone SOP to Standby mode using the SOP Shell:
Baseline 1 and High Availability >= 2.6.0:

Navigate to: System > High Availability > Switch to standby mode
:
You cannot switch directly to standby. Here is the procedure.
%STOPPUBLISH (See M6816)
- Switch the Active SOP (haMaster SOP) to standby (or disconnect the network cable)
- Ping the Active IP to be sure it is not used anymore
- Switch the Clone SOP to active
- Switch the Clone SOP to standby
- Ping the Active IP to be sure it is not used anymore
- Switch the haMaster SOP to active (or plug the network cable)
If you prefer, contact Escaux to switch properly the Clone SOP to Standby.
Service delivery
Switch-over procedure
Suppose SOP_1 is currently active and SOP_2 is standby.
The following steps will switch SOP_1 to standby and make
SOP_2 active.

Reporting Data aren't synchronized by default. Please ask to Escaux to synchronize them if needed.
SOP_1 is still running and his Shell is accessible.
For instance if the database on SOP_1 is broken, SOP_1 is still running and you can access the Shell so you must follow these steps to active SOP_2:
| |
SOP_1 |
SOP_2 |
| Initial Status |
Active |
Standby |
| First step |
Standby |
Standby |
| Second step |
Standby |
Active |
- Switch SOP_1 to standby
- login to the SOP on the console or via ssh using its Standby IP
- The Standby IP can be found on the SMP in the High Availability module configuration screen.
- in the Shell, select "System" > "High Availability" to switch to standby
- It is advisable to reboot (using the SOP-shell) in order to clear all arp cache tables and other potential residual cache.
- Switch SOP_2 to active
- Try to ping the active IP to be sure that it's free before switching SOP_2 to active mode.
- login to the SOP on the console or via ssh using its Standby IP
- in the Shell, select "System" > "High Availability" to switch to active
- This will configure the active ip address, but the standby will also remain. If you access the Shell through ssh, you session should not be cut.
- It will also start a number of processes as required (asterisk, dhcpd, ...)
- It is advisable to reboot (using the SOP-shell) in order to clear all arp cache tables and other potential residual cache.
- Unplug the ISDN cables and analog devices from SOP_1 and plug them into SOP_2.
- Do not forget to adapt subsystems status in SMP. Only for SMP <= 4.8
SOP_1 is completely down.
For instance if a crash disk occur on SOP_1 so you must follow these steps to active SOP_2:
| |
SOP_1 |
SOP_2 |
| Initial Status |
Active |
Standby |
| First step |
Disconnect |
Standby |
| Second step |
Disconnected |
Active |
- Switch SOP_1 to standby
- disconnect the Ethernet cable
- leave it disconnected until you succeeded to switch SOP_1 to standby mode
- Switch SOP_2 to active
- Try to ping the active IP to be sure that it's free before switching SOP_2 to active mode.
- login to the SOP on the console or via ssh using its Standby IP
- in the Shell, select "System" > "High Availability" to switch to active
- This will configure the active ip address, but the standby will also remain. If you access the Shell through ssh, you session should not be cut.
- It will also start a number of processes as required (asterisk, dhcpd, ...)
- It is advisable to reboot (using the SOP-shell) in order to clear all arp cache tables and other potential residual cache.
- Unplug the ISDN cables and analog devices from SOP_1 and plug them into SOP_2.
- Do not forget to adapt subsystems status in SMP. Only for SMP <= 4.8
Switch-back procedure
The following steps will switch SOP_2 to standby and make SOP_1 active:
| |
SOP_1 |
SOP_2 |
| Initial Status |
Down or Standby |
Active |
| First step |
Standby |
Standby |
| Second step |
Active |
Standby |
If SOP_1 was completely down, don't forget to check if her status is standby before replugged the Ethernet cable.
- Switch SOP_2 to standby
- login to the SOP_2 on the console or via ssh using its Standby IP
- The Standby IP can be found on the SMP in the High Availability module configuration screen.
- in the Shell, select "System" > "High Availability" to switch to standby
- It is advisable to reboot (using the SOP-shell) in order to clear all arp cache tables and other potential residual cache.
- Switch SOP_1 to active
- Try to ping the active IP to be sure that it's free before switching SOP_1 to active mode.
- login to the SOP on the console or via ssh using its Standby IP
- in the Shell, select "System" > "High Availability" to switch to active
- This will configure the active ip address, but the standby will also remain. If you access the Shell through ssh, you session should not be cut.
- It will also start a number of processes as required (asterisk, dhcpd, ...)
- It is advisable to reboot (using the SOP-shell) in order to clear all arp cache tables and other potential residual cache.
- Unplug the ISDN cables and analog devices from SOP_2 and plug them into SOP_1.
- Do not forget to adapt subsystems status in SMP. Only for SMP <= 4.8
Hints & Caveats
- To access the Shell, always use the Standby IP address. Besides avoiding confusion, it also makes sure your session is not cut when switching from Active to Standby mode.
- Normally, all configuration changes are performed on both SOPs so that they are always kept up to date. Should however the standby become disconnected for some time during which apply changes and/or install modules is performed, this must be repeated once the standby becomes connected again. If you forget to do this you will need to do it during the switch-over procedure which is not advisable.
- The status (Active or Standby) is stored locally on the SOP. This is the actual operational status. It can be changed directly using the Shell. This status is kept when rebooting the SOP.
- If you switch a SOP to Active, a test is done to see if the Active IP address is not in use (e.g. by the other SOP). If it appears to be in use, the switch will not be performed. Make sure that the other SOP is in Standby mode or is disconnected from the network.
Other resources


