Administrator Guide: Sangoma Card Support v.1
Revision: 11 Apr 2017 - rev 16
Introduction
You'll see here the various Sangoma Card Support module parameters, Shell options made available by the module and configuration procedures in order to install new cards.
Module configuration parameters - Sangoma B700DE, A101, A104, A200, A400
- Card 1: The type of the first card installed on the SOP
- PCI slot: The PCI slot where the card is installed
- PCI bus: The PCI bus where the card is installed
- Card 2: The type of the second card installed on the SOP
- PCI slot: The PCI slot where the card is installed
- PCI bus: The PCI bus where the card is installed
- PRI media: A comma separated list indicating the type of media for each PRI, either 'E1' or 'T1'
- PRI clock: A comma separated list indicating if the source of the clocking for each PRI. Set 'NORMAL' to use the clock received on the trunk (typically a connection with a Telecom Operator) or 'MASTER' if the clock is to be provided on the trunk for the remote side.
- PRI Framing type: A comma separated list indicating the framing type for each PRI. Possible values are CRC4, NCRC4 (both used for E1) and ESF (used for T1).
Locating the PCI bus and slot can be found at

Navigate to: SOP shell > Diagnostic > PCI cards > List all recognized cards
.
In the following example, PCI slot 6 and PCI bus 4 are used:
0000:04:06.0 Network controller: Unknown device 1923:0040
Shell plugin
The Sangoma module installs a Shell plugin.
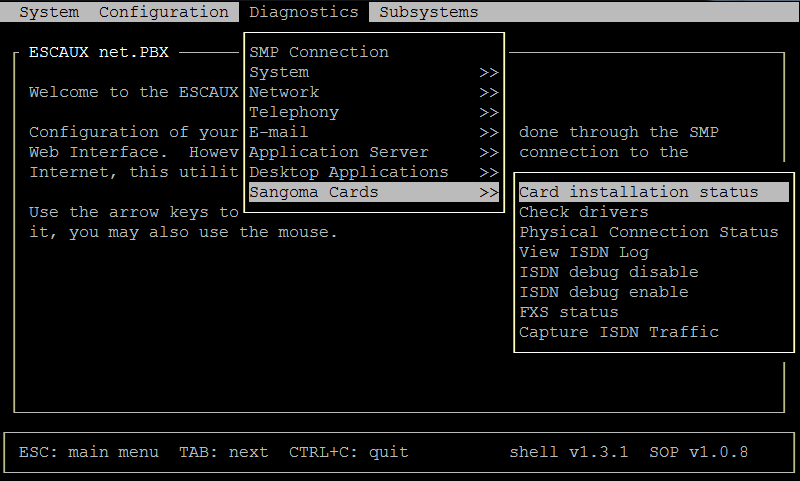
The following menus and options are created :
- Diagnostics Menu
- Sangoma Cards
- Card instalation status
- Check drivers
- Physical Connection Status
- View ISDN Log
- ISDN debug disable - Disables logging on the sangoma cards.
- ISDN debug enable - Enables logging on the sangoma cards.
- FXS status - Allows to check the status of an FXS interface.
- Capture ISDN Traffic - Captures ISDN traffic on the desired interface
- Subsystems menu
- Sangoma
- Restart drivers - restarts asterisk and sangoma drivers.
Hardware combinations for new installations
Please refer to this
document to know which combinations of cards are allowed
Extract of this document:
Card combinations allowed for new install :
Legend:
-
 : Supported
-
 : Not supported
-
 : Work in progress, will be updated soon
-
 : Combination already described in this table, check the diagonal mirror value.
- (6) : Please contact Escaux : This is a non-standard card combination or requires careful dimensioning.
- (7) : These cards can be combined to carry voice, but will in such a setup not carry fax/modem communication reliably. More information can be found here.
See
Cards Hardware Installation for physical installation of the cards.
Configuration procedures
PRI + FXS combination
 Installation steps in a nutshell
- Detect PCI slot and bus used by the Sangoma card
- Add "sangoma card support" 1.xx module, select right sangoma card and fill in slot, bus and PRI params
- Add latest Zaptel-Asterisk-1.2 module and select PRI and FXS interfaces
- Install "Sangoma Card Support" and "Zaptel-Asterisk-1.2" modules
- Restart the server
- Check card ordering in order to configure channels numbers
- Ressource configuration according to the card order
- (if any) Add AnalogInterface (ZDA1) ressource type: IP PHONE for FXS module (missing parts!)
- (if any) Add Zaptel PRI Trunk (previously OutgoingPRItrunk) (ZOA1) ressource type: INTERFACE for PRI module
- Do an "apply changes"
- Restart sangoma driver
STEP 1 "PCI order"
- Configuring the Sangoma card module requires the PCI slot and bus of the installed card:
PCI slot: The PCI slot where the card is installed
PCI bus: The PCI bus where the card is installed
Note: Locating the PCI bus and slot can be found at
Navigate to: SOP shell > Diagnostic > PCI cards > List all recognized cards
.
Attention
Those values are in
hexadecimal format but the module requires you to enter it in a decimal format.
In the following example, PCI slot 6 and PCI bus 4 are used:
0000:04:06.0 Network controller: Unknown device 1923:0040
Following example requires you to convert the hexadecimal value to a decimal value :
11:04.0 Network controller: Sangoma Technologies Corp. A200/Remora FXO/FXS Analog AFT card
- PCI bus: 11 hexadecimal format is 17 in decimal format
- PCI slot: 4 hexecimal format is 4 in decimal format
So in sangoma card module you have to insert PCI bus 17 and slot 4
| Hexadecimal |
Decimal |
| 00 |
0 |
| 01 |
1 |
| 02 |
2 |
| 03 |
3 |
| 04 |
4 |
| 05 |
5 |
| 06 |
6 |
| 07 |
7 |
| 08 |
8 |
| 09 |
9 |
| 0A |
10 |
| 0B |
11 |
| 0C |
12 |
| 0D |
13 |
| 0E |
14 |
| 0F |
15 |
| 10 |
16 |
| 11 |
17 |
| 64 |
100 |
| FF |
255 |
| 100 |
256 |
Repeat the same procedure if you have a second card installed
STEP 2 "Sangoma Card Support"
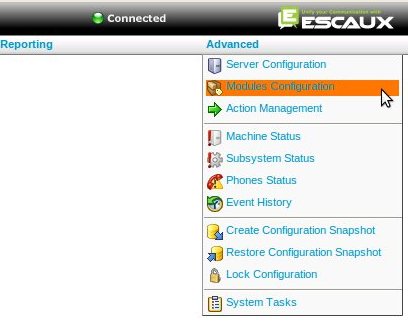
Navigate to: SMP > Advanced > Module Config
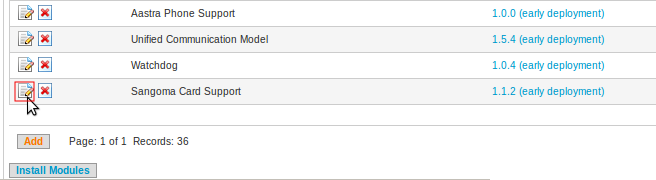
Click on "add" and choose "Sangoma card support":
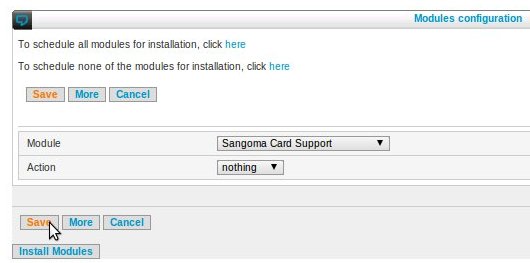
Click on "Save" you will be redirect to the module overview page, first of all click on the version to have the latests stable version. click on the change icon to configure the sangoma card:
First of all you can select the version of the module you want to install. We recommend the latest
1.xx stable version (2.xx is for netborder). But it always useful to check the release notes of the latest early deployment version for important bug fixes. Click on the question mark for the release notes.
Card 1: The type of the first card installed in the SOP => Select
1 PRI (A101) or
4 PRI (A104)
PCI slot: The PCI slot where the card is installed (See STEP 1)
PCI bus: The PCI bus where the card is installed (See STEP 1)
Card 2: The type of the first card installed in the SOP => Select
4 FXS (A200)
PRI media: Depending on the number of PRI ports, a comma separated list of PRI media types. (e.g. 2 cards of 1 PRI in belgium connected to an operator: E1,E1)
PRI Clock: Depending on the number of PRI ports, a comma separated list of PRI clocking types. This can be either NORMAL or MASTER. MASTER should only be used when connecting to another PRI enabled system (like another PBX or a channelbank). NORMAL means we will receive the clock on the PRI, MASTER means we will generate the clock. (e.g. 2 cards of 1 PRI in belgium connected to an operator: NORMAL,NORMAL)
PRI Framing: Depending on the number of PRI ports, a comma separated list of PRI framing types. Possible values: NCRC4, CRC4 or ESF. Most normal connections to a telco in Europe will use NCRC4. Some telco's also use CRC4. To be sure, please check with your telco. In case of a T1 interface, use ESF. (e.g. 2 cards of 1 PRI in belgium connected to an operator: NCRC4,NCRC4)
Sangoma card parameters configuration:
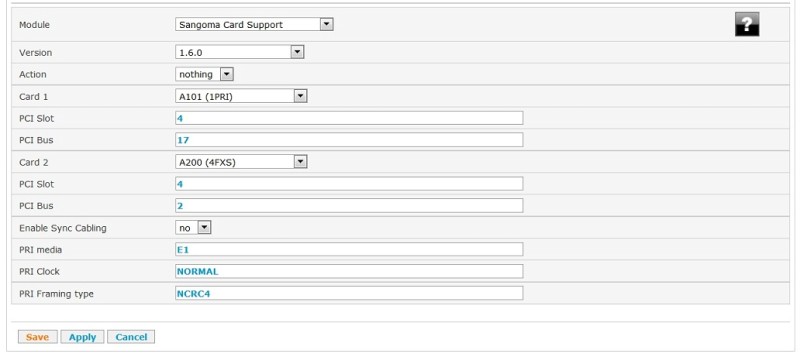
Mark the Sangoma module for installation: click on nothing in the action column to change it to "Install"
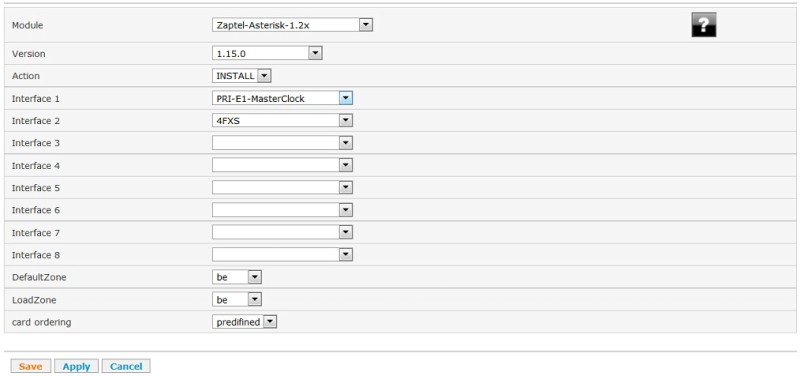
STEP 3 "Zaptel-Asterisk-1.2 Module"
Configure now the zaptel module.
Install the Zaptel module 1.15 or higher. It is best to use the version 1.15 of the Zaptel module since it includes a fixes for the order of the cards.
See the
Zaptel-Asterisk-1.2 module documentation
PRI interfaces have to be set before FXS interfaces (for clocking reason)
- Set as first interface the PRI card (PRI-E1-MasterClock)
- If there are other PRI interface, configure them as PRI-E1-BackupClock
- Set DefaultZone and LoadZone with your country code (eg: be)
- Set Card ordering to Predefined (for Baseline 1, Zaptel-Asterisk-1.2x module version 1.6.0 or higher is required)
After the configuration, also mark the Zaptel module for installation.
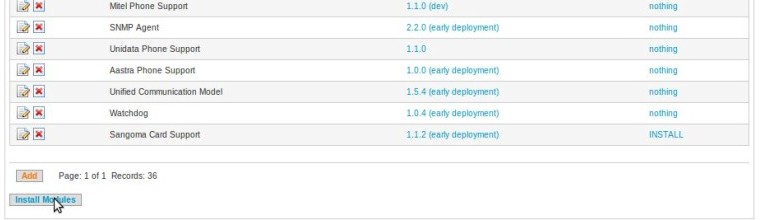
STEP 4 "Install module"
After the configuration of the
Zaptel-Asterisk-1.2x and the
Sangoma Card Support module click on
install modules.
STEP 5 "Reboot server"
Restart the server in order to let Zaptel and Sangoma drivers detect the cards
Navigate to: Shell > System > Reboot
STEP 6 "Check card ordering"
Check card ordering in order to configure channels numbers
Navigate to: Shell > Diagnostics > Telephony > Zaptel hardware detection
If you only have Sangoma cards you can use the Sangoma Hardware detection tool.
Navigate to: Shell > Diagnostics > Sangoma Cards > Card installation status
Example output if you have a PRI card + 4FXS card:
-----------------------------------------
| Wanpipe Hardware Probe Info (verbose) |
-----------------------------------------
1 . AFT-A101-SH : SLOT=4 : BUS=5 : IRQ=11 : CPU=A : PORT=1 : HWEC=32 : V=39
+01:DS26521: PCIe: PLX2
2 . AFT-A200-SH : SLOT=4 : BUS=8 : IRQ=11 : CPU=A : PORT=PRI : HWEC=32 : V=13
+01:FXS: PCIe: PLX2
+02:FXS: PCIe: PLX2
+03:FXS: PCIe: PLX2
+04:FXS: PCIe: PLX2
+05:EMPTY
+06:EMPTY
+07:EMPTY
+08:EMPTY
+09:EMPTY
+10:EMPTY
+11:EMPTY
+12:EMPTY
+13:EMPTY
+14:EMPTY
+15:EMPTY
+16:EMPTY
+17:EMPTY
+18:EMPTY
+19:EMPTY
+20:EMPTY
+21:EMPTY
+22:EMPTY
+23:EMPTY
+24:EMPTY

Sangoma Card Count: A101-2=1 A200=1
First card detected is the A101 = 1PRI card.
According to the list order, the first channel number will be associated to an FXS ressource or PRI ressource (Normaly the PRI cards will be listed in first position).
STEP 7 "Resource configuration"
Resource configuration PRI
Create 1 interface type ZOA (Zaptel PRI Trunk) for each PRI module/card
Navigate to: Resources > interfaces > New > Zaptel PRI Trunk
The field "First channel ID" is very important and should be filled in following examples in this table:
Sangoma BRI-FXS / FXS
| Physical card |
Usable Zaptel channels |
Zaptel interface name |
Zaptel channels consumed |
| Sangoma 2BRI-2FXS (B700DE) |
2 |
S-2FXS |
24 |
| Sangoma 4BRI-2FXS (B700DE) |
2 |
S-2FXS |
24 |
| Sangoma 4FXS (A200) |
4 |
S-4FXS |
24 |
| Sangoma 8FXS |
8 |
S-8FXS |
24 |
| Sangoma 24FXS |
4 |
S-24FXS |
24 |
Remarks:
- The Zaptel-Asterisk-1.2x module is only used for Sangoma cards configured using Sangoma 1.x module (not Sangoma 2)
- BRI's channels are not Zaptel channels
PRI / Channel bank
| Physical card |
Mode |
Zaptel interface name |
Zaptel channels consumed |
| Digium 1TEx / Sangoma A10x |
E1 Master clock |
PRI-E1-MasterClock |
31 |
| Digium 1TEx / Sangoma A10x |
T1 Master clock |
PRI-T1-MasterClock |
24 |
| Digium 1TEx / Sangoma A10x |
E1 Backup clock |
PRI-E1-BackupClock |
31 |
| Digium 1TEx / Sangoma A10x |
T1 Backup clock |
PRI-T1-BackupClock |
24 |
| Digium 1TEx |
Channel bank |
24FXS |
24 |
Remarks:
- For Digium 1TE2x and 1TE4x cards, configure several E1 or T1 interfaces, only first one as Master clock.
- The Zaptel-Asterisk-1.2x module is used only for Sangoma cards configured using Sangoma 1 (not Sangoma 2)
Zaptel FXS
See below a correspondence table between Digium FXS hardware and Zaptel configuration.
| Physical card |
Usable FXS channels |
Zaptel interface name |
Zaptel channels consumed |
| Digium 2FXS PCI |
2 |
4FXS |
4 |
| Digium 4FXS PCI |
4 |
4FXS |
4 |
| Digium 4FXO PCI |
4 |
4FXO |
4 |
| Digium 4FXS PCI-E 4 ports |
4 |
4FXS |
4 |
| Digium 4FXS PCI-E 8 ports (1 module) |
4 |
8FXS |
8 |
| Digium 8FXS PCI-E 8 ports (2 modules) |
8 |
8FXS |
8 |
Resource configuration FXS
Create 1 ressource type ZDA1 (AnalogInterface) for each FXS port you have.
Navigate to: Resources > IP Phone > New > AnalogInterface
For configuration parameters see the
Analog Interfaces documentation
The only required option is the channel number. Like with PRI config, consider the card order and other zaptel channels in order to configure the ZDA's:
- If the FXS card is at first position, increment the channel ID of all ZDA interface starting with "1"
- If the FXS card is at second position after a PRI card, increment the channel ID of all ZDA interface starting with "32"
STEP 8 "Apply change"
Navigate to: Apply Changes > Apply SOP Changes
STEP 9 "Restart Sangoma Driver"
Restart Sangoma drivers via the shell in order to finalize the installation. (Asterisk will restart)
Navigate to: Shell > Subsystems > Sangoma > Restart drivers
BRI + FXS card (B700DE)
Installation steps in a nutshell
- Detect PCI slot and bus used by the Sangoma card
- Add "sangoma card support" 1.xx module, select right sangoma card and fill in slot and bus.
- Add latest Zaptel-Asterisk-1.2 module and select FXS interfaces
- Install "Sangoma Card Support" and "Zaptel-Asterisk-1.2" modules
- Restart the server
- Ressource configuration according to the card order
- Add AnalogInterface (ZDA1) ressource type: IP PHONE for FXS module
- Add WoomeraTrunk interfaces (WOA1) ressource type: INTERFACE for BRI interfaces
- Do an "apply changes"
- Restart sangoma driver
STEP 1 "PCI order"
Repeat the STEP 1 of the PRI+FXS installation
STEP 2 "Sangoma Card Support"
Navigate to: SMP > Advanced > Module Config
Click on "add" and choose "Sangoma card support":
Click on "Save" you will be redirect to the module overview page, first of all click on the version to have the latests stable version. click on the change icon to configure the Sangoma card:
First of all you can select the version of the module you want to install. We recommend the latest
1.xx stable version (2.xx is for netborder). But it always useful to check the release notes of the latest early deployment version for important bug fixes. Click on the question mark for the release notes.
Card 1: The type of the first card installed in the SOP => Select
B710100D (2BA + 2FXS) or
B720100D (4BA + 2FXS)
PCI slot: The PCI slot where the card is installed (See STEP 1)
PCI bus: The PCI bus where the card is installed (See STEP 1)
Sangoma card parameters configuration
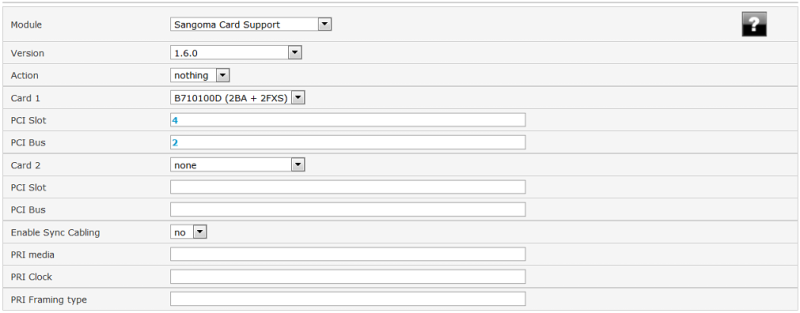
Mark the Sangoma module for installation: click on nothing in the action column to change it to "Install"
STEP 3 "Zaptel-Asterisk-1.2 Module"
Configure now the zaptel module.
Install the Zaptel module 1.15 or higher. It is best to use the version 1.15 of the Zaptel module since it includes a fixes for the order of the cards.
See the
Zaptel-Asterisk-1.2 module documentation
- Set as first interface S-2FXS or S-4FXS

- Set DefaultZone and LoadZone with your country code (eg: be)
- Set Card ordering to Predefined (for Baseline 1, Zaptel-Asterisk-1.2x module version 1.6.0 or higher is required)
After the configuration, also mark the Zaptel module for installation.
STEP 4 "install module"
After the configuration of the
Zaptel-Asterisk-1.2x and the
Sangoma Card Support module click on
install modules.
STEP 5 "reboot server"
Restart the server in order to let Zaptel and Sangoma drivers detect the cards
Navigate to: Shell > System > Reboot
STEP 6 "Resource configuration"
Resource configuration FXS
Create 1 ressource type ZDA1 (AnalogInterface) for each FXS port you have.
Navigate to: Resources > IP Phone > New > AnalogInterface
For configuration parameters, see the
Analog interfaces documentation
Note that if you are using two B700 card (BRI+FXS), the first card takes always 24 channels. See following table for zaptel channels consumptions examples:
Sangoma BRI-FXS / FXS
| Physical card |
Usable Zaptel channels |
Zaptel interface name |
Zaptel channels consumed |
| Sangoma 2BRI-2FXS (B700DE) |
2 |
S-2FXS |
24 |
| Sangoma 4BRI-2FXS (B700DE) |
2 |
S-2FXS |
24 |
| Sangoma 4FXS (A200) |
4 |
S-4FXS |
24 |
| Sangoma 8FXS |
8 |
S-8FXS |
24 |
| Sangoma 24FXS |
4 |
S-24FXS |
24 |
Remarks:
- The Zaptel-Asterisk-1.2x module is only used for Sangoma cards configured using Sangoma 1.x module (not Sangoma 2)
- BRI's channels are not Zaptel channels
PRI / Channel bank
| Physical card |
Mode |
Zaptel interface name |
Zaptel channels consumed |
| Digium 1TEx / Sangoma A10x |
E1 Master clock |
PRI-E1-MasterClock |
31 |
| Digium 1TEx / Sangoma A10x |
T1 Master clock |
PRI-T1-MasterClock |
24 |
| Digium 1TEx / Sangoma A10x |
E1 Backup clock |
PRI-E1-BackupClock |
31 |
| Digium 1TEx / Sangoma A10x |
T1 Backup clock |
PRI-T1-BackupClock |
24 |
| Digium 1TEx |
Channel bank |
24FXS |
24 |
Remarks:
- For Digium 1TE2x and 1TE4x cards, configure several E1 or T1 interfaces, only first one as Master clock.
- The Zaptel-Asterisk-1.2x module is used only for Sangoma cards configured using Sangoma 1 (not Sangoma 2)
Zaptel FXS
See below a correspondence table between Digium FXS hardware and Zaptel configuration.
| Physical card |
Usable FXS channels |
Zaptel interface name |
Zaptel channels consumed |
| Digium 2FXS PCI |
2 |
4FXS |
4 |
| Digium 4FXS PCI |
4 |
4FXS |
4 |
| Digium 4FXO PCI |
4 |
4FXO |
4 |
| Digium 4FXS PCI-E 4 ports |
4 |
4FXS |
4 |
| Digium 4FXS PCI-E 8 ports (1 module) |
4 |
8FXS |
8 |
| Digium 8FXS PCI-E 8 ports (2 modules) |
8 |
8FXS |
8 |
Resource configuration BRI
On the SMP go to "Resources" > "interfaces" and select a woomera trunk for each BRI
(2 woomera trunks for 2 BRI , 4 woomera trunks for 4 BRI)
Note: Be sure you have the latest version of the resource. Check the
WoomeraTrunk release notes
SMP - Resources - Woomera:
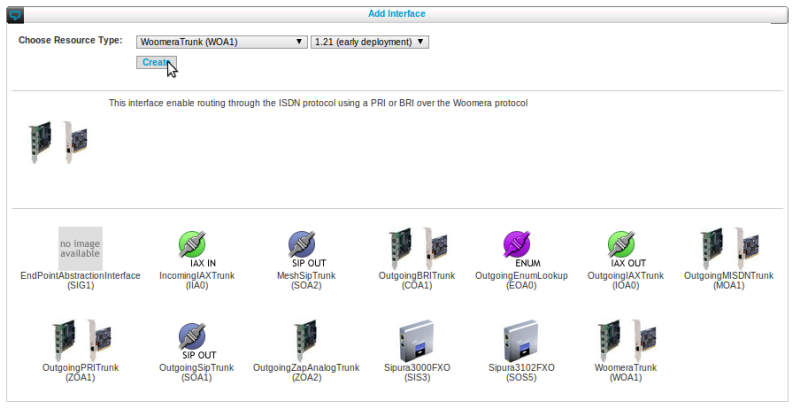
- Those are 2 important parameters :
- Group: Set it to the BRI id you want to configure
- Span: Set it to the BRI id you want to configure.
- The group and the span should be the same.
- Group and span are not to be confused with zaptel channels. Woomera trunks does not use zaptel channels.
SMP-Woomera-config:

STEP 7 "Apply changes"
Navigate to: Apply Changes > Apply SOP Changes
STEP 8 "restart sangoma drivers"
Restart Sangoma drivers via the shell in order to finalize the installation. (Asterisk will restart)
Navigate to: Shell > Subsystems > Sangoma > Restart drivers
PRI card alone
Configuration
The implementation is similar as for PRI + FXS combinaison with folowing differences:
- No need to create ZDA1 interface as there is no FXS ports
- No need to check order of cards as if there are multiple PRI cards, there are all the same type.
- No need to complete "first channel" number for interface Zaptel PRI Trunk (even if there are multiple PRI interfaces)
Other resources