Fusion 3.0 Migration procedure
Introduction
The UC Template is a modular solution for IP-telephony and Unified Communications. The solution is based on
open standards and is very efficient from an operational point of view.
The UC Template is software delivered as a service (SaaS). Updates and a water-proof disaster recovery pack
(automated and guaranteed back-up, documentation, redundancy) are included. The solution is most
scalable and allows you to effectively respond to the changing communication needs of your
organisation.
The UC Template is a rich IP-PABX solution, designed to maximize the self-management by IT administrators
and end-users.
This guide will help you to go through the configuration of your UC Template solution.
Intended audience
This guide is intended for certified engineers only.
Disclaimer
This document is confidential. It is provided for informational purposes only and is not
guaranteed to be without errors. Some of the functionalities described may be specific to a
device, to an application or to a network. Some features may only be available as optional
functionality. Escaux has a policy of continuous improvement and therefore reserves the right
to modify this document without prior notice.
Goal of this document
The goal of this document is to describe how a migration can be performed from UC version 2 to Fusion 3.0, especially for Belgacom,
without requiring to execute manual actions in the release notes.
Upgrade procedure
Upgrades currently require an intervention of the Escaux support department and can be requested via mail. An upgrade to version 3 is only possible from version 2.1.2. In case an inferior version is used, an upgrade towards version 2.1.2 should be performed first.
The upgrade will be done in
2 steps:
-
 a preparation phase (pre-upgrade) to make sure the configuration can be upgraded
- the actual upgrade
Pre-upgrade (important)
- make sure the hardware can support version 3 (supported hardware)
- make sure you have at least version 4.9 of the SMP web interface.
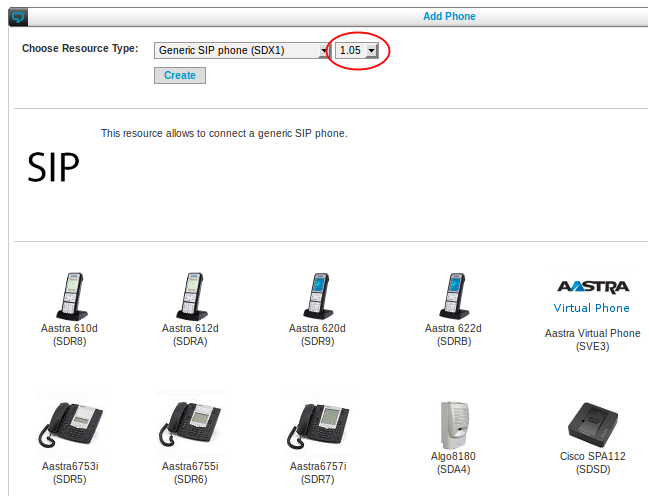
- request a "dry run" upgrade: the support team will do a test-upgrade (no impact on the SOP) and check if the configuration is compliant (some old phones or modules might not be compatible with version 3). Afterwards, the previous configuration will be put back (ESCAUX ONLY)
Here is an example of incompatible resource that could be found, because the version does not match the Fusion 3 one.
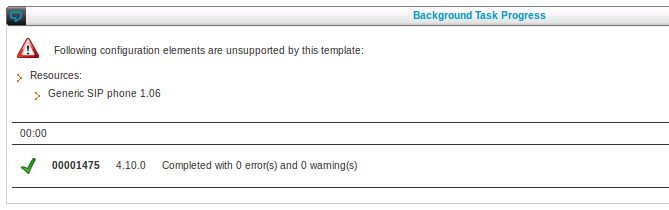
In order to know which version of modules or resources are allowed, you can use the Add button for new resource or module (without actually creating), the right version will be presented.
Upgrade on the SMP
- Make a snapshot of the configuration
- Request the actual upgrade on the SMP. The configuration on the SMP will be updated (ESCAUX ONLY)
Manual actions before upgrading the SOP
1. Kernel & Goto.APPLICATION
- The Kernel module needs to be removed using the Modules configuration page on the SMP
- In case UC 2.2 was installed, the kernel needs to be downgraded on the SOP to support the Sangoma and Dahdi modules which are used in Fusion 3.0 (ESCAUX ONLY)
- In case Goto.APPLICATION v1.4 was added in the Routes or Extra-Cluster routing, it should be downgraded to version 1.3
2. If a PRI or BRI-FXS card is used in combination with a 4FXS card, a sync cable is now required
Sangoma drivers in Fusion 3 require a clock sync cable between FXS cards and other Sangoma cards for the driver to start.
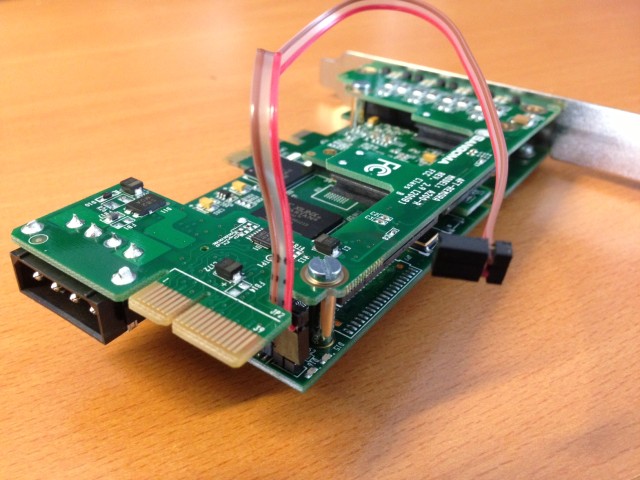 Connect the sync cable on both cards
 with the red cable on the opposite side of the slot
3. Remove Digium cards from the servers
Digium cards (ex: Digium 8FXS) need to be removed physically from the server. Keeping these cards in the server will cause audio issues.
The way to configure Sangoma cards in Fusion 3 is different than Fusion 2. The configuration is now to be done using Sangoma resources, not in the Sangoma module.

Navigate to: Resources > Interfaces
All external trunks should be in the context FromOutside. This will ensure proper pre-processing of all incoming calls.
For each SOP which contains 1 or multiple
PRI connection, one Sangoma PRI resource (SOV2) should be configured with the following settings:
- Interface: All PRIs or PRI X (only for multi route)
- Restriction Group: FromOutside
- Enable T.38: no
- The other parameters depend on the operator.
For each SOP which contains 1 or multiple
BRI connection, one Sangoma BRI resource (SOV1) should be configured with the following settings:
- Incoming interfaces: All BRIs or BRI X (only for multi route)
- Restriction Group: FromOutside
- Enable T.38: no
- The other parameters depend on the operator.
SIP Trunks should be configured using those mandatory parameters:
- Restriction group: FromOutside
- Allow T.38: yes
Configure the SIP Trunks to use the P-Asserted-ID header as
Send Caller ID method if this is required by the operator (not applicable for Belgacom IMS)
For Belgacom IMS:
- Send Caller ID method: Default (Keep default settings defined in the server)
- User equals phone: yes
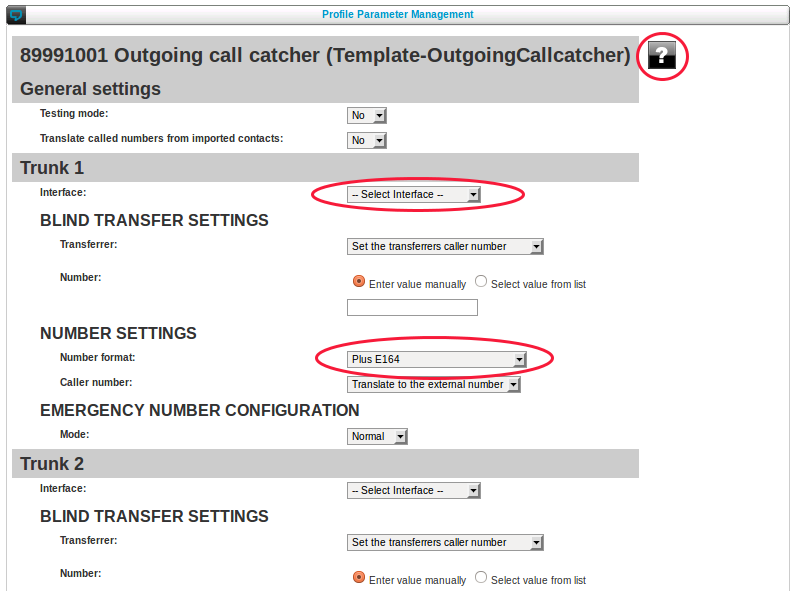
6. Replace Goto.INTERFACE configuration by CallSplitter & OutgoingCallCatcher in the Internal Directory
The outgoing trunks configuration is now to be made in the Internal Directory. The trunk can be configured in the OutgoingCallCatcher directly.
Note that a new Profile/callflow will be executed before the OutgoingCallCatcher: the CallSplitter. This one provides the "Multi-route" feature support and allows to define a different OutgoingCallCatcher for the FMU trunks.
Standalone SOPs
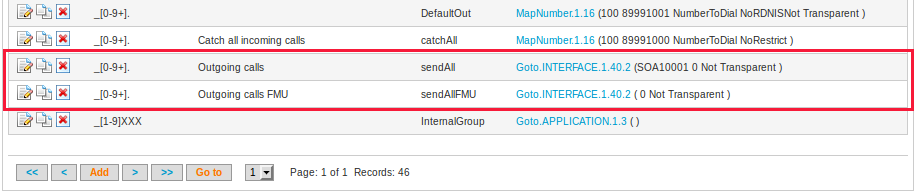
In the call routing of every SOP (Routes or Extra-Cluster routing) , 2 'Goto.Interface' routes exist. Those are kept only so that you can copy the info to the OutgoingCallCatcher where you now have to fill-in the interface.
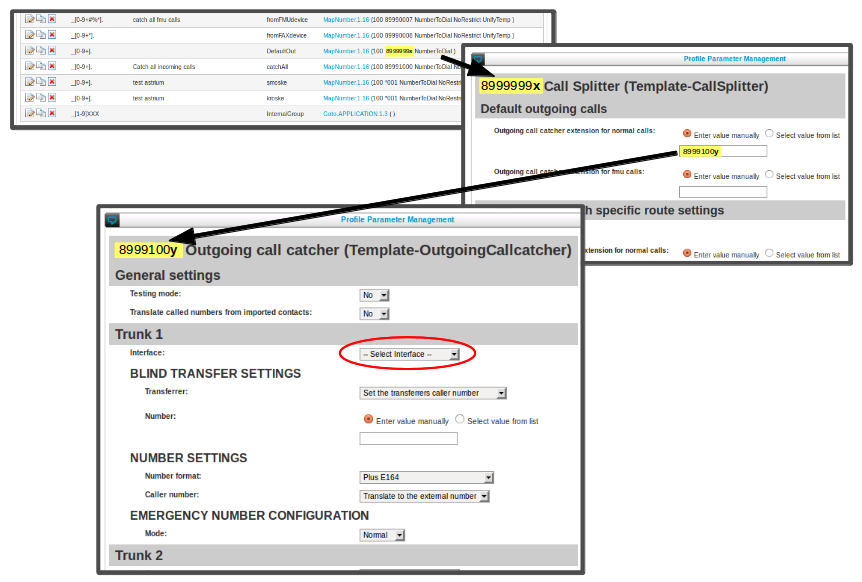
In case FMU is applicable, a different OutgoingCallCatcher should be created for FMU and should be mentioned in the CallSplitter:
- Look for the OutgoingCallCatcher profile (default one has extension 89991001)
- Duplicate it to another extension in the reserved range (89991002 for example)
- Update the profile parameter of the new OutgoingCallCatcher to use the right FMU trunks and configuration
- Update the profile parameter of the CallSplitter (default one has extension 8999999)
- An OutgoingCallCatcher should be already configured for "normal calls", configure the new one for "FMU calls"
Have a look at the online profile documentation (question mark button) for help on the parameters that need to be configured.
When done,
delete the 2 routes.
Cluster
In case of cluster, there are additional steps:
- you have to configure a different CallSplitter and OutgoingCallCatcher(s) per-SOP, therefore create additional CallSplitter and OutgoingCallCatcher extensions
- in the OutgoingCallCatchers mention (an) outgoing trunk(s) or MeshSipTrunk(s) to the gateway SOP(s)
- reference the CallSplitters in the Extra-Cluster routing of each SOP for the DefaultOut route.
- in the CallSplitter extensions, mention the new OutgoingCallCatcher extensions in the "Outgoing call catcher extension for normal calls" parameter
Finally:
- remove the 2 routes in "Extra-Cluster routing" for each SOP Key. This is to be done also on cluster level. Therefore, change the SOP Key in the URL like this:
https://smp.stable-4.smp020.escaux.com/smp/<cluster_sopkey>/outgoing_profile_admin.php
7. fromFAXdevice Route Group for route _[0-9+*]. which maps to 89990008
A route _[0-9+*]. which maps to extension 89990008 exists in the routing table (Routes or Extra-Cluster routing) of every SOP. Make sure the "Route group" is set to "fromFAXdevice".
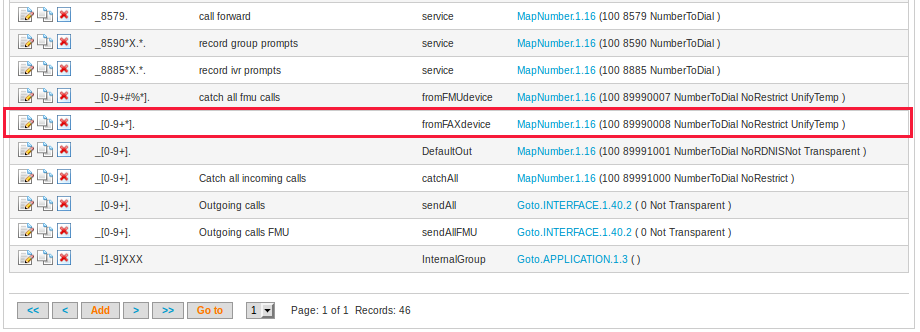
This might not be the case in cluster environments where custom routes or restriction groups have been created.
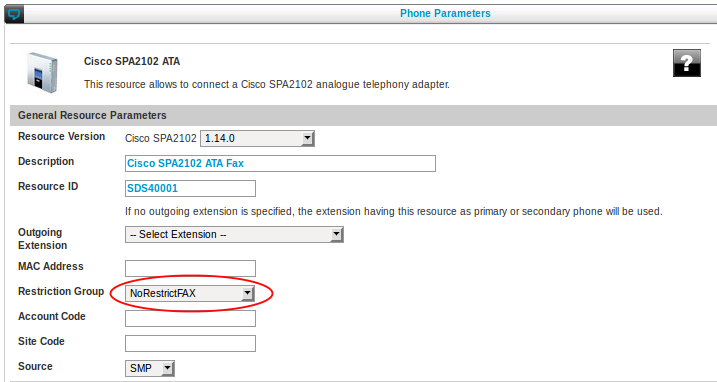
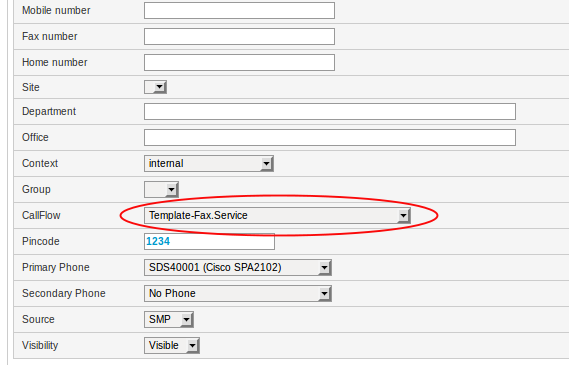
8. FAX devices
- Be sure to configure ATA boxes on the SOP that receives the fax initially
- Be sure to configure a FAX restriction group (ex: RestrictNatFAX) for ATA and FXS resources used to connect fax devices
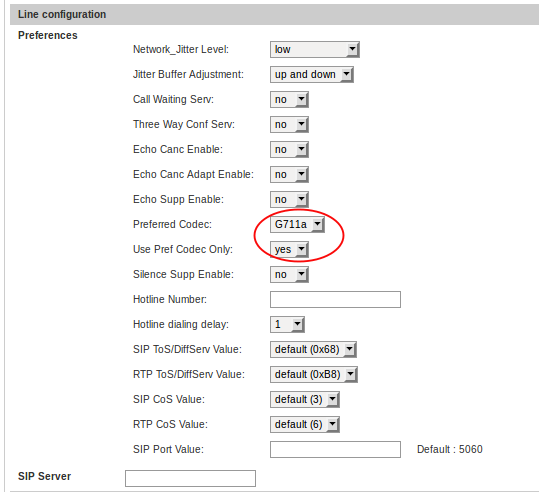
- Check codec configuration for ATA boxes to use G711a only
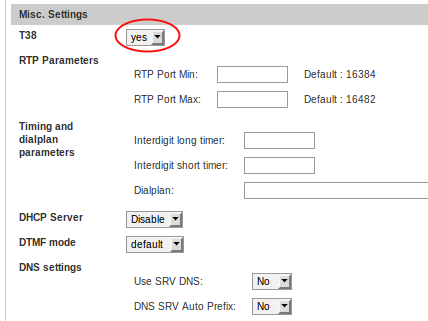
- Enable T.38 for ATA boxes
- Extensions to which the ATA device or FXS interface will be assigned should be configured with a Template-Fax.Service Callflow in the Internal Directory
9. The external number should be filled in for all extensions.
Fusion 3 requires an external number to be filled in for
all extensions in the Outgoing Number Mapping.
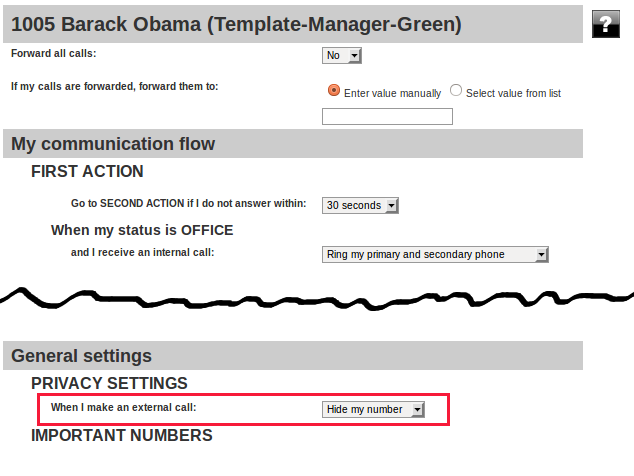
CLIR is still possible but should be set in the profile parameters of the user. This will make sure that the users number is still sent to the operator to ensure proper billing and reporting on operator side, but that the operator hides it.
10. Belgacom IMS with remote sites: external number format required for the main number
In case of Belgacom IMS with remote sites, the "User attribute 2" of the
Site definition was configured to be the
internal number of the main number of the site for each zip code. This
should now be the external number, in the format that is understood by the operator.
On the Cluster SOP Key:
Navigate to: Advanced > Site Configuration
For every remote site:
- User Attribute 1 should contain the ZIP code of the remote site
- User Attribute 2 should contain the EVN (emergency virtual number) of the remote site in E.164 number format
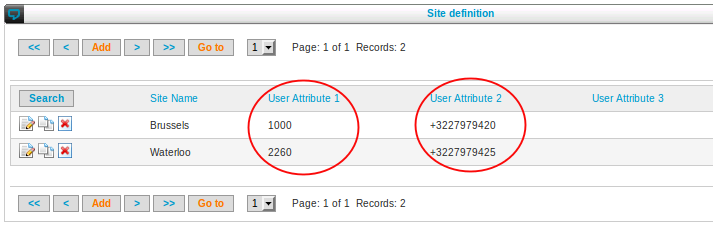
You can edit the different records to make the required change to User attribute 2.
In the (multiple) Outgoing Call Catchers, check in the profile parameters that
- Emergency Number Configuration mode is set to Prefixed for every IMS trunk

11. Enable DHCP again in the DHCP Server module
The DHCP module is now always installed as the DHCP service can be disabled in the module configuration. It is disabled by default.
If a DHCP server was used, make sure to
re-activate it again by setting "deactive DHCP server" to "no".

12. Adapt LDAP Synchronization to the new profile names
In case LDAP synchronization is used, and one of the included profiles is used as default profile, the module should be adapted to use the new name of the default profiles (ex: Template-User-Green.Office instead of Unify-User-Green.Office)
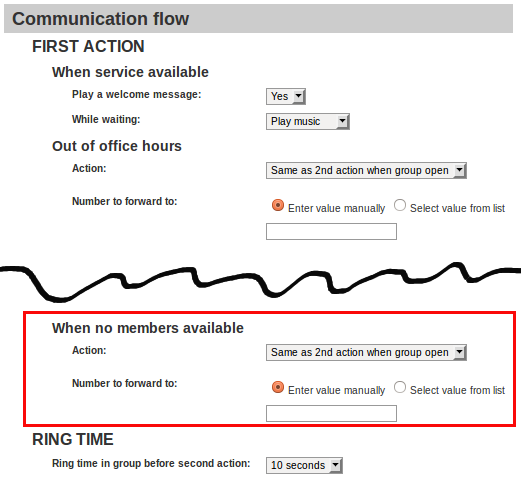
For every call queuer, configure what needs to be done in case of "No Member available" (all members logged out or all logged in users have their phone disconnected). Pressing submit is necessary, even if the action is already configured correctly.
14. Upgrade actions in custom callflows
In case of custom callflows, make sure to upgrade the used actions to be compatible with Communication Server 2
See the
Communication Server 2 Administrator Guide for the minimal versions of actions and action compatibility.
Tip: you can use the task
MigrateActionsToCommunicationServer to upgrade the action, routing and application selector configuration for compatibility with the Communication Server module.
15. Changes for FMU on the NAG side (Belgacom FMU team)
FMU devices should use SDF resources on the SOP instead of SDX-resources to avoid local call rerouting for unlogged FMU MTC users. Because the resource identifier is used as
Remote peer on the NAG, it should be changed there also. It is best to make the change on the NAG first because that way we have the list of FMU users that should be changed on the Escaux PBX side.
First, get the list of current FMU users and provide it to the team that upgrades the Escaux PBX (list of SDX identifiers)
After, make the change:
- Change the Remote peer: replace SDX to SDF
- Update also the Description field if applicable
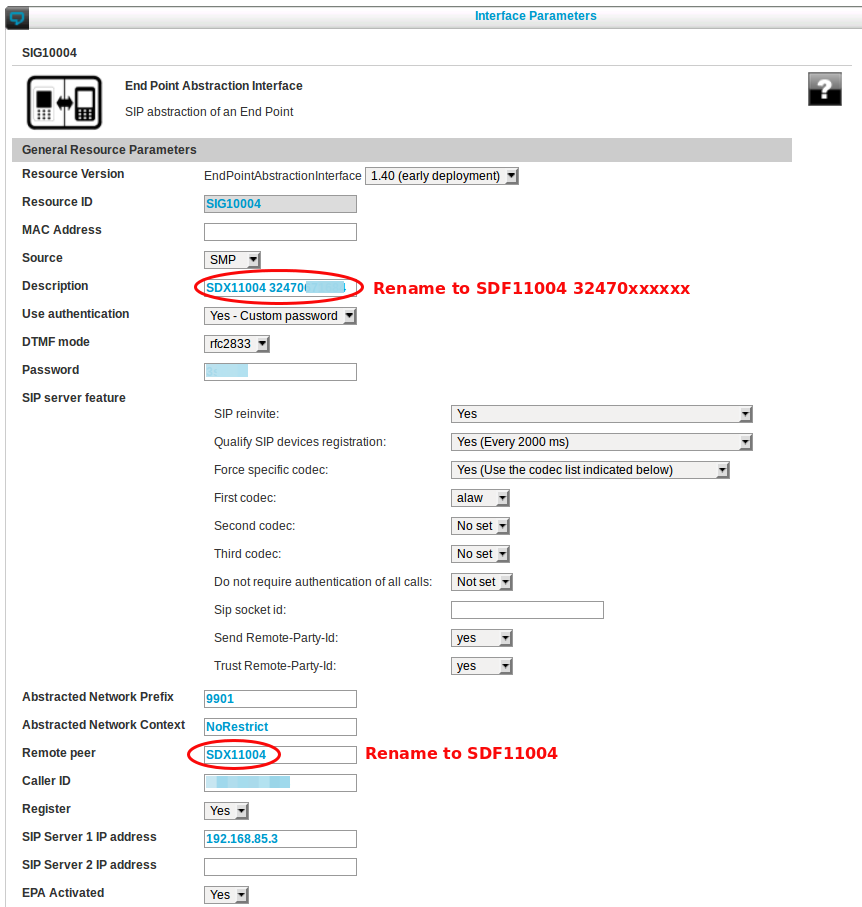
This can also be done using BulkAdministration and search and replace for "SDX"
Coordinate with the team that upgrades the Escaux PBX for when to do the
Apply Changes. In case changes are applied on the NAG and not on the Escaux PBX, there will be an
FMU downtime. See "Upgrading the SOP (start impact)"
16. Changes for FMU on the Escaux PBX side
FMU devices should use SDF-resources instead of SDX-resources to avoid local call rerouting for unlogged FMU MTC users
Based on the list obtained previously, convert the SDX resources used for FMU to SDF resources on the SMP managing the Escaux PBX configuration.
For each SDX resource for which an EndPointAbstractionInterface exists on the NAG:
- Change the resource to a FMU phone resource (SDF) v1.0.1
- Keep the same id (e.g. SDX11004 becomes SDF11004)
- Keep other settings unchanged
This can be done using BulkAdministration:
- For the VERSION column mention "FMU phone 1.0.1"
- Change SDX to SDF for all FMU phone in the RESOURCEID column
The change should be made only for FMU phones. Note that softphones also use SDX resources.
Check Belgacom validated settings
It has to be ensured that especially regarding to codec and RTP-redirect configurations settings everything is set according to what has been tested by Belgacom ITT for Fusion 3.0.x
Communication Server Module
- SIP Direct Media: re-invite
- First codec to use: alaw
- Second codec to use: g729
- Third codec to use: none
- Fourth codec to use: none
SIP Trunk Configuration for IMS
- First Codec To Use: G.711a
- Second Codec To Use: G.729
- Allow qualify: yes (This setting will enable the SIP trunk monitoring by the SOP / sending SIP OPTIONS requests)
- Allow T.38: Yes
- Can reinvite: Default (Keep default settings defined in the server)
IP Phone Configuration
Sites for which the available BW does not cause a restriction + RTP to Phone for a specific IP-phone is requested
- SIP reinvite: Default (Keep default settings defined in the server)
- Force specific codec: No (Keep default settings defined in the server)
- First codec: No set
- Second codec: No set
- Third codec: No set
Sites for which the available BW does not cause a restriction + RTP through SOP is requested
- SIP reinvite: No
- Force specific codec: No (Keep default settings defined in the server)
- First codec: No set
- Second codec: No set
- Third codec: No set
Sites for which the available BW is a restriction + RTP to Phone for a specific IP-phone is requested
- SIP reinvite: Default (Keep default settings defined in the server)
- Force specific codec: Yes (Use the codec list indicated below)
- First codec: g729
- Second codec: No set
- Third codec: No set
Sites for which the available BW is a restriction + RTP through SOP is requested
- SIP reinvite: No
- Force specific codec: Yes (Use the codec list indicated below)
- First codec: g729
- Second codec: No set
- Third codec: No set
FMU
In order to display a correct caller ID for mobile FMU user originating calls towards external users it make sure that the "Send Caller ID Method" parameter on the FMU trunk is set to the value "use Remote-Party-ID" header.
FMU Trunks configuration:
- Send Caller ID method: User Remote-Party-ID header
Upgrading the SOP (start impact)
- Install Modules
- Apply changes on the PBX cluster and vNAG cluster (any time interval will cause an FMU downtime)
- Restart the SOP
- Restart all phones and ATA boxes
- Reinstall net.Desktop and net.Console on the computers
Manual actions after upgrading the SOP
16. Register G.729 codec again
In case of usage of the G729 codec, the codec should be re-registered in order for G729 to work. This can be done using the SOP Shell.
Navigate to: Subsystems > G729 > Post installation
17. Login queue members again
Once the upgrade has been completed, dynamic queue members will be logged out from their queues (defined in their profile parameters).
Ask the users to log into their queue again, using the short codes.
Alternatively, ask the users to change their status to something different that they have now, then back the status they want.
In Fusion 3,
phones are logged in and out of the users' queue automatically when changing the status. By default the primary phone is logged into all the user's queues when changing status to Office. Configure the profile parameters of extension 8855 to change the default behaviour.
Rollback procedure
In case of major problems that can not be resolved within an acceptable time frame, an emergency rollback procedure can be executed. This rollback procedure might require an intervention of the Escaux support department and will have impact on the client
- Restore the previously created snapshot
- Reinstall the SOP baseline. This will delete all information on the SOP (prompts, voicemails, ...)
- Reinstall all modules
- Reboot the SOP
- Press "Apply changes"
- Ask Escaux to restore the backup from just before the upgrade. Attention: backups are taken over night (data loss of maximum 1 day)