Fusion 3.0 Installation guide
- Fusion 3.0 Installation guide
- Introduction
- Creating server configuration
- Modules configuration
- Install modules
- Call admission control configuration
- Emergency call configuration
- Creating phones
- Creating fax devices
- Creating FXS ports
- Creating users
- Creating extensions
- Dynamic queue login on status change
- External calls
- Unified communication applications
- Fixed Mobile Unification
- Clusters
- External contacts integration
- Multi-codec G711-G729 configuration
- Post-installation
Introduction
The UC Template is a modular solution for IP-telephony and Unified Communications. The solution is based on open standards and is very efficient from an operational point of view. The UC Template is software delivered as a service (SaaS). Updates and a water-proof disaster recovery pack (automated and guaranteed back-up, documentation, redundancy) are included. The solution is most scalable and allows you to effectively respond to the changing communication needs of your organisation. The UC Template is a rich IP-PABX solution, designed to maximize the self-management by IT administrators and end-users. This guide will help you to go through the configuration of your UC Template solution.Intended audience
This guide is intended for certified engineers only.Disclaimer
This document is confidential. It is provided for informational purposes only and is not guaranteed to be without errors. Some of the functionalities described may be specific to a device, to an application or to a network. Some features may only be available as optional functionality. Escaux has a policy of continuous improvement and therefore reserves the right to modify this document without prior notice.Goal of this document
The goal of this document is to describe all actions that need to be done to install a new UC Template solution.Creating server configuration
- IP address
- Netmask
- Default gateway
- Primary and secondary DNS server. If only 1 DNS server is available, fill in the same value for both fields
- Server name
- Account (drop down menu)
- Network ID
- Time zone
- VSOP Container (can be empty)
- Public key
Modules configuration
- Mail server
- Local admin password : you are strongly advised to change the default admin and customer 's password
- Fax server : Domain and number of fax channels can be modified
- DHCP Server : by default, it's disabled. Don't forget to activate it if you need.
Active/Standby
Follow those steps if you are installing an Active/Standby pair Follow these steps to configure 2 SOPs as an Active-Standby High Availability pair. 1. On the haMaster, add the High Availability module in version 2.5.6 or higher. Configure the module as following:- SOPKEY 1 (default active): enter the SOPKEY (8 digits) of the haMaster.
- Standby IP 1: enter the standby IP of the haMaster.
- SOPKEY 2: enter the SOPKEY (8 digits) of the clone.
- Standby IP 2: enter the standby IP of the clone.
Install modules
Installation check
To make sure all modules have been installed correctly, execute the ListPackages system taskCall admission control configuration
The information about Call Admission Control has been copied from the AdminGuide. Please refer to this guide for more info (limitations, FAQ, ...)- Site name
- Site: the site where the network is located
- Network name: this field is informative
- network address: the network address (ex: 10.9.6.0)
- netmask: the netmask for this network (ex: 255.255.255.0)
- Description: this field is informative
- maximum number of audio streams: the number of simultaneous calls that can go over this link
Emergency call configuration
When calling an emergency number, the emergency service needs to know your location. This used to be easy by simply looking where a BA is terminated for example. Because of remote offices, connected over VPN to a single server, this becomes more difficult as the location of the caller is not necessarily the same as the termination point of the line.Some SIP platforms allow you to send the location of the caller. This information is passed to the operator by changing the called number so it contains the zip code of the caller. Example: You call from a remote site in Tremelo (zip code 3120) to the emergency number 112.
The main number of the site in Tremelo is 016123456. In this case, the call will be rerouted to 1992 112 3120 and the caller number will be 016123456 This allows the emergency services to know your location (zip code) and to contact someone on your site (the main number). Keep in mind that someone needs to be able to pick up this main number at all time as this is the number that will be used by the emergency services to call you back.
- User Attribute 1 : the zip code of the site (example: 1000 for Brussels)
- User Attribute 2 : the main number of the site in the correct format (example: +3216123456)
Supported prefixed setups
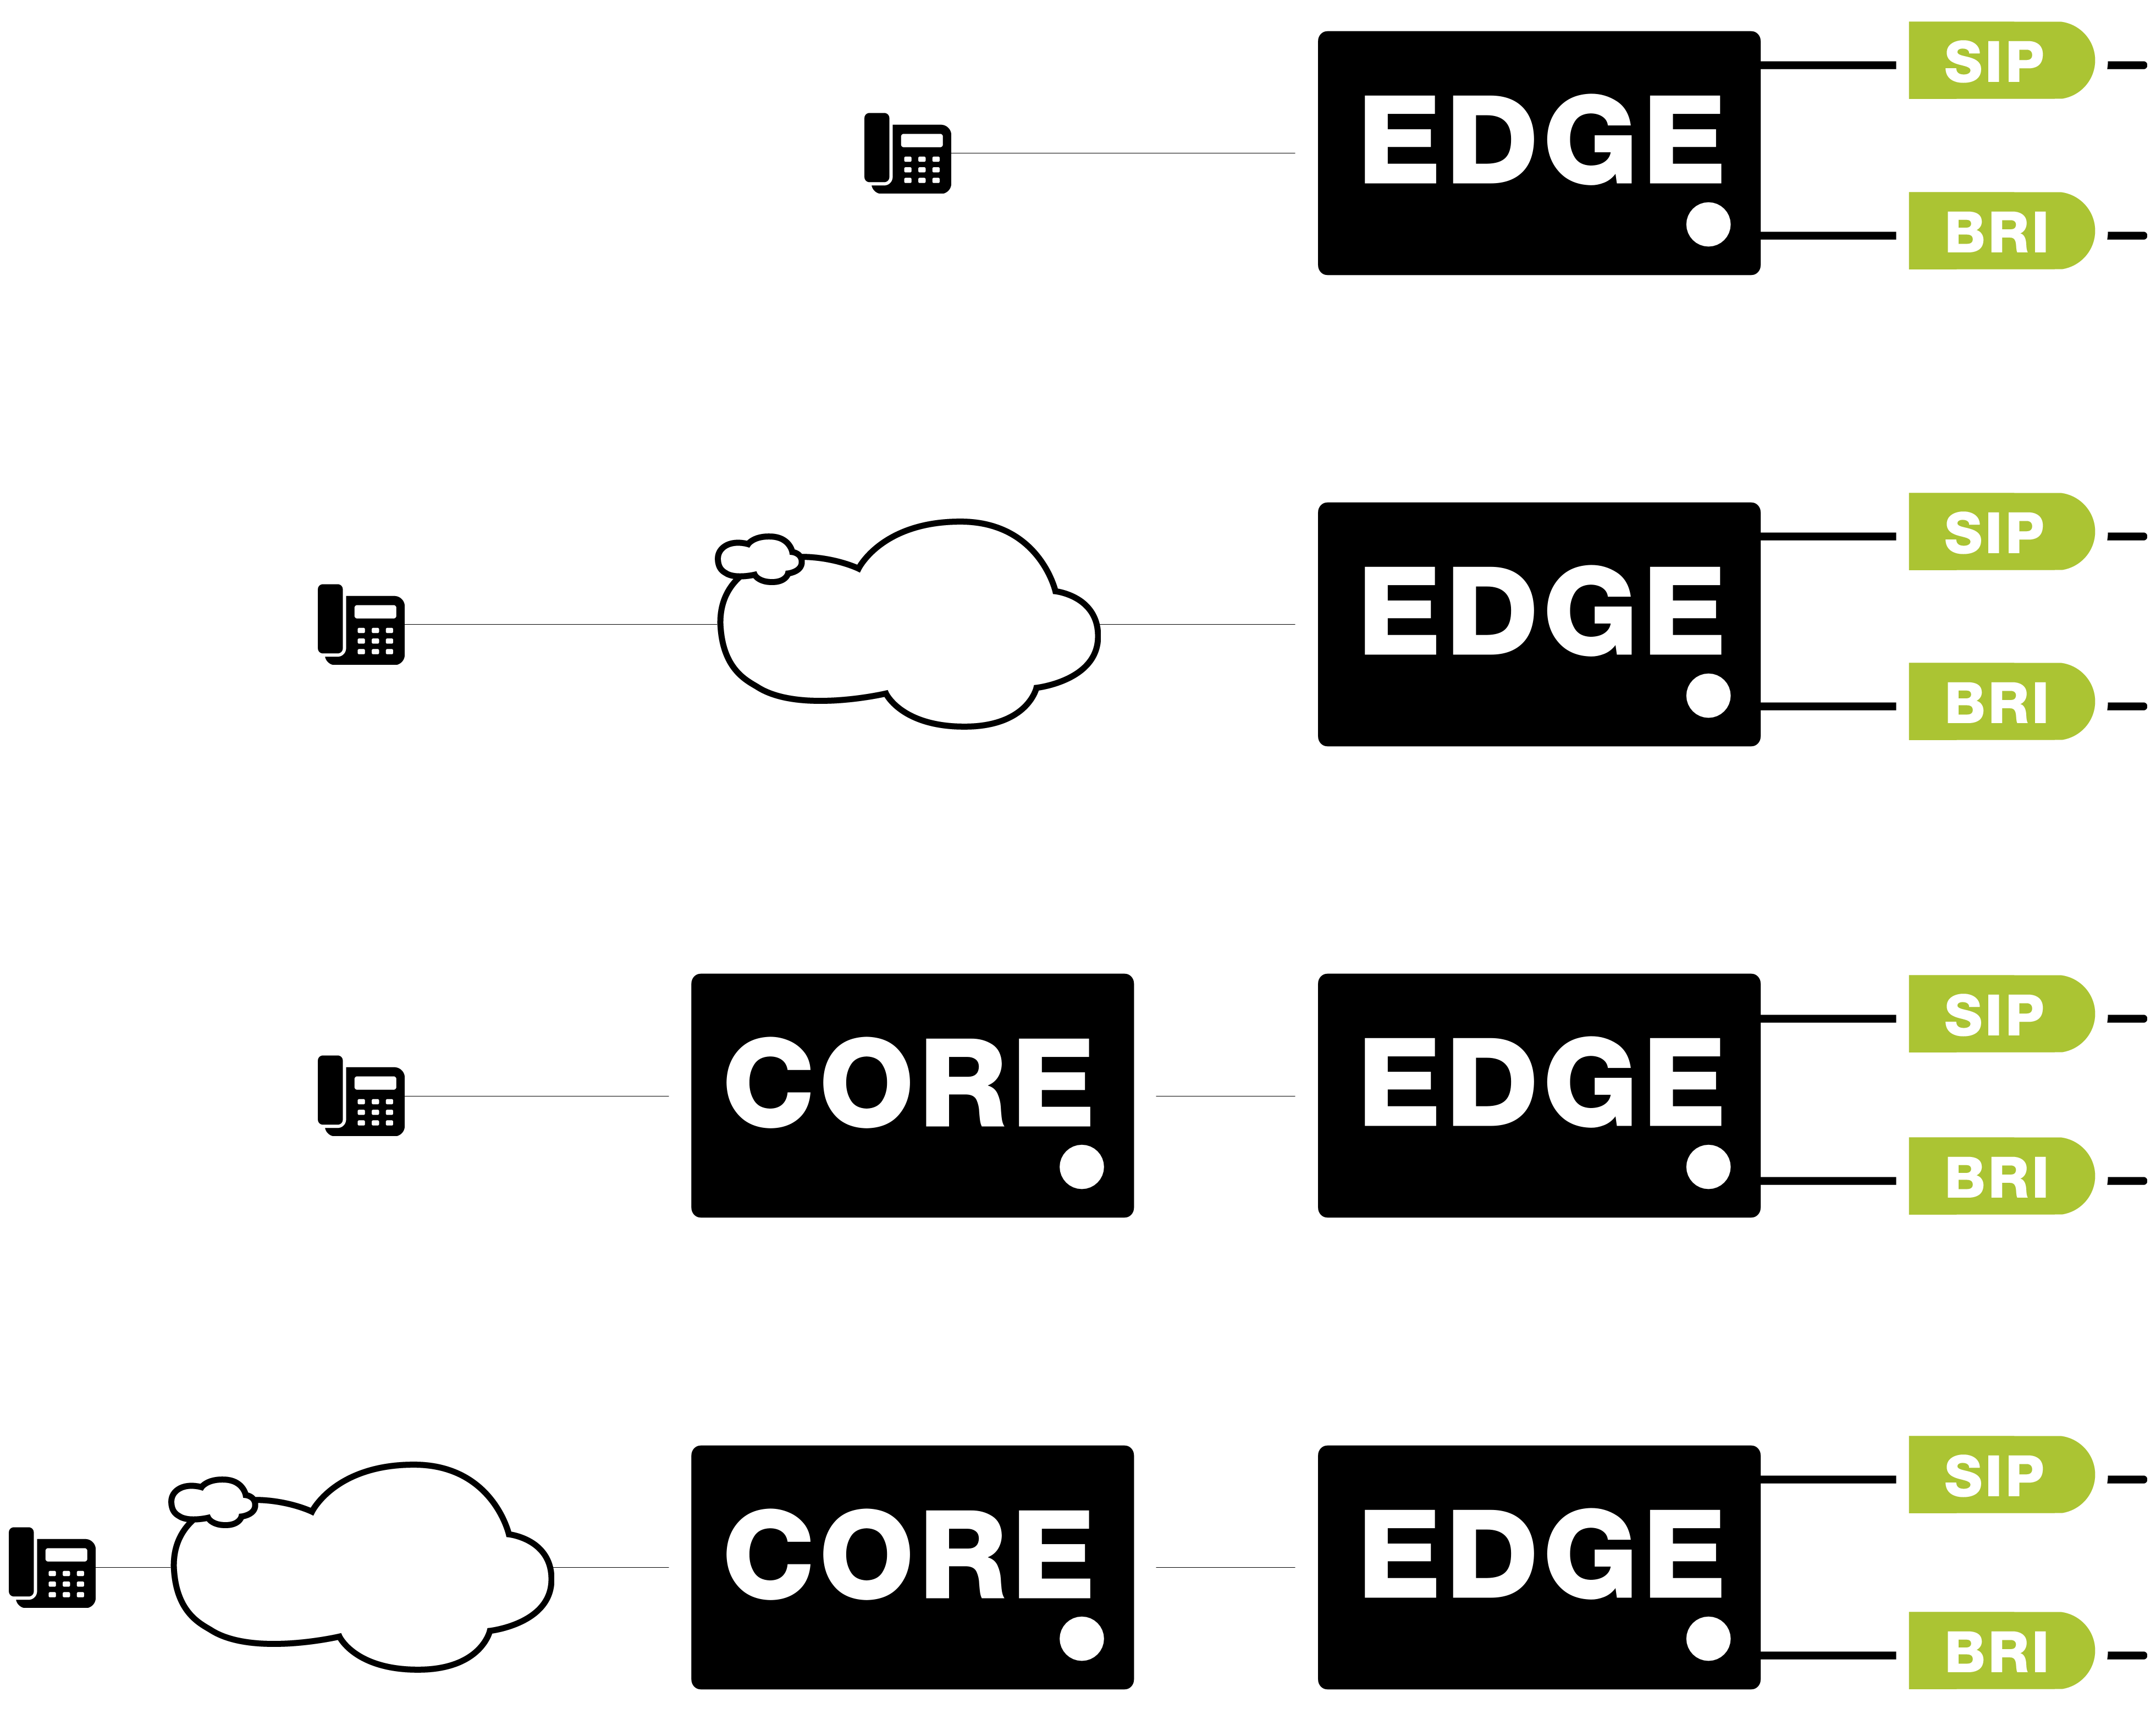 4 setups have been validated. The scenario is the following:
 - The edge server has connectivity to
- Primary trunk: a (SIP) platform which supports emergency number prefixing
- Secondary trunk: a (BRI) platform which does not support emergency number prefixing
- A phone makes an outgoing emergency call
- While trunk 1 is functional
- While trunk 1 is down
Phones connected directly to an edge server
(first setup in the image)This is the easiest setup: No remote sites exist, prefixing is in theory not needed. If emergency number prefixing is activated, the following will happen
- While trunk 1 is up: calls are being sent prefixed to the operator over trunk 1
- While trunk 1 is down: calls are being sent non-prefixed to the operator over trunk 2
Phones from a remote site connected to an edge server
(second setup in the image)The following will happen
- While trunk 1 is up: calls are being sent prefixed to the operator over trunk 1
- While trunk 1 is down: calls are being sent non-prefixed to the operator over trunk 2
Phones connected directly to a core server, connected to an edge server
(third setup in the image)- While trunk 1 is up: calls are being sent prefixed to the operator over trunk 1
- While trunk 1 is down: calls are being sent prefixed to the operator over trunk 2 (causing the call to fail)
Phones from a remote site connected to a core server, connected to an edge server
(fourth setup in the image)- While trunk 1 is up: calls are being sent prefixed to the operator over trunk 1
- While trunk 1 is down: calls are being sent prefixed to the operator over trunk 2 (causing the call to fail)
Creating phones
Restriction groups
Following restriction groups have been predefined and are ready to use:- NoRestrict : This phone is able to call any type of number
- RestrictInternal : This phone can only call internal numbers
- RestrictNat : This phone can only call national and internal numbers
- RestrictNatMob : This phone can only call national, mobile and internal numbers
- RestrictNatMobInt : This phone can only call national, mobile, international and internal
- RestrictNatMobPre : This phone can only call national, mobile, premium and internal numbers
Outgoing Extension
Please do not use this parameter because it will cause problems with PUM login/logout.Template supported phones
Not all phones are supported in this configuration. This does not mean that they won't work, but that there is no default configuration (buttons to configure, features to (de)activate, ...). Other phones can still be used. By default, one phone resource of every supported phone will be available in the SMP. This will allow you to easily copy the configuration to all the other phones of this type. Have a look at the procedures guide to see which parameters can be adapted| Brand | Type | comment |
|---|---|---|
| Polycom | IP330 | The configuration for most Polycom phones is exactly the same. If you have a different type of Polycom phone that you would like to use, you can use the same parameters from the bulk admin file. Keep in mind that the idle url refresh page turns on the screens backlight when refreshing. This is why it is advised to disable screen backlight |
| Polycom | IP331 | The configuration for most Polycom phones is exactly the same. If you have a different type of Polycom phone that you would like to use, you can use the same parameters from the bulk admin file. Keep in mind that the idle url refresh page turns on the screens backlight when refreshing. This is why it is advised to disable screen backlight |
| Polycom | IP650 receptionist phone | |
| Polycom | Virtual phone | PUM is not supported between IP and VVX phones: both types of phones can use PUM, but a user who has a virtual Polycom phone which is used for an IPXXX resource can not be used to log in on a VVX phone and vice versa |
| Aastra | 6731i | |
| Aastra | Virtual phone | |
| Polycom | VVX300 | |
| Polycom | VVX310 | |
| Polycom | VVX400 | |
| Polycom | VVX410 | |
| Polycom | VVX500 | |
| Polycom | VVX600 |
Template available devices
Some additional devices can be used. As these are not standard included devices, some features might not be available on them or might not have been tested. In the below spreadsheet you'll find which phones are available in Fusion and starting from which version. See 0.2 Fusion availability row.Other devices
2N Helios IP
Supported features:| Keys assign | Elect. relay by DTMF | Video | Used configuration | |
|---|---|---|---|---|
| 3x1 butt. + cam. | |
|
|
Example Config |
Algo 8180
- Available in 3.0.6
- Supported features: can be used as primary and secondary phone
- Needs module "Algo phone support"
Creating fax devices
To connect fax devices to the SOP, an analog convertor (ATA) should be used. To make sure the ATA uses the T38 fax-protocol instead of the ulaw/alaw (which is unreliable for fax transmission), the ATA devices must- be configured using the provided example configuration (csv)
- be configured in a FAX restriction group (ex: RestrictNatFAX)
- be connected to the SOP that receives the fax initially
Creating FXS ports
- The "Direct bridge" should not be activated
Creating users
- Login name: e-mail address of the user
- Password: the password for this user (can be changed via the SMP by the user)
- E-mail : the e-mail address of the user (same as Login name)
- Language: English, French or Dutch
Creating extensions
- admin: the admin of the extension
- owner: the owner of the extension. This login name will be used for net.Console/net.Desktop and to define the language of the user
- extension: the internal number of the user.
- first name: the first name of the user.
- last name: the last name of the user
- e-mail: the e-mail address of the user. This will be used for "voicemail to e-mail" or for "fax to e-mail"
- Mobile number: The mobile phone number of the user. Leave empty if this is an FMU enabled mobile phone. Enter the number in national format (00475123456)
- Fax number: Pure informative, currently not used
- Home number: Only used for speeddial profiles
- Site: Pure informative, currently not used
- Department: Displayed in the net.X applications. Used for department pickup
- Office: Displayed in the net.X applications.
- Context: always use internal
- Callflow: please refer to the section "Profiles" below
- Pincode: Only used for "authenticator" profiles (see authenticator documentation). Leave at 1234 for other profiles
- Primary phone: the primary phone of the user (typically a hardphone like a Polycom or Aastra device)
- Secondary phone: the secondary phone of the user (typically nothing, a softphone or an FMU device)
- source: the source of this record. Typically CSV or LDAP
- visibility: set this to 'visible' for users. Technical extensions (IVR/group/...) can be set to hidden
All predefined extensions (voicemail, callCatchers, serviceAvailability, CallSplitters, ...) should be left to
- SOP 1 : all
- SOP 2 : none
- SOP 1 : the primary SOP
- SOP 2 : the secondary sop or none
Profiles
All profiles that can be used, start with "Template-". Please refer to the online documentation in the SMP for more information on the profilesProfile colors
Users and managers can have multiple colors: Green, Blue, Purple and Red. Depending on the color of the profile, the end user can or can not change certain parameters. Keep in mind that the admin will still have access to all options. This means that the options are not removed for certain profiles, but that the admin can decide to force a specific option. Have a look in the Feature list to find out which parameters are accessible by whomStatic versus dynamic profiles
Due to the nature of dynamic profiles, it is not possible to configure the profile parameters of these profiles as long as there is no connection between the SOP and the SMP (the SOP is master of all profile parameter settings) Starting from template 3, the IVR profile has been transformed into a dynamic profile. This has been done to support the service availability plugin, which means that the end user should be able to override the service availability status by changing the status from "default" to, for example, "Holiday".| Template 3.0 | Static | Dynamic | Submit | Submit and Apply Changes | Parameters |
|---|---|---|---|---|---|
| Template-CallQueuer | |
|
|
|
|
| Template-CallSplitter | |
|
|
|
|
| Template-Conference | |
|
|
|
|
| Template-Fax | |
|
|
|
|
| Template-HuntGroup | |
|
|
|
|
| Template-IVR | |
|
|
|
|
| Template-Manager-Blue | |
|
|
|
|
| Template-Manager-Green | |
|
|
|
|
| Template-Manager-Purple | |
|
|
|
|
| Template-Manager-Red | |
|
|
|
|
| Template-OutgoingCallcatcher | |
|
|
|
|
| Template-Receptionist-Green | |
|
|
|
|
| Template-ShortNumber | |
|
|
|
|
| Template-User-Blue | |
|
|
|
|
| Template-User-Green | |
|
|
|
|
| Template-User-Purple | |
|
|
|
|
| Template-User-Red | |
|
|
|
|
| Template-VirtualFax | |
|
|
|
|
Dynamic queue login on status change
By default users will be logged in/out of their queues (groups) as following:- Office: Primary phone logged in (only)
- Telework: Secondary phone logged in (only)
- OutOfOffice, Busy, Holiday: Primary and Secondary phone logged out
External calls
Creating trunks
PRI
In this version, only Sangoma cards are supported. One Sangoma PRI resource (SOV2) should be configured per SOP which contains at least one PRI connection. The following settings should be used:- Interface: All PRIs or PRI X (only for multi route)
- Restriction Group: FromOutside
- Enable T.38: no
BRI
In this version, only Sangoma cards are supported. One Sangoma BRI resource (SOV1) should be configured per SOP which contains at least one PRI connection. The following settings should be used:- Incoming interfaces: All BRIs or BRI X (only for multi route)
- Restriction Group: FromOutside
- Enable T.38: no
SIP trunks
The configuration of SIP trunks depend almost completely on the operator that is used. The following parameters are mandatory:- Restriction group: FromOutside
- Allow T.38: yes
Creating routing on external trunks
By default, all outgoing calls are sent to CallSplitter extension 89999999. Please note that this extension might be different in cluster setups (see below) The CallSplitter will contain the extension 89991001, which is the default OutgoingCallCatcher. The CallSplitter should be used for every outgoing call and can not be skipped. Refer to the online help page in the profile parameter page for an explanation on all available parameters of the CallSplitterCreating incoming number mapping
Creating outgoing number mapping
Configuring predefined call catcher extensions
Incoming call catcher
Every incoming call will be routed to extension 89991000. Have a look at the online profile documentation for help on the parameters that need to be configuredOutgoing call catcher
Every outgoing call will by default be routed to extension 89991001 after passing the CallSplitter . Have a look at the online profile documentation for help on the parameters that need to be configuredMulti route
In case multi route is used, special configuration is required- In the profile parameters of the user, manager, receptionist and fax profile, you should indicate to which group they belong
- In the call splitter, a separate Outgoing Callcatcher can be used for each group. These callcatchers can send the call on a specific trunk
Unified communication applications
net.Desktop
The following is needed to configure net.Desktop:- a user
- an extension
- a license
- a link between the user, extension and the license
- Press add and select the desired net.Desktop (X100/X300/...)
net.Console
You will find bellow steps to follow in order to configure net.Console in Fusion 3.Queues creation
General queue
Press 'Add' and fill out the following parameters:- Queue name: For example GeneralQueue1 or GeneralQueue2 (GeneralQueue2 is not reflected in the scheme below, it can be used you have two groups of receptionists which don't have to take calls from the other one). The queue name should be composed of letters and digits only, no special characters of white space permitted. Also don 't use the Queue name 'General ' !
- Music on hold: select your Music on Hold resource.
- Ring strategy: 'random' is probably the most appropriate for a general queue. It ensures that the incoming calls are distributed evenly among the different receptionists.
- Timeout: 60
- Retry: 1
- Permanent members: must be left empty
- Join and leave when empty policy: loose
- Ring in use policy: no
Receptionist queues
Press 'Add' and fill out the following parameters:- Queue name: For example ! ReceptionistQueue1, ReceptionistQueue2. The queue name should be composed of letters and digits only, no special characters of white space permitted.
- Music on hold: select your Music on Hold resource.
- Ring strategy: 'ringall' is probably the most appropriate for a general queue. It ensures that the incoming calls are distributed evenly among the different receptionists.
- Timeout: 60
- Retry: 1
- Permanent members: must be left empty
- Join and leave when empty policy: loose
- Ring in use policy: no
Create resources
Create Reception phone
For the Snom based net.Console, do the following.- Outgoing Extension: Leave blank
- MAC Address: The mac address of the phone can be found on the back of the phone
- Restriction Group: Norestrict unless the restriction group Receptionist has been created
- Line: 1
- SIP can reinvite: no
- Auto-answer: disabled
- Display missed calls: no
- Display dialed calls: no
- Display received calls: no
- Call waiting: off
- Web access security: Leave all three fields (Login, User password, Admin password ) empty
- TimeZone: Select the time zone to be used
- Return to idle even if offhook: yes
- Outgoing Extension: Leave blank
- MAC Address: The mac address of the phone can be found on the back of the phone
- Restriction Group: Norestrict unless the restriction group Receptionist has been created
- Line: 2
- SIP can reinvite: no
- Auto-answer: disabled
- Display missed calls: no
- Display dialed calls: no
- Display received calls: no
- Call waiting: off
- Web access security: Leave all three fields (Login, User password, Admin password ) empty
- TimeZone: Select the time zone to be used
- Return to idle even if offhook: yes
- Outgoing Extension: Leave blank
- MAC Address: The mac address of the phone can be found on the back of the phone
- Restriction Group: NoRestrict unless the restriction group Receptionist has been created
- SIP can reinvite: no
- Callist-received: Disabled
- Callist-placed: Disabled
- Callist-missed: Disabled
- Call waiting: Disabled
- Allow Push Message: All
- Push URL: Leave empty (the default value will be used)
- Login: Leave empty (the default value will be used)
- Password: Leave empty (the default value will be used)
Reception extensions and profiles parameters configuration
Create General reception extension
- Extension: for example 1000
- Callflow: select Template-CallQueuer profile
- Primary Phone: No Phone
- Secondary Phone: No Phone
- General reception profile parameters
- Group name: select the resource Queue ID of the General Queue (ex: AQA00001)
- Display name: enter the name to be shown in net.Console
- Use of net.Console: Select 'Polycom phones only' if you will use a Polycom IP650 or select 'Snom phones only' if you will use net.Console in combination with a Snom phone.
Create Internal receptionist extension
- Extension: 1001 for example
- Callflow: Template-Receptionist-Green profile
- Primary Phone: the resource (SDP80001) of the Polycom IP650
- Secondary Phone: the same resource (SDP80001) of the Polycom IP650
- Primary Phone: the 1st resource (SDO20001) of the Snom320
- Secondary Phone: the 2d resource (SDO20002) of the Snom320
- Internal reception profile parameters
- Queue for the receptionist: select the resource Queue ID of the receptionist (ex: AQA00002)
- Reception number: enter the general extension (1000)
net.Console resource
- Assign permissions
- User: Select the user created for this reception desk
- Resource:Select the net.Console resource created for this reception desk
- Permissions: By default select all permissions.
net.Console application installation
Open a browser and enter the following URL: http://<netConsole_SOP's_IP>/netConsole and download the msi file. Once downloaded install it on the PC of the reception desk.Fixed Mobile Unification
When an FMU device makes an outgoing call, the call should be sent out to the FMU trunk instead of to the default outgoing trunk. The internal routing mechanisms have been built in, the only things that need to be done are defining a FMU restriction group for each FMU device and defining which trunk should be used for FMU callsCreating resources
FMU trunk
To make sure FMU calls are send towards the correct trunk you need to specify which trunk should be used. This is done in 3 steps- Search from extension 89999999 - CallSplitter and open the profile parameters. You will notice 2 fields, "Normal calls" and "FMU calls". Please fill in the corresponding OutgoingCallCatcher extension(s).
- This way it is possible to use a different OutgoingCallCatcher for the FMU calls then for the normal calls.
- Please make sure to verify that the OutgoingCallCatchers are configured with the correct trunks.
Avoid rerouting
In case FMU MTC is used (MTC is activated by default by Proximus), following scenario might occur- An FMU user is de-registered by using 5001 (example: internal: 2001, external: 0475123456)
- A colleague tries to call the FMU user on his mobile phone number (0475123456)
- The SOP does local rerouting for known DDIs, the call will be rerouted to extension 2001
- The FMU user will not see a call on his mobile phone
- The parameter TemplateForwardFmuMtcToMobile should be set to 1 (default)
- The parameter TemplateForwardMtcToMobileRegex should contain a regular expression to match the mobile phone number (as this should only be done for calls to the mobile DDI) (default for BE)
- The FMU phones resource ID should start with SDF (not SDX)
- If the call has been made towards the mobile DDI, both phones of the user will be checked
- If one of the two phones is an SDF-device and it is unregistered, the call will be pushed towards the mobile DDI of the user on the FMU callcatcher with local rerouting disabled
Implementing the Corporate/Private mode
In case corporate and private mode is needed, this can be implemented by following HowToFMUPrivateCorporateAdd mobile number in incoming number mapping
In case FMU MTC is used, each mobile number will need to be added in the incoming number mapping in +32 format.Clusters
Modules
The following modules need to be added if there are multiple SOPs in the cluster:- Cluster & SOP Active-Active Support
- Enable "Automatic Sync" in order to synchronize prompts and music-on-hold among the cluster
- SSH peer connectivity
Routing
Additional trunks
- "default" : only allows to send internal calls over the trunk
- A restriction group (example: NoRestrict): allows to send any type of traffic over the trunk. In cluster setups with a gateway server, this is often used to avoid having to create a second trunk to send outgoing calls from the application to the gateway server
Intra cluster routing
Outgoing call catchers
As the OutgoingCallCatcher configuration will probably be different for every SOP in the cluster, additional OutgoingCallCatchers need to be configured.- Make a new CallSplitter and OutgoingCallCatcher for each SOP (have a look at the Procedures Guide to find out the correct range for these extensions)
- Configure your CallSplitter and OutgoingCallCatcher
- Make sure the correct CallSplitter is used
- On SOP-level, Go to Call routing - extra cluster routing
- Change the "add prefix" parameter in the settings of MapNumber all telephony routes (those that point to 89999999 by default) to the CallSplitter you want to use
Redundancy
In case multiple SOPs have a local breakout, it is possible to use the other SOPs as fallback when the local breakout is unavailable (line problem, all lines used).Simply configure the mesh sip trunk towards the other server as fallback route (attention: this requires the mesh sip trunk to be configured in context NoRestrict). The following scenarios have been validated
Setups with separate gateway servers
 On each core server, both gateway servers can be defined.
 - In case one gateway server goes down (or if the trunk is congested), calls will automatically go over the other gateway.
- In case both gateway servers go down (or if the trunks on both gateways are congested), calls will fail without causing any routing loop
Setups without separate gateway servers
 On the primary SOP, a fallback route can be defined towards the secondary SOP.
 - In case the primary SOP goes down, calls might go over the secondary SOP (depending on if the phone supports active active)
- In case the secondary SOP goes down, calls will follow the normal way out (over the primary SOP)
- In case the trunks on the primary SOP are congested, calls will be sent out over the secondary SOP
- In case the trunks are congested on both SOPs, calls will fail without causing any routing loop
External contacts integration
The SOP will periodically import an XML file which contains contacts. More information on the XML file itself can be found in the Administrator Guide External Contacts IntegrationModule configuration
The Unified Communication Model module should be configured in order to fetch and process the XML file on specific moments. Configure the following parameters- URL: the link to your XML file
- Cron: 0 23 ? * *
- priority: 0 0 0 0 0 0 0 0 0 0 0 0 0 0 0 0 0 0 0 0 0
- Merge directory cron should be left untouched
Configuring Call catchers
Both the incoming and outgoing callcatcher need to be configured to do the lookup in the imported contacts. Have a look at the profile documentation for more informationMulti-codec G711-G729 configuration
The multi-codec feature allows to control the bandwidth consumption to access a site. A SIP trunk connected to the IMS shall always have both G711 and G729 configured with G711 as first codec. If you have a cluster, all the Meshed SIP Trunk shall have both G711 and G729 configured with G711 as first codec. On sites without any specific bandwidth limitation all the SIP phones located on this site shall be configured with both G711 and G729 allowed with G711 as first codec. In this way the RTP traffic will be in G711 unless the remote party does not support G729. On sites with limited bandwidth, only the codec G729 shall be configured on each SIP Phones located on this site. All the RTP traffic to this site will therefore be in G729.G.729 transcoding
In case G.729 transcoding is needed, add the Codec G.729 Annex APost-installation
Follow those post-installation steps if you are installing an Active-Standby pair- Switch the Active SOP (haMaster SOP) to standby (or disconnect the network cable)
- Ping the Active IP to be sure it is not used anymore
- Switch the Clone SOP to active
- Switch the Clone SOP to standby
- Ping the Active IP to be sure it is not used anymore
- Switch the haMaster SOP to active (or plug the network cable)
Copyright © Escaux SA