Administrator Guide : 2N Helios IP Vario door phone
- Administrator Guide : 2N Helios IP Vario door phone
- Introduction
- First install
- Features enabling
- Register the door phone on the SOP
- Configuring direct call to local phones as backup (optional)
- Assign extensions to "Quick Dial" buttons
- Listen to "what is happening outside"
- Look at "what is happening outside"
- Establish a video call between the door phone and another video-compliant phone
- Remotely unlock the door
- All-in-one solution ("2N Helios IP Eye" software)
- Limitations
- Improvements to come
- 2N Helios installation with PureCloud over Public Internet, without VPN
Introduction
This administrator guide only covers up the software configuration part for Escaux supported 2N devices like the 3 "Quick Dial" buttons model.For the hardware configuration part, please refer to the following official 2N wiki pages:
Some of the features presented in this AdminGuide will require extended licensing. See 2N Helios IP Devices Licensing for more info.
First install
Network configuration
There are 2 ways of connecting your new device to your existing network. Either by using the IP assigned by your DHCP server or by setting a static IP.With a dynamic IP
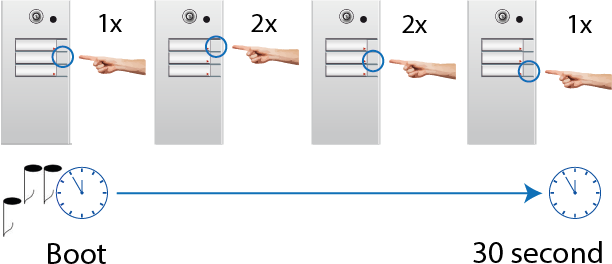
To enable a dynamic network configuration, first power up the device and once you have heard 2 consecutive tones AND within 30 seconds, press the following sequence of "Quick Dial" buttons from the right-side column:- 1x the 2nd button
- 2x the 1st button
- 2x the 2nd button
- 1x the 3rd button
To get the dynamic IP that was assigned to the doorphone, first reboot the device and once you have heard 2 consecutive tones AND within 30 seconds, press 5x the 2nd "Quick Dial" button from the right-side column.
The door phone will then start spelling (in english) the IP that the DHCP server assigned to it.

If the spelled IP is not understandable or if the above procedure failed for any reason, then you will have to get it another way:
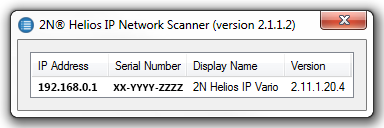
- Download the "2N Helios IP Network Scanner" from their official website or from this wiki page (may be outdated).
- Extract it from the archive and run it. That software should only detect "Helios" branded devices on your LAN. You should see your door phone appear in the list side to side with its IP and firmware version.
- If your device is not listed, right-click in the blank area and then click on refresh.
-
 If not detected either, please check your hardware installation or contact your network administrator!
- If your device is not listed, right-click in the blank area and then click on refresh.
If the IP is 4x zero (0.0.0.0), meaning that the device did not get an IP from the DHCP server, then you will have to set a static one instead.
With a static IP
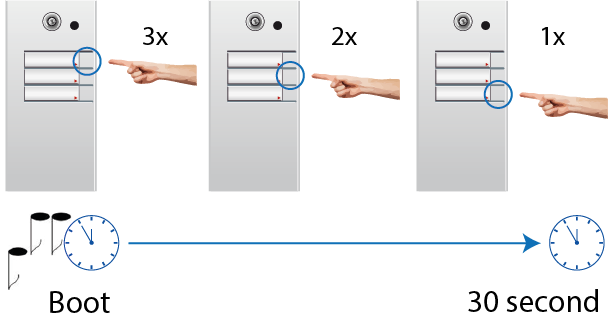
To enable a static network configuration, first power up the device and once you have heard 2 consecutive tones AND within 30 seconds, press the following sequence of "Quick Dial" buttons from the right-side column:- 3x the 1st button
- 2x the 2nd button
- 1x the 3rd button
Once that done, the door phone plays 3 tones and then restarts.
After restarting, it will have the following network configuration:
- IP address: 192.168.1.100
- Network mask: 255.255.255.0
- Default gateway: 192.168.1.1
Web interface
The device integrated web server provides an elegant web interface that will be the primary way of configuring the device.In order to access that configuration interface, simply enter the device IP (you got from the previous section) in the URL bar of your web browser.
As you will quickly notice it, the access to the interface is password protected and the default credentials are:
- user: "admin"
- password: "2n"
Here is the home page as it will be displayed the first time you log in:
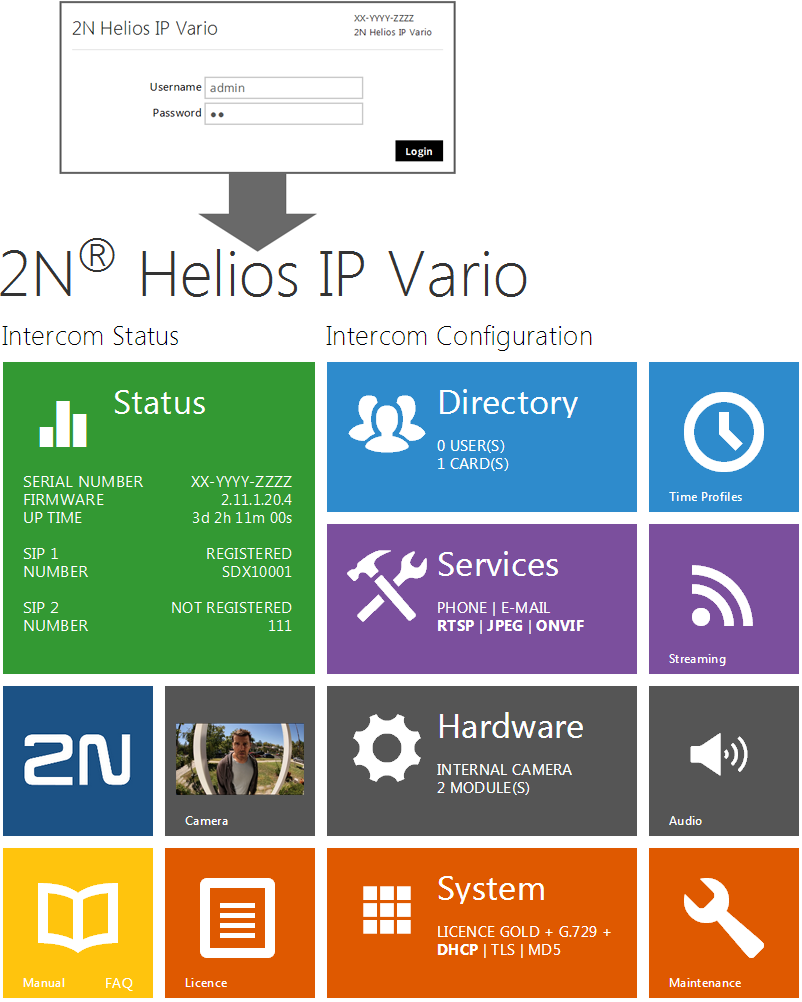
As you can see, the configuration interface in subdivided in 5 different categories, each one represented by a different color scheme:
- Status (Green)
- Directory (Blue)
- Services (Purple)
- Hardware (Grey)
- System (Orange)
Firmware upgrade
First download the lastest "2N Helios IP Vario Firmware" from their official website or the firmware version we used at the time this documentation was created, from this wiki page (may be outdated).
Once downloaded, make sure to extract the content of the archive so that it can be browseable.
First click on the "Upgrade Firmware" button, then click on the "Select File..." button to browse through your local file system and finally click on the "Upload" button to start uploading the selected firmware binary.
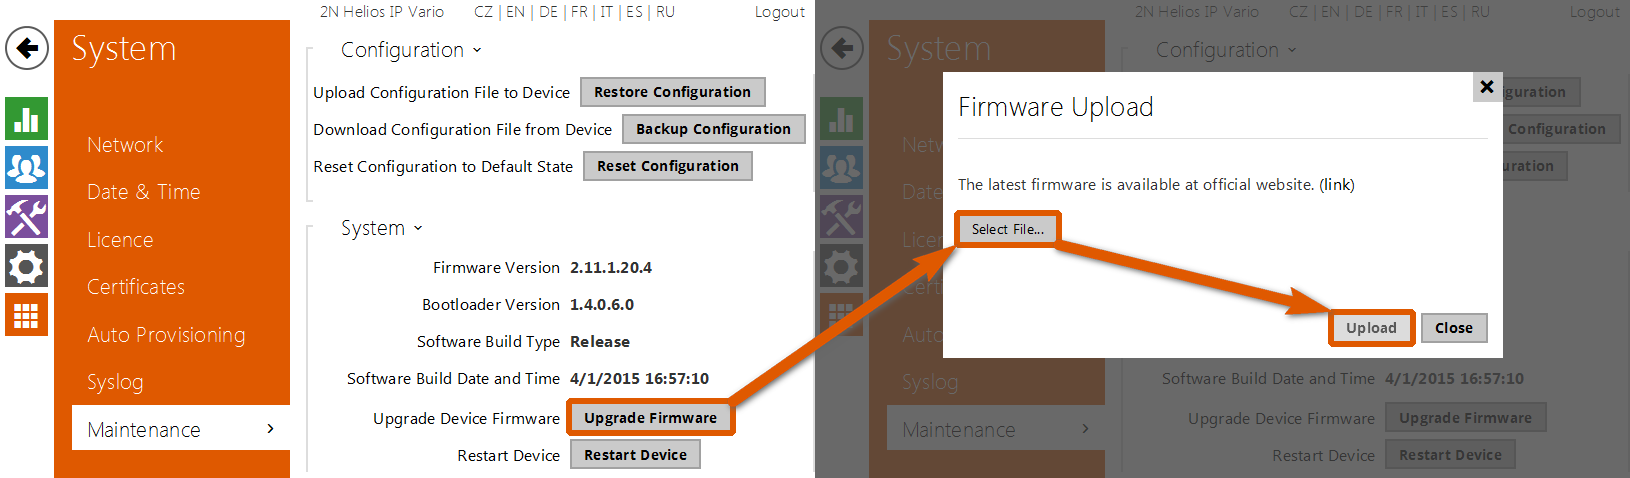
After importing the binary file, the device will proceed to the install followed by a reboot.
After the reboot, you may click on the "Reset Configuration" button if you want to ensure you start from a clean environment.
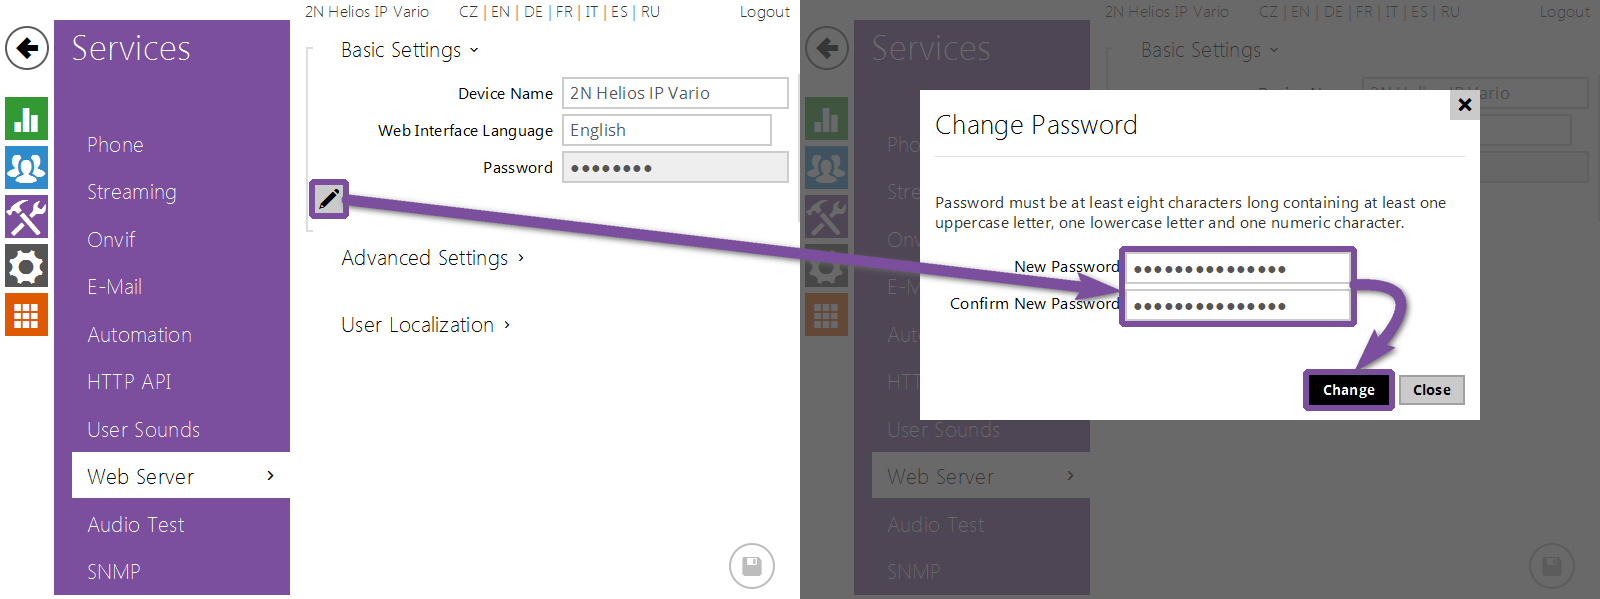
Admin password change
As previously mentioned, it is always a good practice to change the default admin password.Click on the "Edit" button (with a pencil icon), type in twice your new password and confirm by clicking on the "Change" button.
Services disabling
You need to know that the more services are running, the more you are exposed to vulnerabilities.Therefore, if there are services you don't need, it is strongly advised to disable them (if they are enabled by default).
Now, for each service you are not going to use, uncheck their respective "Enabled" checkbox.
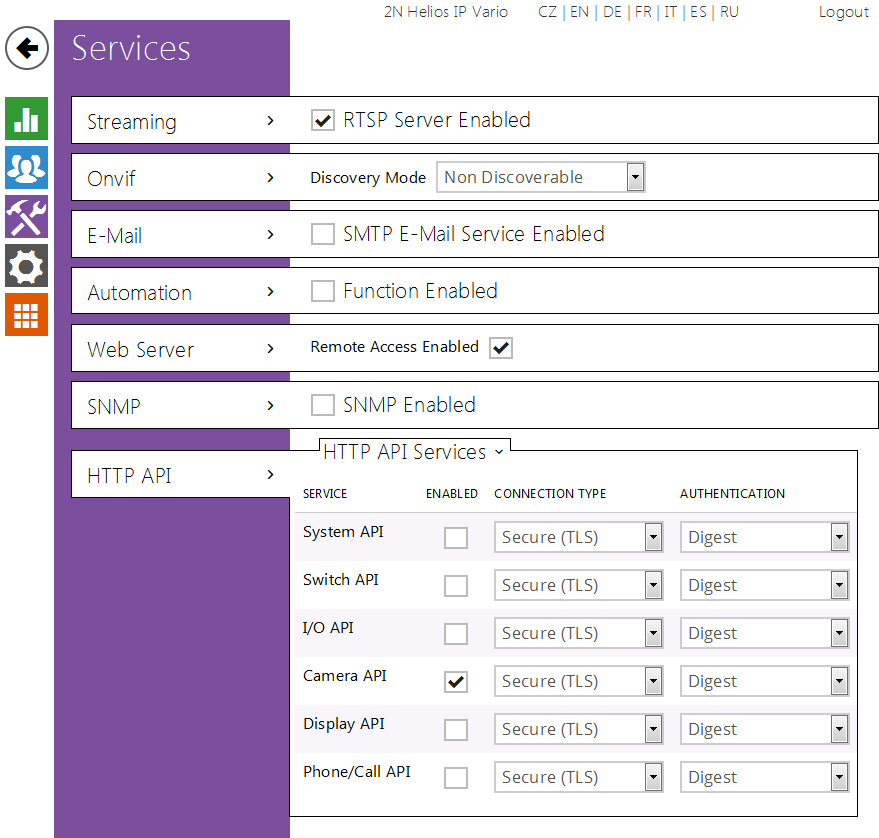
By going back to the home page, you can always have a quick overview of services that are enabled (bold font) and those that are disabled (regular font):

Video
In case you have a choosen for a Doorphone with Video, you will need :- to activate the video licence. At the initiation you will get a licence for only one month. This activation should go via Fuzer Sales Operations
- Enable video support in Fusion. See here
- Configure your doorphone as described below
Features enabling
Register the door phone on the SOP
In order to enable the door phone to initiate outgoing calls and to receive incoming calls, it needs to be registered on your SOP.Configuration on the SMP
As for a regular IP phone, you will need to create a resource and assign it to an extension:First, create a "Generic SIP Phone" (SDX) resource with a mandatory "Password" parameter.
Next, create an extension with the previously created "Generic SIP Phone" as its primary phone and with a custom callflow of your choice.
Finally, submit your modifications by doing an "Apply Changes".
Configuration on the door phone
Now, you will need to provide some parameters to the door phone, based on the changes made on the SMP:When filling in the few required parameters, keep in mind that:
- Phone Number (ID) = Authentication ID = "Generic SIP Phone" resource ID (SDX).
- Domain = Proxy Address = Registrar Address = SOP IP.
- The only password to provide in the one that was set in the "Generic SIP Phone" resource.
- You can let the other fields to their default values such as for the port (5060).
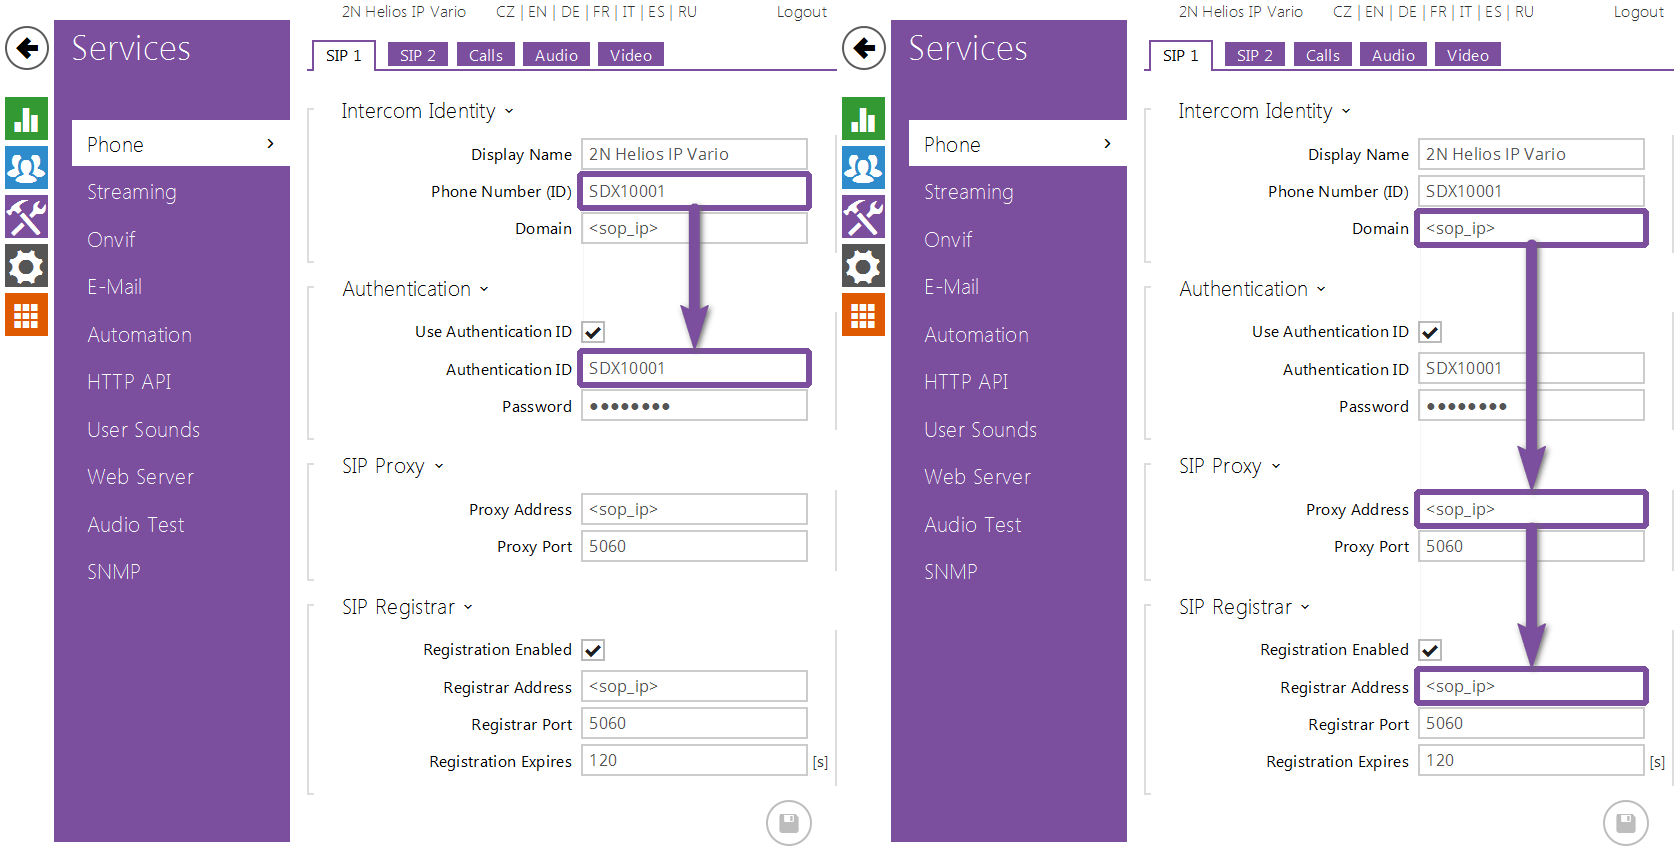
Don't forget to save the changes you made by clicking on the "Save" button (with a floppy disk icon) after what the phone should be registered on your SOP.

Configuring direct call to local phones as backup (optional)
If the internet or VPN connection fails, it won't be possible to call the SOP anymore. As a backup for that event, a second account can be configured to directly call some phones in the same LAN as the door phone.Create a SIP account for local calling
This account (SIP2) will configure how to reach Polycom phones in the LAN, without any internet access needed. This is invisible to Fusion.- Services -> Phone -> SIP2
- SIP transport protocol: UDP
- Encrypted outgoing calls (SRTP): checked
Create user for each local phone
Use the phone local IP address and add a "/2" at the end to call it with the SIP2 account.- Directory -> Users -> Add user
- Phone Number: sip:0@<Polycom IP>/2
Assign extensions to "Quick Dial" buttons
One of the basic features of a door phone is to call specific extensions when the corresponding "Quick Dial" (with a bell icon) buttons have been pressed.You will have to enable as many positions (= users) as you want "Quick Dial" buttons (the x th position being mapped to the x th "Quick Dial" button by default). Start by setting a user-specific extension for each of them:
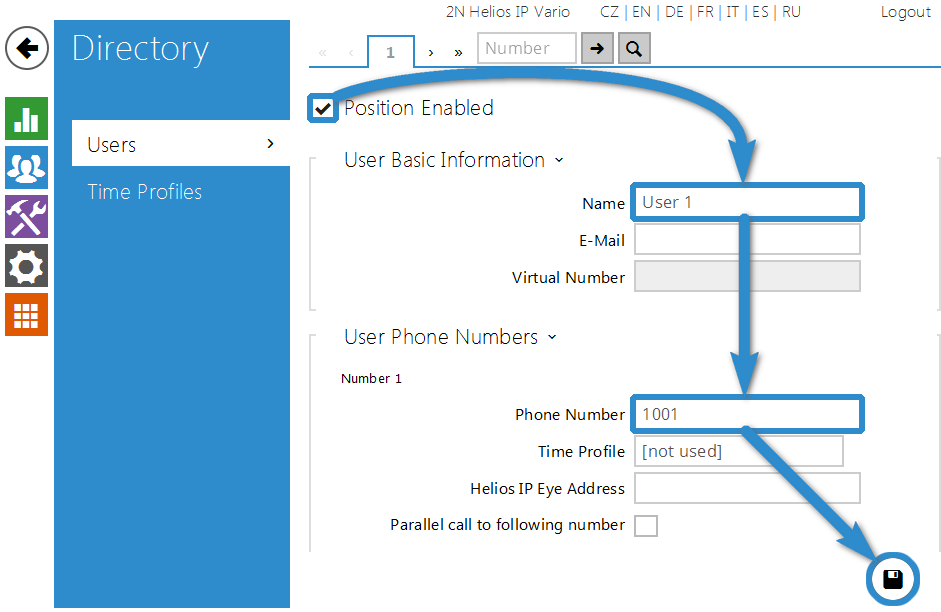
You can now assign the previously created user(s) to the desired "Quick Dial" button(s). For each button, just click on the associated "Search" button (with a magnifying glass icon), look for the desired user and simply click on it to validate the assignment.
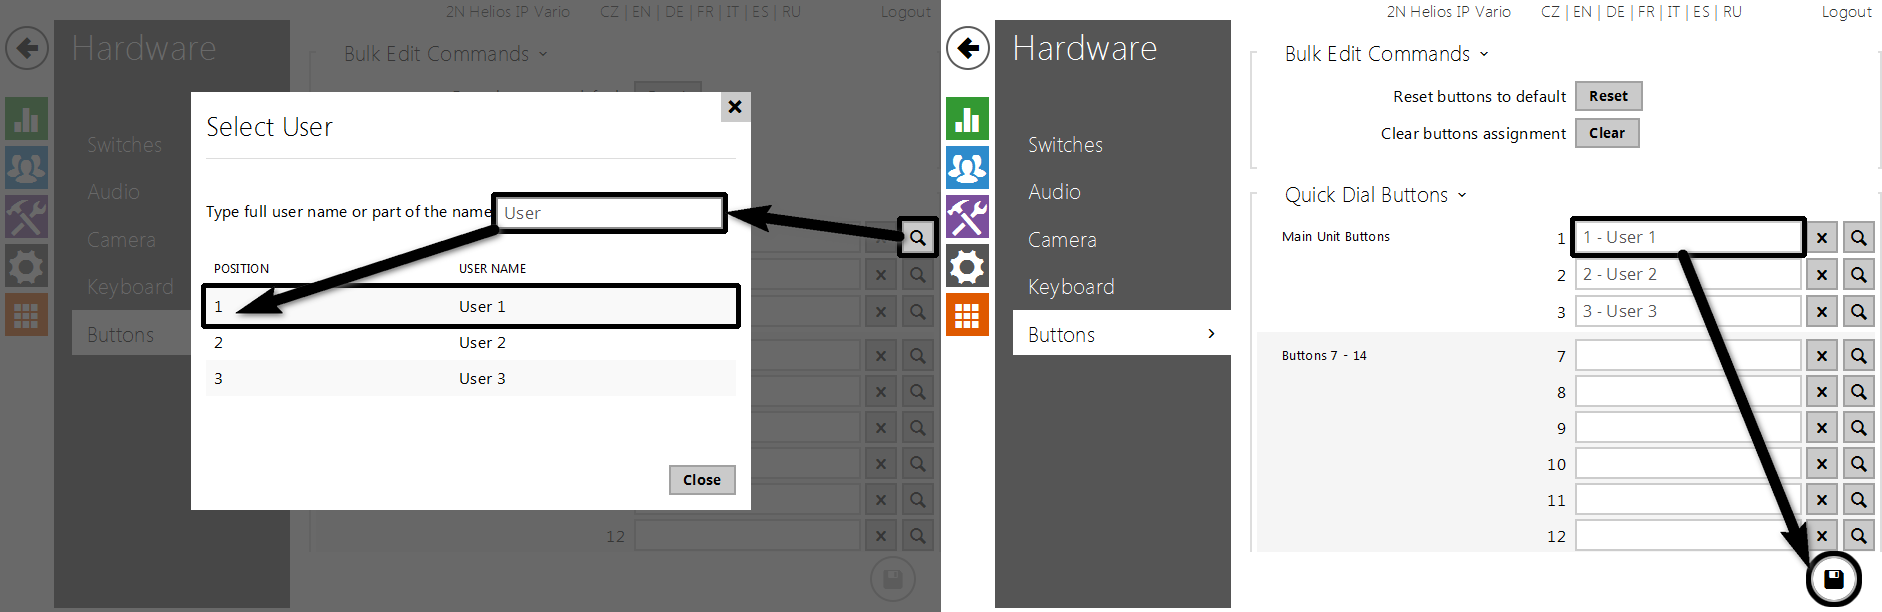
Don't forget to save the changes you made by clicking on the "Save" button (with a floppy disk icon) after what the "Quick Dial" buttons should call the expected extensions when being pressed.
Listen to "what is happening outside"
As it could sometimes be useful to listen to what is happening in front of the door phone, we will describe here the procedure to be able to do so.Configuration on the SMP
Start by creating a static profile (i.e. "CallDoor")
Followed by a single default status (typically "Service")
Next, create a custom callflow only composed of a single "CallDevices" action and set the "Generic SIP Phone" resource ID as the device to call.
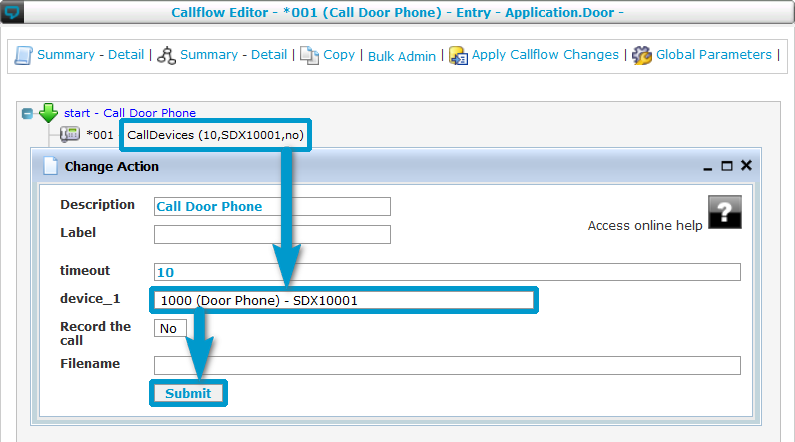
Finally, you will need to link the 3 previously created elements with a "callflow assignment". And don't forget to set the status as the profile default one.
From now you can choose to assign this profile to either a newly created extension or to the extension already created in the "Register the door phone on the SOP" section.
Configuration on the door phone
Check the "Automatic Pickup" checkbox for the line you configured in the "Register the door phone on the SOP" section and select the "Automatic" mode from the "Call Activation" drop down menu.
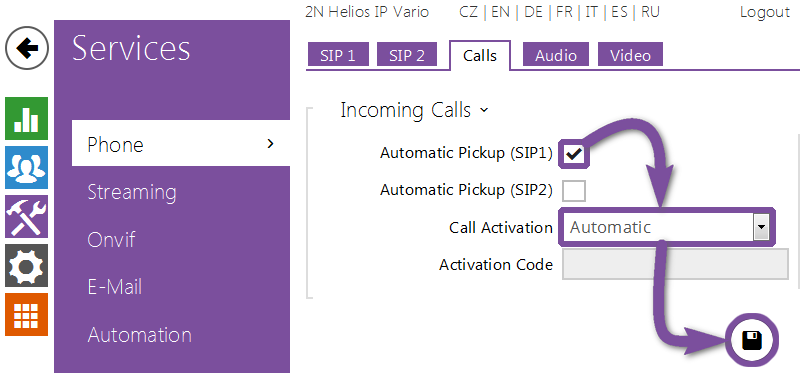
Don't forget to save the changes you made by clicking on the "Save" button (with a floppy disk icon) after what the phone will automatically pick up every incoming calls. From now, you should be able to hear what is happening in front of you door phone.
Look at "what is happening outside"
As it could sometimes be useful to look at what is happening in front of the door phone, we will describe here the procedure to be able to do so.
Configuration on the door phone
You can activate the video streaming simply by checking the "RTSP Server Enabled" checkbox and according to your network overall performance, you can also adjust the video quality in the codec-specific subsection:
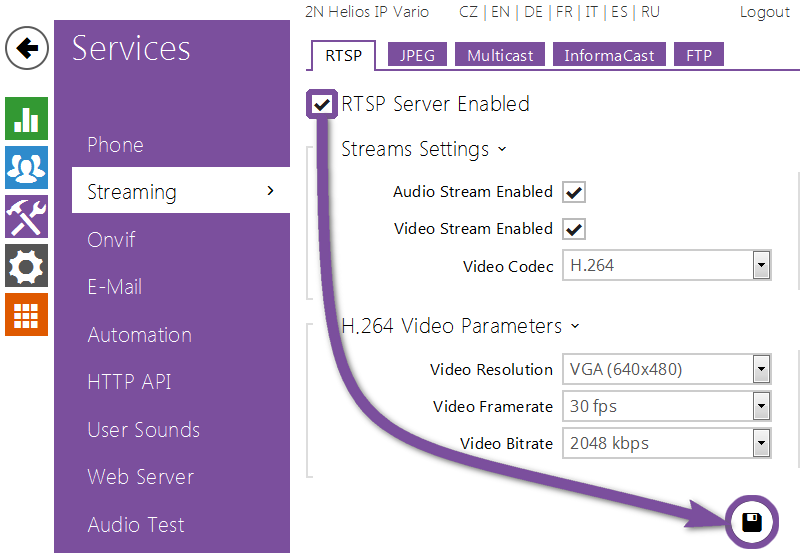
Don't forget to save the changes you made by clicking on the "Save" button (floppy disk icon) after what the video stream will be accessible to any remote clients!
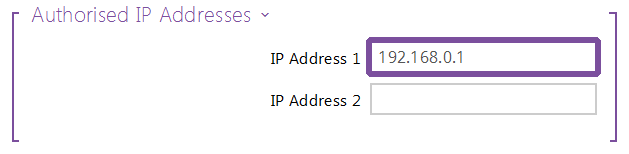
If you want to restrict the number of end-users able to stream the video from the doorphone, you will have to set few allowed IP addresses (up to 4 max):
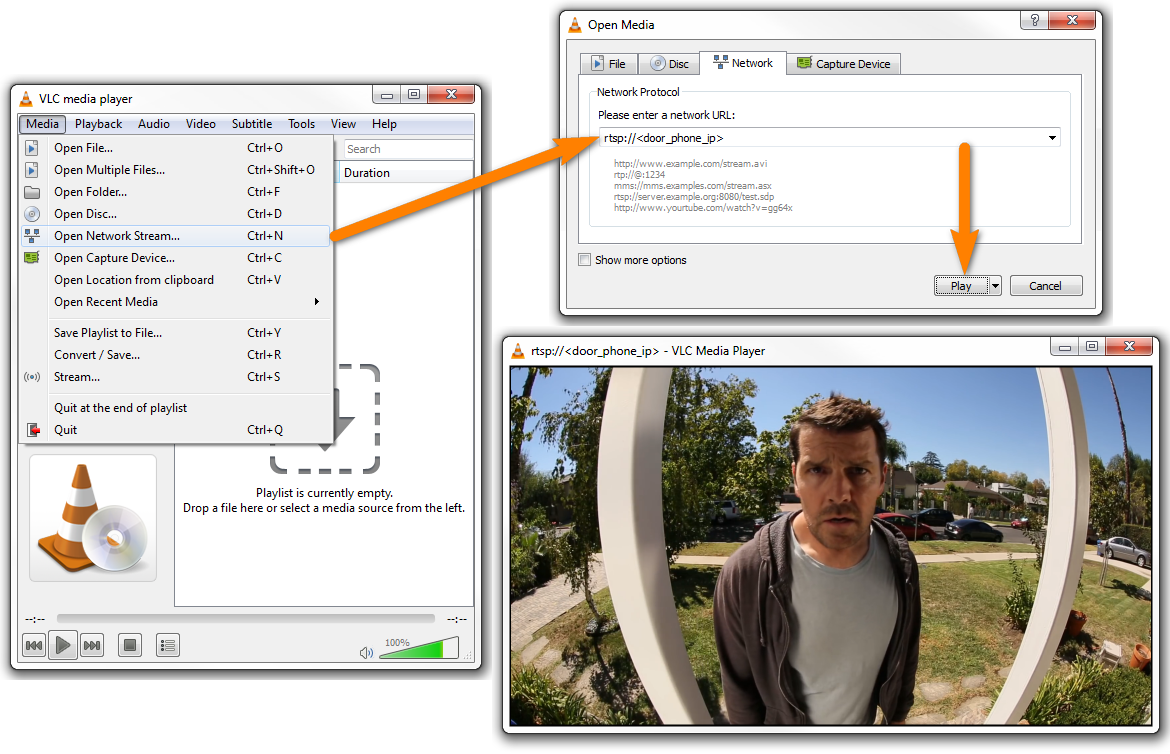
Video streaming client
As video streaming client we chose the renowned "VLC Media Player", that can be downloaded from here.In order to start reading the video stream coming from your door phone:
Enter "rtsp://<door_phone_ip>" as the network URL (i.e. rtsp://192.168.0.1) and click on the "Play" button. From now, you should be able to see what is happening in front of you door phone.
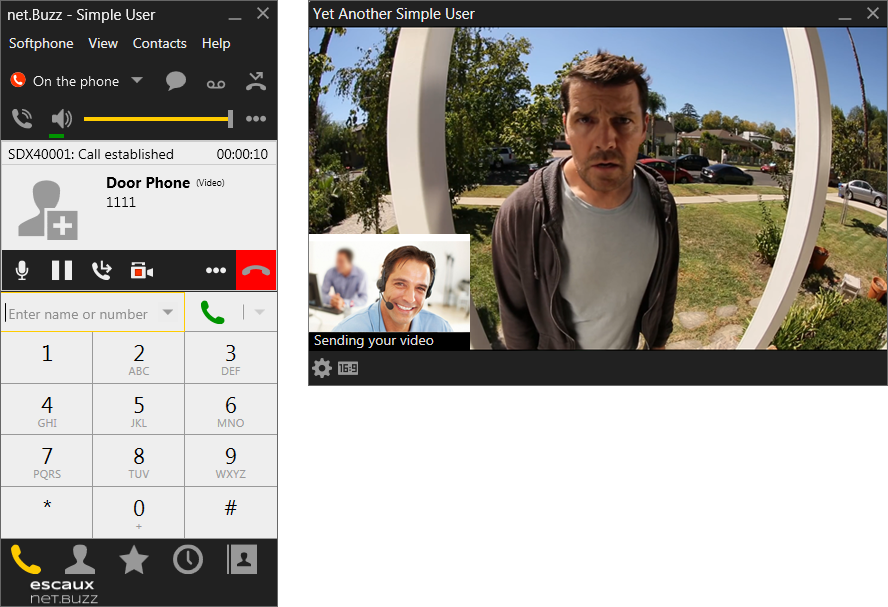
Establish a video call between the door phone and another video-compliant phone
As one of the main features of this door phone is to hear but also, and above all, to see who is at the door, you may want to make it call another video-compliant (soft)phone.In order to establish a video call between the door phone and another video-compliant phone, you will need to configure their respective resources by following the "Video Telephony Support Implementation" guide.
And finally, replicate that same configuration in the door phone web interface:
Remotely unlock the door
As one of the main features of this door phone is to unlock the door to authorized people, we will describe here the procedure to remotely unlock the door by sending a DTMF signal from any internal/external phone in conversation with the door phone.
First start by enabling the software Switch, then choose the "Monostable" mode and define the related "Switch-On Duration", so that the door will be unlocked for 5 seconds and then locked again.
From here, we have to choose between either a specific "Controlled Output" or "HTTP Commands".
Using the doorphone Switch to trigger a Controlled Output
Most of the doorphone configurations are using the internal relay output of the doorphone to control the door locker. When an Helios IP doorphone is connected to an analog PBX, the cabling diagram may look like this: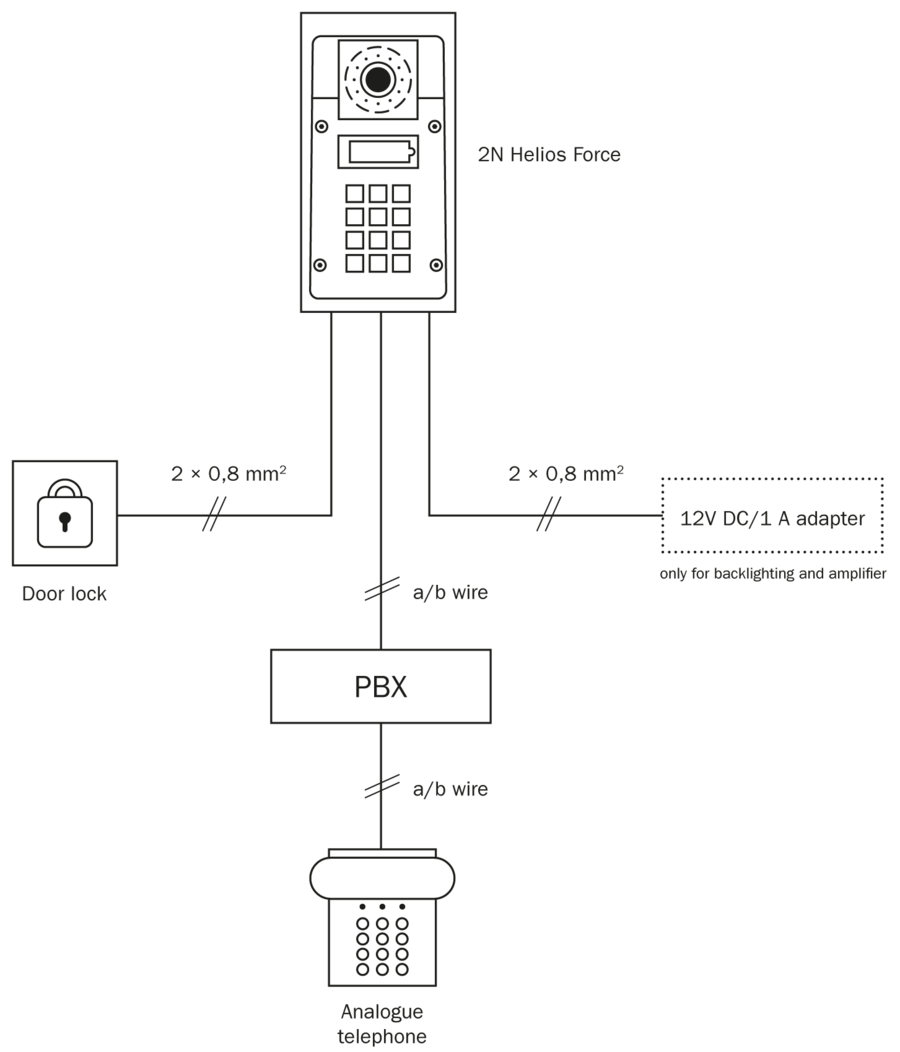 As you can see on above diagram, the Door lock is directly connected to one of the Relay output of the Helios doorphone. In this case, you just need to select Relay 1 or Relay 2 depending on the electric cabling.
Finally, we need to set a specific action to trigger the door unlocking. In our example, we will configure a DTMF code which can be sent by the called phone and/or by the keypad of the doorphone. This DTMF code must be at least 2-digits long but it is highly advised to set a 4-digits long one.
As you can see on above diagram, the Door lock is directly connected to one of the Relay output of the Helios doorphone. In this case, you just need to select Relay 1 or Relay 2 depending on the electric cabling.
Finally, we need to set a specific action to trigger the door unlocking. In our example, we will configure a DTMF code which can be sent by the called phone and/or by the keypad of the doorphone. This DTMF code must be at least 2-digits long but it is highly advised to set a 4-digits long one.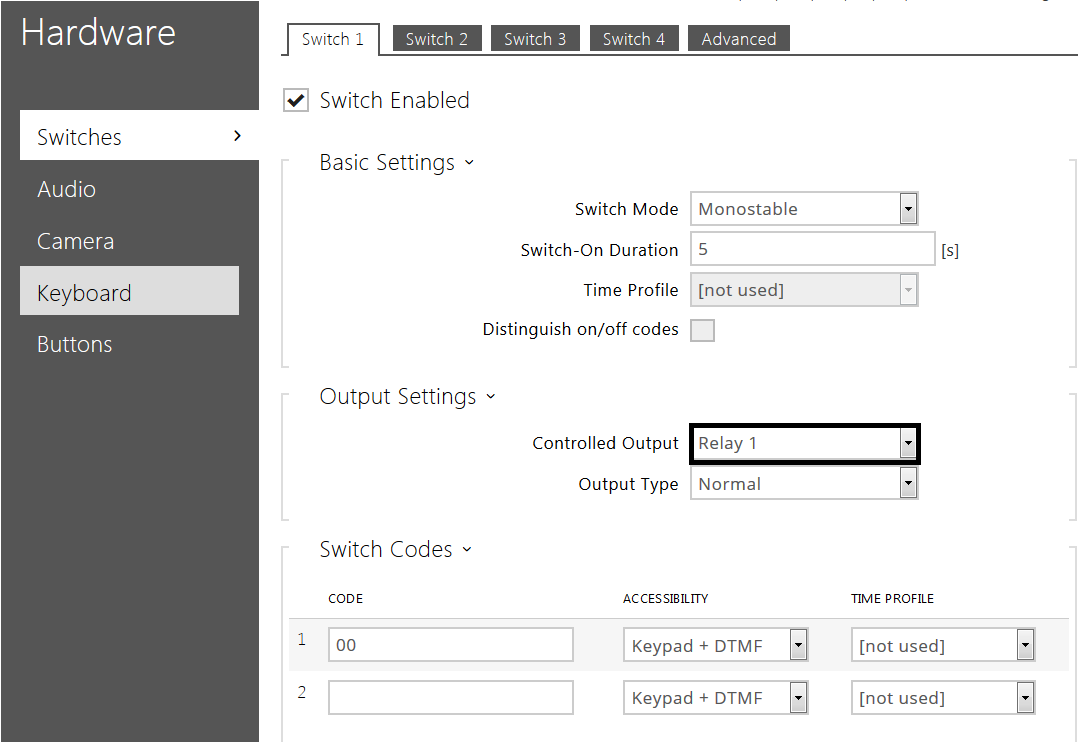
Using the doorphone Switch to send HTTP commands to a remote IP relay
The software Switch of the doorphone is also able to control a remote IP relay by sending HTTP commands. This method is also used by Helios badge readers to unlock the door. To trigger a remote IP relay, we will set the "Controlled Output" to "None" and provide our relay-specific commands URL (i.e. http://<relay_ip>/state.xml?relay1State=[0|1]).In this case we also need to set a specific action to trigger the door unlocking: DTMF code sent by a remote phone and/or the keypad of the doorphone.
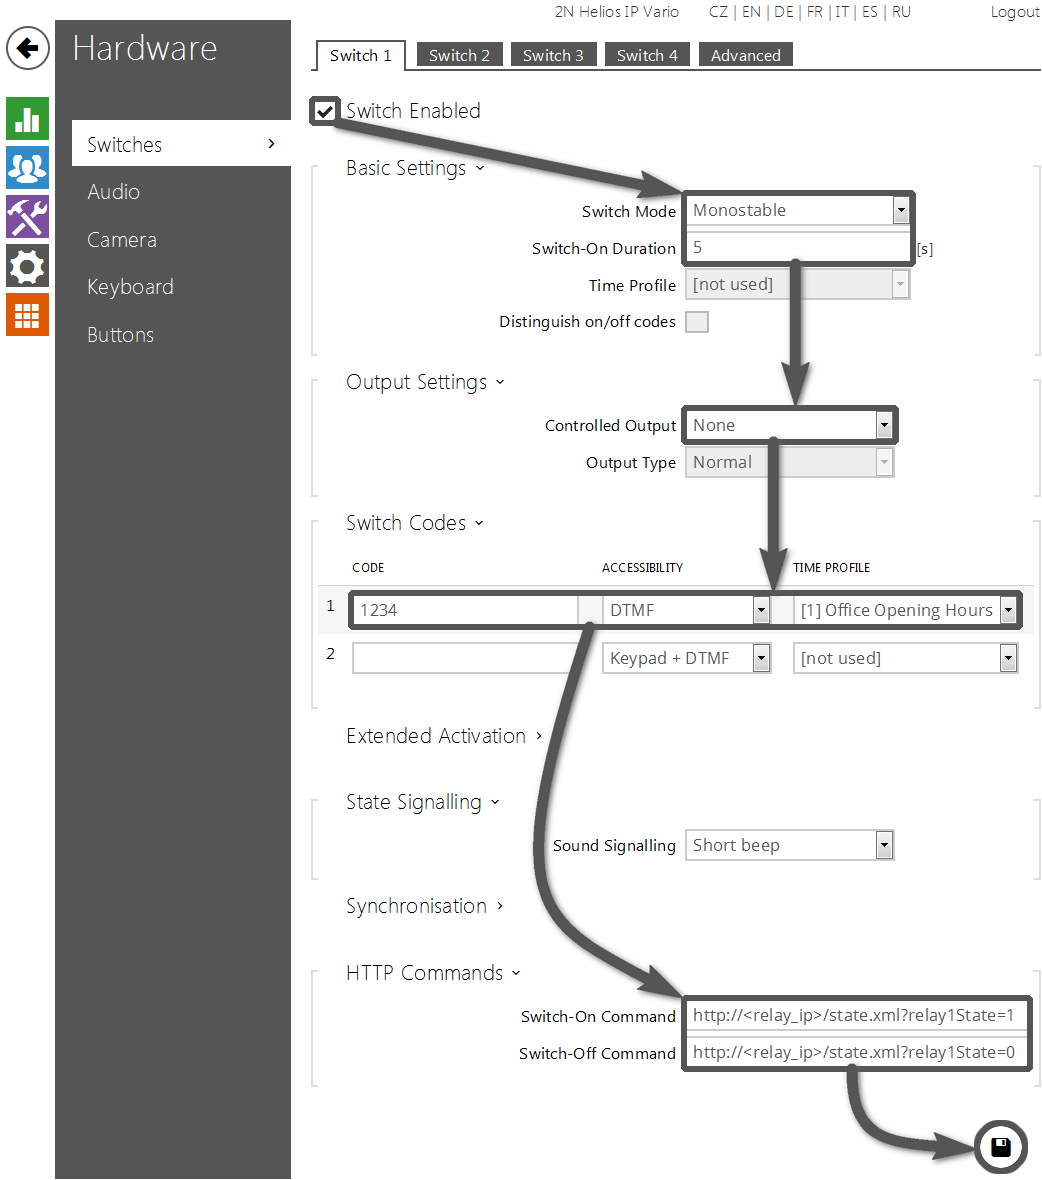
Don't forget to save the changes you made by clicking on the "Save" button (floppy disk icon) after what anyone called by the door phone will be able to unlock the door by pressing the "1234"+"star" => "1234*" sequence on their phone's dialpad.
All-in-one solution ("2N Helios IP Eye" software)
At this point, thanks to the previous sections, we are able to use each of the former features, but on an individual basis only!That's where the "2N Helios IP Eye" software come in action: it combines most of the previously mentioned features such as video streaming, door unlocking or even triggering of pop-up notifications!
It can be freely downloaded either from their official website or from this wiki page (may be outdated). Simply extract it from the archive and run it, while the current section will explain us how to configure it!
Video streaming
Configuration on the door phone
First make sure to have enabled the "Camera API"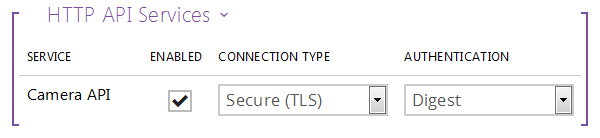
In addition to enabling it, don't forget to secure the API connection by setting the "Connection Type" as "Secure (TLS)" (use HTTPS instead of HTTP) and the "Authentication" as "Digest" (require credentials and encrypt the password before sending it).
Now that the connection is secured, it will require credentials that you can set in the following section:
- Check the "Account Enabled" checkbox
- Input a "User Name" and "Password" combination
- Check the "Camera Access" checkbox
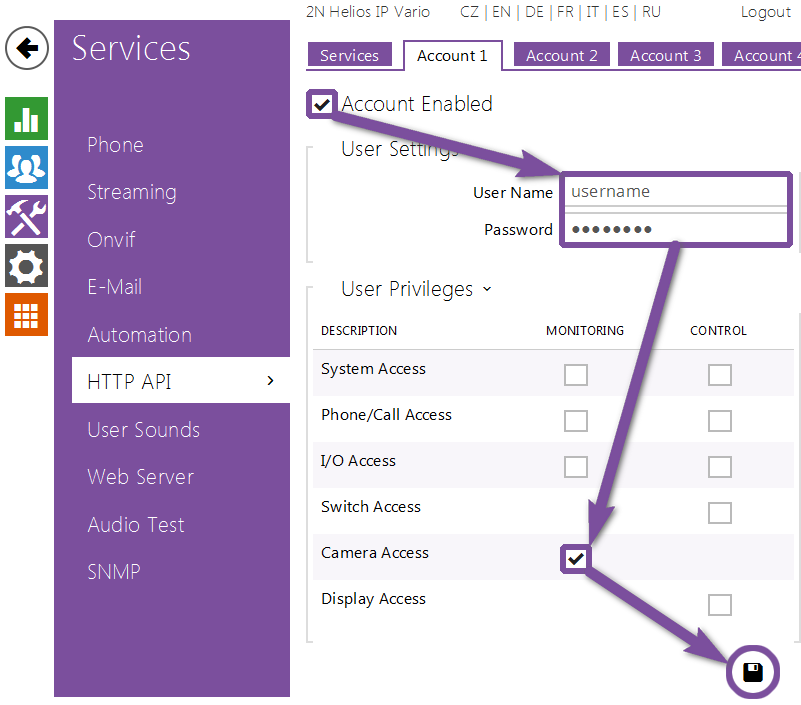
Don't forget to save the changes you made by clicking on the "Save" button (with a floppy disk icon) after what the Camera API should only be accessible with that account.
Configuration in the software
- Click on the "Add Camera" button so that it will add a new line
- Then, click on the "magnifying glass" icon of that line to look for available cams in your local network
- A pop-up containing the list of available cameras will be displayed
- Once successfully found, select it and click on the "OK" button
- Finally, click on the "padlock" icon of the same line to input your credentials
- A prompt asking for the user and password combination will appear
- Once you've input the same credentials as in the previous section, click on the "OK" button
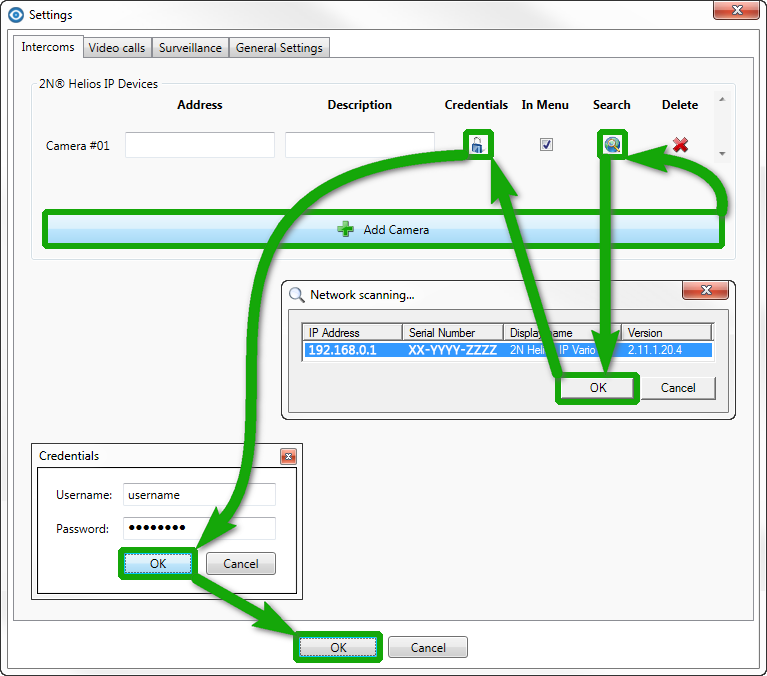
To apply every of the former changes, click on the "OK" button of the main "Settings" window.
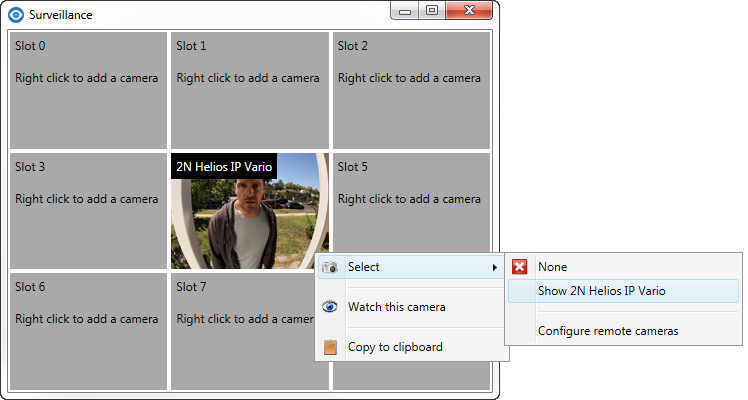
Now, we will add a preview thumbnail in the main screen for the previously configured camera:
- Right-click on the position you want to place your camera preview at (3x3 display by default)
- Choose the "Add <your_camera_description>" item from the contextual menu
Door unlocking
Configuration on the door phone
Same as for the "Remotely unlock the door" sectionConfiguration in the software
Right-click the camera preview your previously added in the main interface and choose the "Show <your_camera_description>" item from the contextual menu
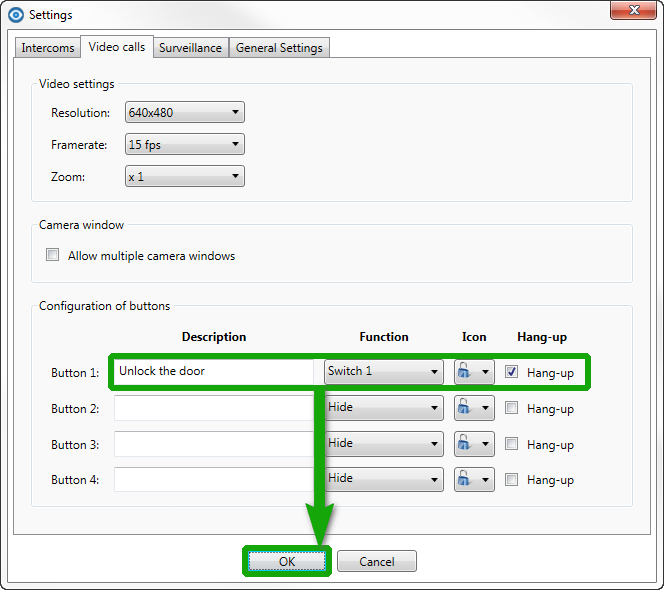
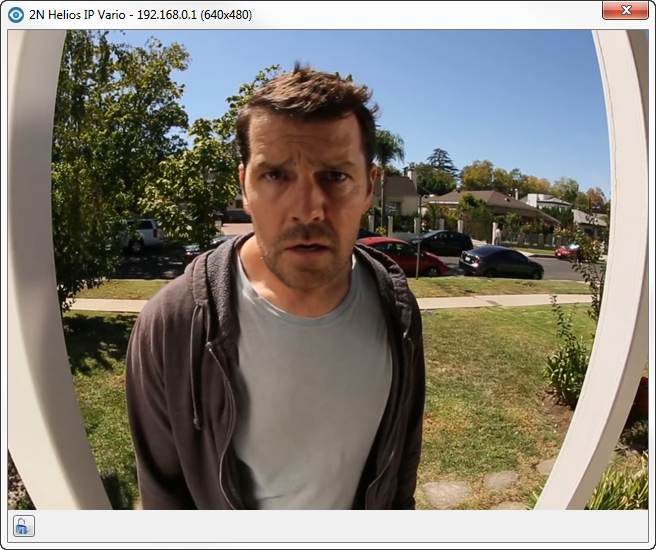
The camera stream should now be displayed in a separate window with an "action" bar at the bottom of it, allowing us to trigger predefined switches (represented by a "padlock" icon in this case):
Pop-up notifying
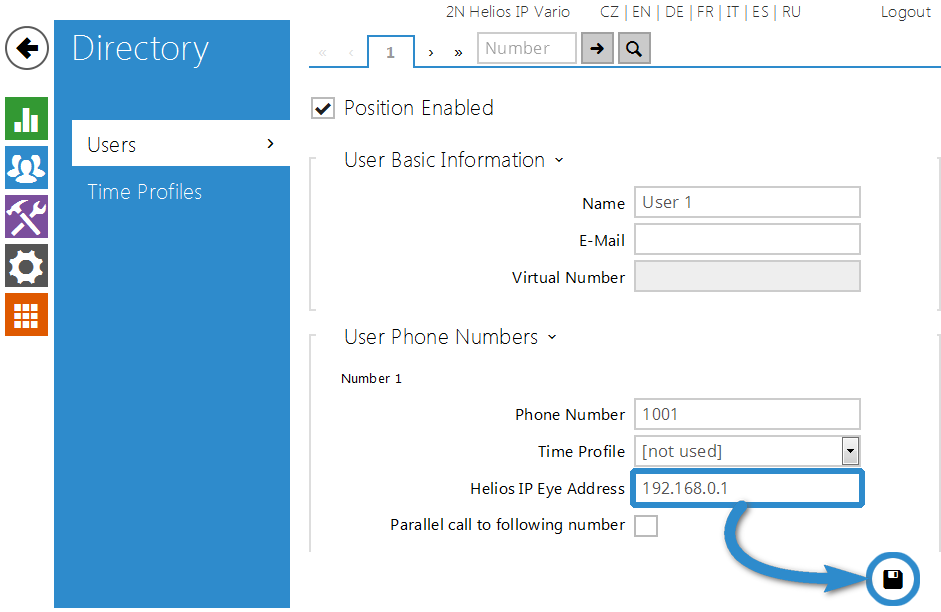
Configuration on the door phone
Bring modifications to the user previously created in the "Assign extensions to Quick Dial buttons" sectionJust set the "Helios IP Eye Address" parameter to the IP of the desktop computer where the "Eye" software will be installed on
Here, there is nothing to do in the software itself!
The "Eye" software will automatically trigger a pop-up window when someone ring at the "quick dial" where the "IP Eye address" is set!
Limitations
Active-Active configuration
Even if the door phone has 2 available SIP lines, an "Active-Active" setup is currently not supported for this device.2N Helios installation with PureCloud over Public Internet, without VPN
This setup without VPN is not supported with PureCloud at the moment. Copyright © Escaux SA