Fusion 4: Installation Guide
Software module installation
Sop settings
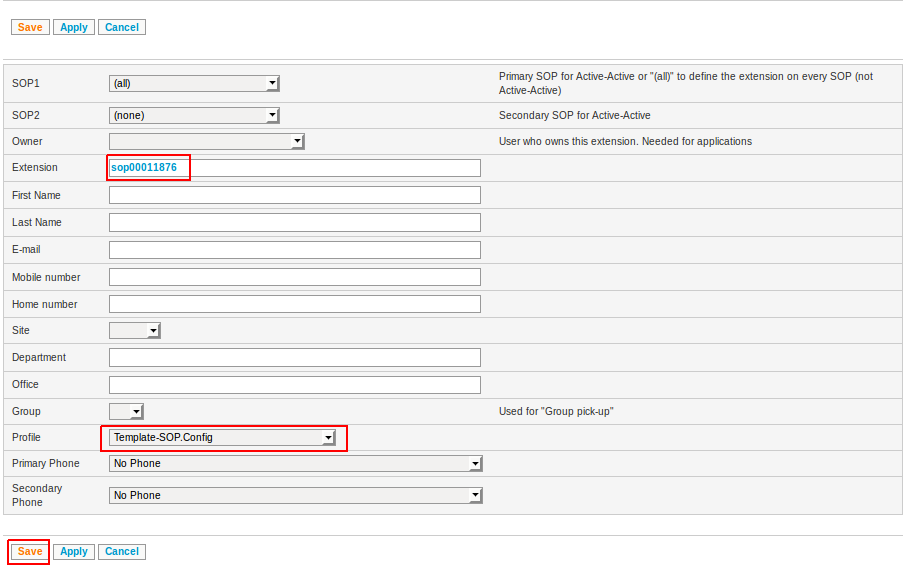 Open the profile parameters of the extension and fill in all fields. For help on the profile settings, click on the interrogation mark icon that is available on the right upper part of the profile parameters page:

Extra software modules
If you are configuring a cluster, the following extra modules must be added on each SOP of the cluster:- Cluster & SOP Active-Active Support
- SSH Peer Connectivity
- High Availability
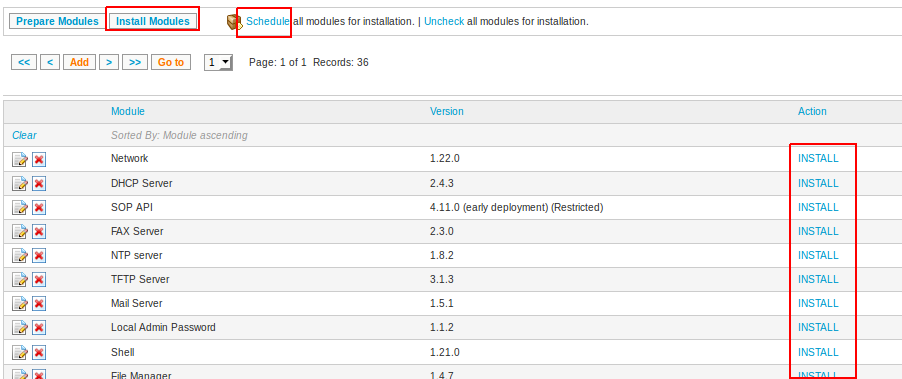
Install modules
- Select Schedule all modules for installation to make sure all modules are set to INSTALL
- Press the Install modules button
Software configuration
Site configuration
The site configuration is required for the following services:- Site-based routing of the emergency number in an international cluster
- Emergency number prefixing as required by the SIP provider
- Site-based routing of public short service numbers
- Site-based default language when calling some PBX service numbers such as the PUM login
- User Attribute 1: zip code of the site (ex: 3120)
- User Attribute 2: caller number to be used when doing an emergency call (ex: +32123456)
- User Attribute 3: country code of the site (ex: BE)
- User Attribute 4: default language of the site (optional)
- fr_BE
- fr_FR
- nl_BE
- nl_NL
- en_UK
- de_DE
- it_IT
- es_ES
Call routing
Incoming calls
All incoming trunks should be set in the context FromOutside. This will guarantee that all incoming calls are pre-processed correctly by using an incoming call catcher (show the name of known contacts, adapt the number formats, etc.).- Trunk specific: IncomingCallCatcherSop<sopkey>Trunk<trunk name> (Example: IncomingCallCatcherSop00001234TrunkSOA10001)
- SOP specific: IncomingCallCatcherSop<sopkey> (Example: IncomingCallCatcherSop00001234)
- Default: DefaultIncomingCallCatcher (this one is included in the template and cannot be modified).
Outgoing calls
A called number prefixed with the outside line access code configured in the SOP settings will be considered as an external number and will be sent out using an outgoing CallCatcher. The CallCatcher will define which interface will be used, which number format will be used, etc. By default, calls will be sent to the DefaultOutgoingCallCatcher<sopkey> extension (ex: DefaultOutgoingCallCatcher00011876).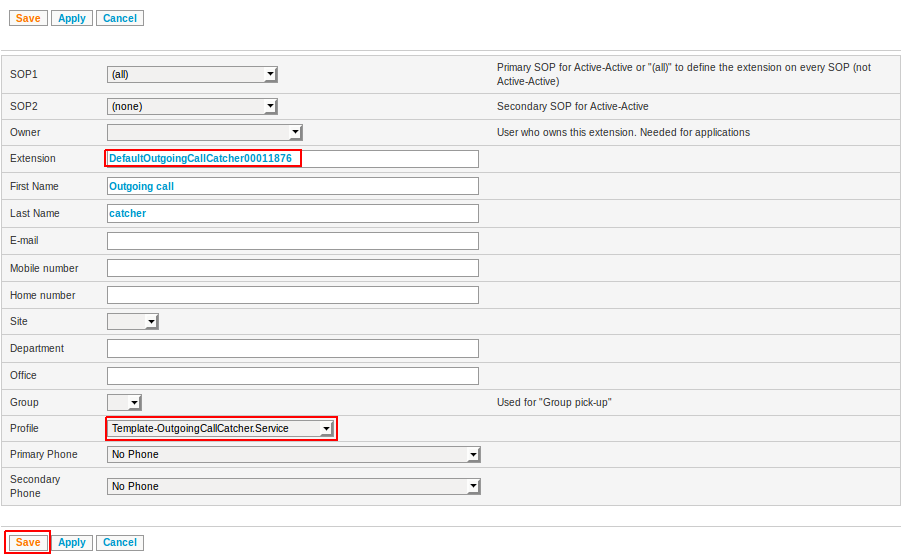 Open the profile parameters of the extension and fill in all fields. For help on the profile settings, click on the interrogation mark icon that is available on the right upper part of the profile parameters page.

Least cost routing
If part of the traffic needs to be sent to a specific OutgoingCallCatcher located on a specific SOP of the cluster, a route can be created (e.g. +32. to capture the traffic to the country whose country code is 32). It is recommended that the related OutgoingCallCatcher reformats the caller ID to the format Plus E164 and uses the _MeshSipTrunk associated to the destination SOP. The !MeshSipTrunk must have the Remote-Party-ID header activated so that all the privacy and screening indicators are carried as well to the destination SOP. Note also that from Fusion version 4, all external numbers are automatically standardized to format Plus E164. An external number will therefore always arrive in the OutgoingCallCatcher in this format.Multi route and FMU
In case FMU MTC is used, following scenario might occur:- An FMU user is de-registered by using 5001 (example: internal: 2001, external: 0475123456)
- A colleague tries to call the FMU user on his mobile phone number (0475123456)
- The SOP does local rerouting for known DDIs, the call will be rerouted to extension 2001
- The FMU user will not see the call on his mobile phone
- Extension: _FMU.
- Profile: OutgoingCallCatcher
- Context: default
- Trunk 1
- Interface: Select the SIP trunk of the UEP (or the FMU if any)
- Called: Select 'Drop the route prefix - Plus E164'
- Caller: select 'Do not modify the caller number'
Route Group based routing
In the same way, if an external call is coming from an extension which is part of a Route Group, the called number will be automatically prefixed with GROUPx where x is the Route Group number. It is then possible to add a route _ GROUPx. so that these calls can be sent to a dedicated OutgoingCallCatcher. If both the FMU and the Route Group are used, a route such as _FMUGROUPx. needs to be created.Intra-cluster routing
For each SOP in the cluster, a MeshSipTrunk should be created. The context for these trunks must be NoRestrict and the directory identifier must be sopxxxxxxxx. Updating the intra-cluster routing is no longer needed.Emergency calls
When calling an emergency number, the emergency service needs to know your location. This used to be easy by simply looking where a BA is terminated for example. Because of remote offices, connected over VPN to a single server, this becomes more difficult as the location of the caller is not necessarily the same as the termination point of the line.Some SIP platforms allow you to send the location of the caller. This information is passed to the operator by changing the called number so it contains the zip code of the caller. Example: You call from a remote site in Tremelo (zip code 3120) to the emergency number 112.
The main number of the site in Tremelo is +3216123456. In this case, if the call will be rerouted to (<prefix><emergency number><zip code>, order depending on the configuration) 1992 112 3120 and the caller number will be +3216123456 This allows the emergency services to know your location (zip code) and to contact someone on your site (the main number). Keep in mind that someone needs to be able to pick up this main number at all time as this is the number that will be used by the emergency services to call you back. The location of the user is based on the Subnet and Site Configuration. Make sure to have the correct Site Configuration.
Supported prefixed setups
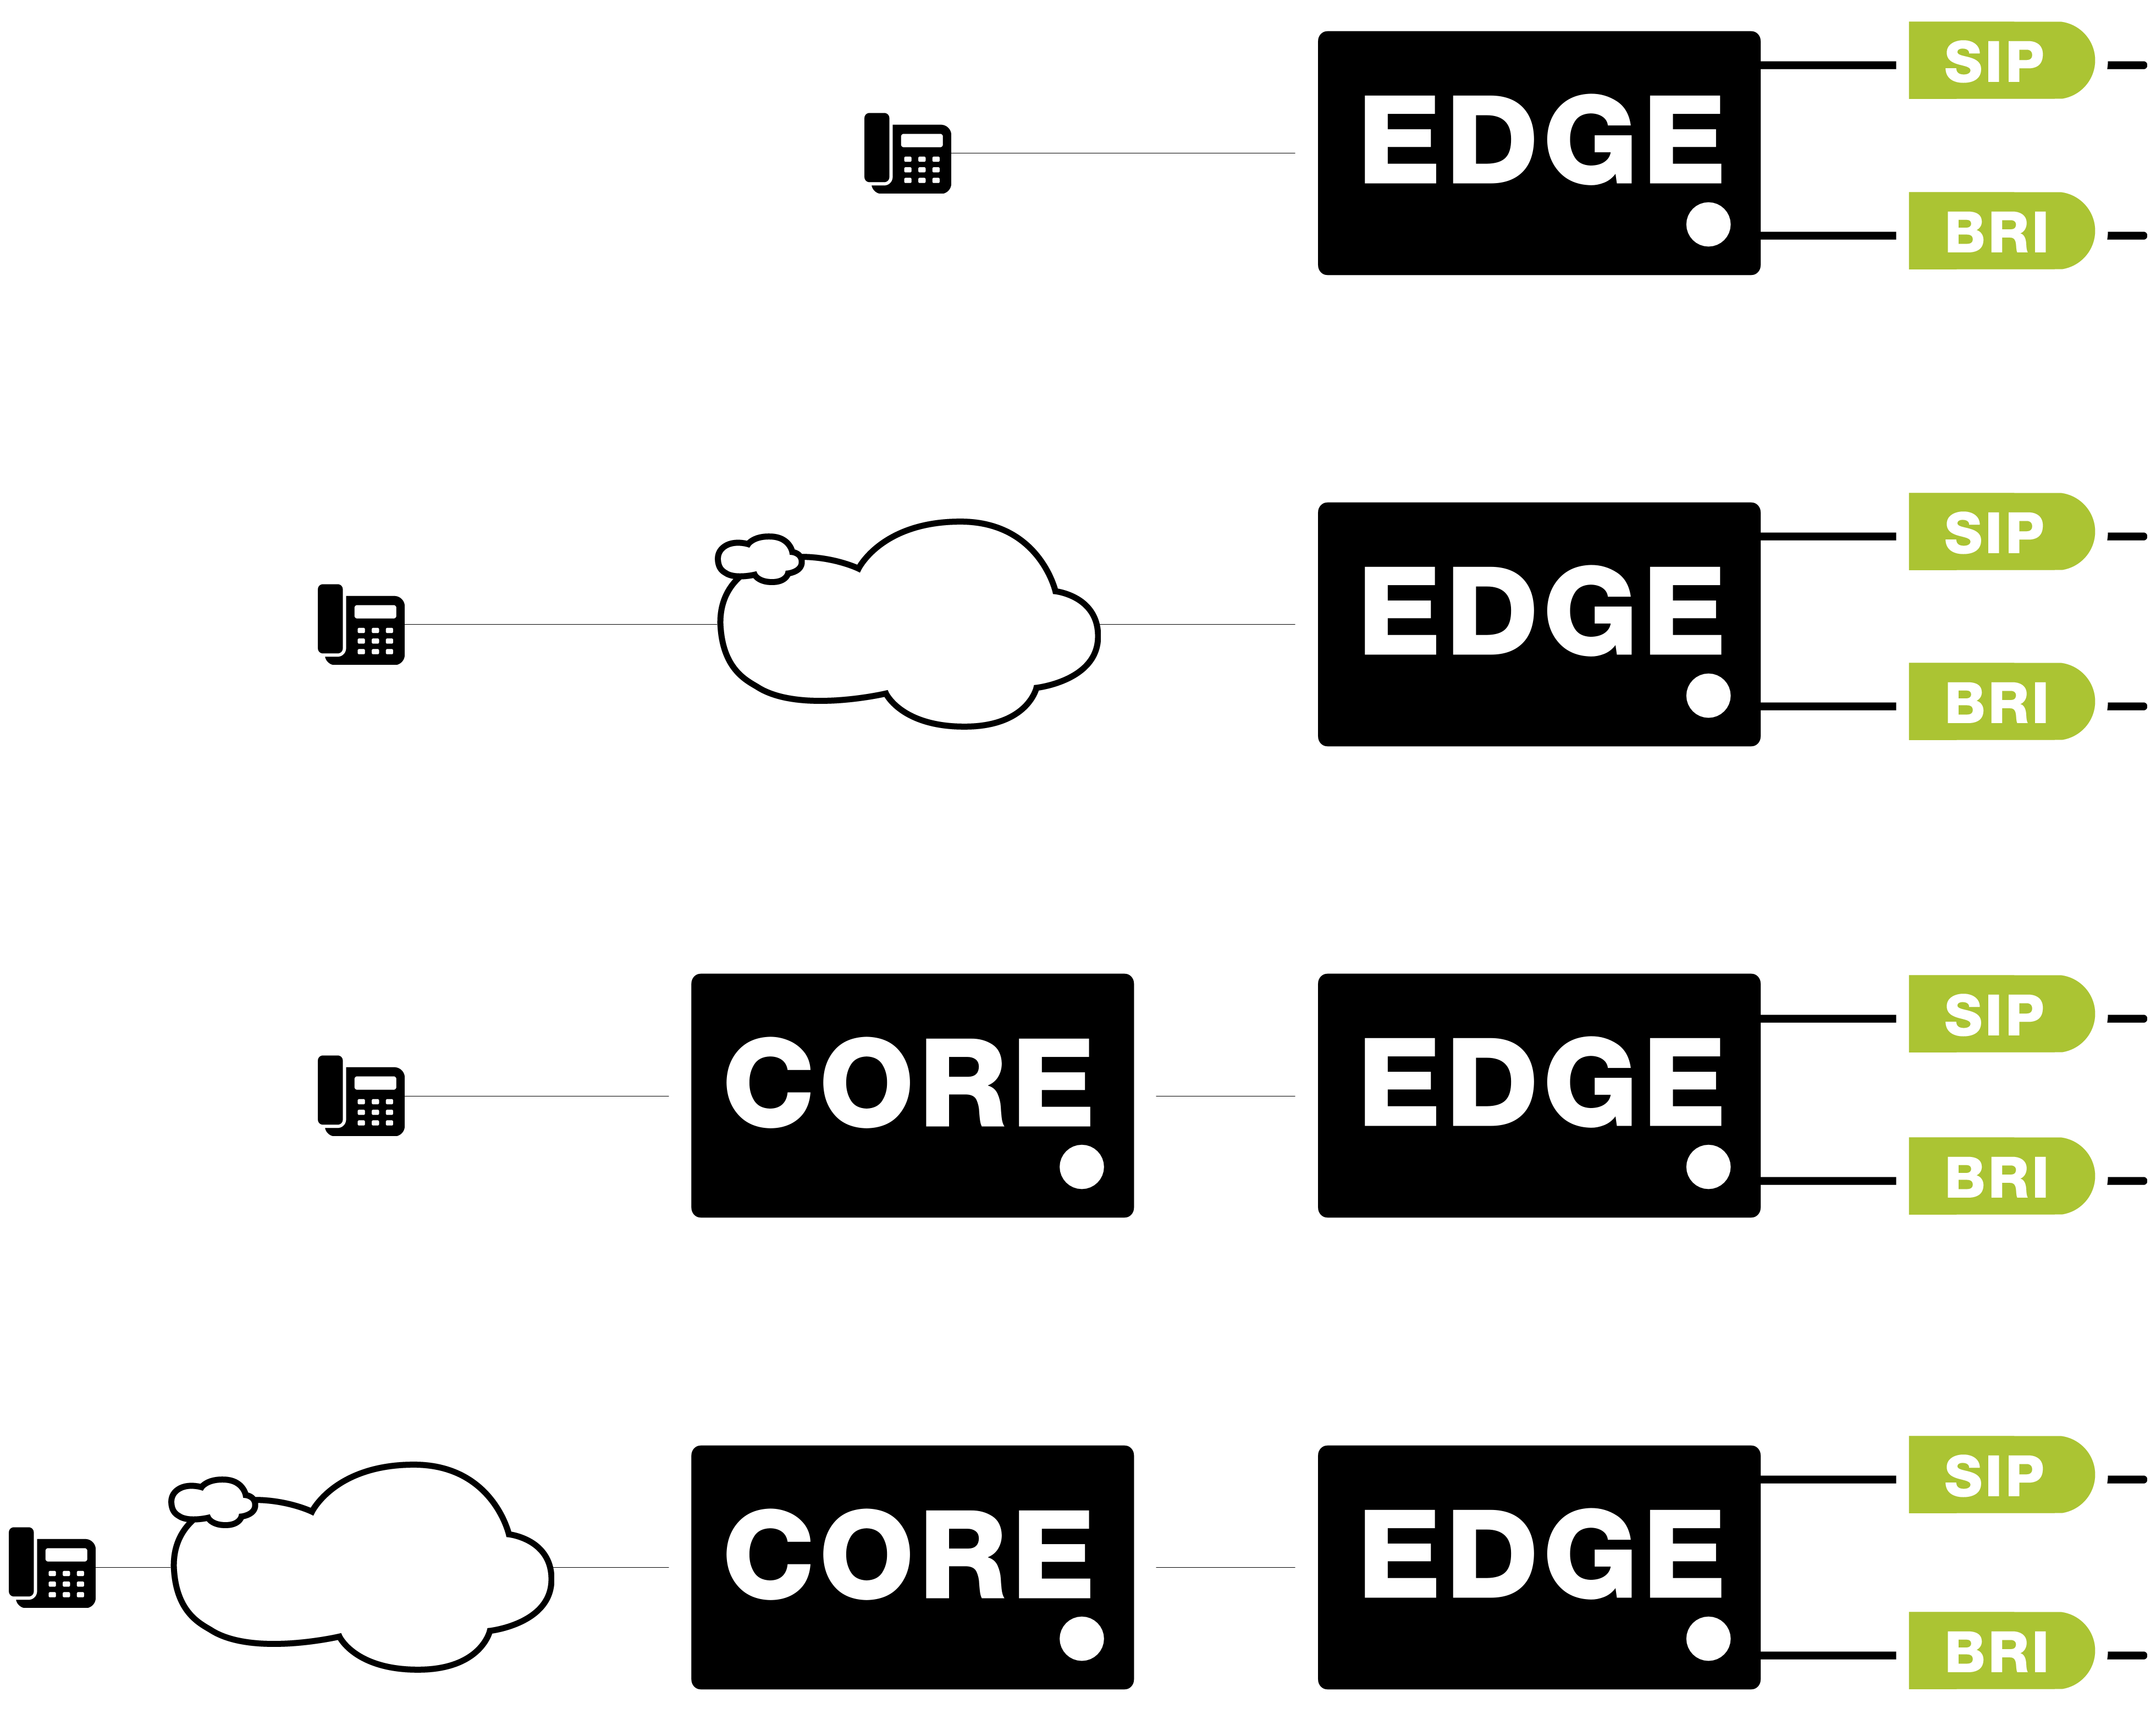 4 setups have been validated. The scenario is the following:
 - The edge server has connectivity to:
- Primary trunk: a (SIP) platform which supports emergency number prefixing
- Secondary trunk: a (BRI) platform which does not support emergency number prefixing
- A phone makes an outgoing emergency call:
- While trunk 1 is functional
- While trunk 1 is down
Callflow customization
Hooks
In the callflows delivered with Fusion 4, a set of hooks has been integrated at the different steps of the call processing so that it is possible to do some small changes in the standard call processing while still being able to upgrade smoothly the template. A typical example is the activation of the call recording when a user's device is ringing or when a user makes an outgoing call. The following steps describe how to do this:- Create a new Profile. It is recommended not to define any profile parameters for this one. It could cause some conflicts with the template callflows.
- Create a new callflow with as First action BeginSub. Refer to the table below to know which parameter is available for which hook. You can also add in it the list of variables that you want to have temporarily available the time to execute the SubCallflow.
- The last action of the callflow should be Return at least version 2.2.0 to return to the initial callflow.
- Assign the callflow to the profile. Select STARTCALLFLOW as application selector.
- Add an entry in the directory. The extension must start with the prefix hook.
- Configure the hook for each entry (user, call queuer, outgoingcallcatcher) for which you would like the subcallflow to be executed.
| Profile | Hook | Input parameter | Description |
|---|---|---|---|
| Template-User | Hook before starting the user callflow | CallerName | Provides the information displayed to the called party |
| CallerNumber | Provides the original number of the caller party | ||
| ConnectedName | Provides the information displayed to the caller party | ||
| ConnectedNumber | Provides the number presented to the caller party | ||
| Template-User | Hook before calling the user's device | CallerName | Provides the information displayed to the called party |
| CallerNumber | Provides the original number of the caller party | ||
| ConnectedName | Provides the information displayed to the caller party | ||
| ConnectedNumber | Provides the number presented to the caller party | ||
| Template-User | Hook after user answered | CallerName | Provides the information displayed to the called party |
| CallerNumber | Provides the original number of the caller party | ||
| ConnectedName | Provides the information displayed to the caller party | ||
| ConnectedNumber | Provides the number presented to the caller party | ||
| Template-OutgoingCallCatcher | Hook before calling the interface | CallerName | Provides the information displayed to the called party |
| CallerNumber | Provides the original number of the caller party | ||
| ConnectedName | Provides the information displayed to the caller party | ||
| ConnectedNumber | Provides the number presented to the caller party | ||
| Template-IncomingCallCatcher (Fusion 4.15.0+) | Hook before dispatching the call | CallerName | Provides the information displayed to the called party |
| CallerNumber | Provides the original number of the caller party | ||
| ConnectedName | Provides the information displayed to the caller party | ||
| ConnectedNumber | Provides the number presented to the caller party | ||
| Template-CallQueuer | Hook before queuing the call | CallerName | Provides the information displayed to the called party |
| CallerNumber | Provides the original number of the caller party | ||
| ConnectedName | Provides the information displayed to the caller party | ||
| ConnectedNumber | Provides the number presented to the caller party | ||
| QueuePreferredDevice | Sets the preferred device (a call attempt will be made to it before the queue strategy takes over). | ||
| Template-CallQueuer | Hook before connecting the agent | CallerName | Provides the information displayed to the called party |
| CallerNumber | Provides the original number of the caller party | ||
| ConnectedName | Provides the information displayed to the caller party | ||
| ConnectedNumber | Provides the number presented to the caller party | ||
| More variables | List found in Queue Connecting Service | ||
| Template-OnStatusChange | Hook before applying queue policies and publishing status change | DbSetProfileExt | Extension for which the status was changed |
| Note | For this hook, you have to create an extension named hookBeforeStatusChange in the directory internal context. |
Hangup handlers
A hangup handler enables to trigger a callflow when a channel is hung up. This handler must be activated by the action ManageHangupHandlers.Automatic callback
Starting with Fusion 4.12, an automatic callback service is available and can be completely customized. Callbacks can typically be requested when the estimated waiting time is too long, or as the timeout action of a Call Queuer. This service is different from the simple callback on busy (aka auto-recall).Adding extra modules and resources
Even though some resources have not been included in the Fusion 4 template, it is still possible to add and use them.- When doing a template upgrade the extra resources and extra modules will be preserved. We strongly advise you however to check at each upgrade the specific behaviour of those extra resources and modules as their validation is not part of the Fusion Quality Assurance.
- If the version of a module or a resource is controlled by the template, it is not possible to add them as extra resources or extra modules. The version defined in the template must be used.
Adding a new SOP in a cluster
Each time a SOP is added to an existing cluster, all the steps described in this document must be repeated for the new SOP. Moreover, the module Cluster & SOP Active-Active Support must be reinstalled on all the SOPs of the cluster so that these ones can see the new SOP.Software updates and upgrades
For each upgrade or update, please follow the steps below:- Read carefully the release notes in which you will find:
- The specific releases note of the template
- The incremental release notes of every included resource and module
- The dependencies
- The special manual upgrade actions
- Apply the template upgrade on each sopkey
- Go to page Modules, click on Schedule to select all modules and then on Install modules.
- Select the SOP key of the cluster
- Go to Advanced, then click on 'Apply public template upgrade'
- Select the template you want to use and click on Upgrade.
- Apply the special manual upgrade actions (see release notes).
- If you created some resources which do not inherit from the master resource, the version won't be inherited. After the template upgrade the versions will have to be updated manually so that the apply-change is allowed.
Copyright © Escaux SA