Administrator Guide: Fax Server 2
Introduction
The fax server is a piece of software running on the SOP. It is equivalent to having a physical fax machine. The minimal fax server installation allows you to use fax to mail, which allows you to receive faxes in your mail box. If you add net.Desktop or a Print to Fax client you will be able to send faxes. A dedicated local fax extension is needed. Its an extension used for sending or receiving faxes. Local fax extensions are able to receive faxes and send them to the e-mail address configured in the "e-mail" field of the extension. You can change the recipient of the fax by changing the e-mail address and pressing on "Apply Changes". You can have a single Local fax extension, or multiple ones for example one per department or one per user. An outgoing fax account is generated for each local fax extension:- Username: It will be the extension of the directory entry. Usage of the email address defined in the extension is no longer a valid credential, since Fax Server 1.8.7+.
- Password: It will be the pin-code of the directory entry.
- On baseline 2: up to 16 simultaneous faxes to 1 individual number (the amount depends on what you ordered).
- On baseline 1: 4 simultaneous faxes to 1 individual number.
- net.Desktop
- HylaFSP (Windows Vista, Windows 7) (Print to fax client)
List of features
- Fax to email
- net.Desktop to fax
- HylaFSP to fax
- Email to fax
Important notes before installation
Fax communication are degraded by VoIP transmission. It is not recommended or supported to have fax communication on any VoIP link. If VoIP must be used due to lack of alternatives, make sure you minimize the VoIP link:- If you use a separate sop as a gateway, the fax server should be installed on this gateway.
- If you use a gateway for incoming calls and a gateway for outgoing calls, the fax server should be installed on the gateway which handle incoming calls and make sure you check the ISDN operator sends all new incoming calls to the this gateway (with the other gateway as backup).
Requirements
Please read the release notes before installing. This administration guide assumes that you already have an Asterisk or Communication server installation working correctly.Modules
- Fax Server Module 2.0.0+ Release notes
- Mail Server Module 1.1.4+ Release notes
- Watchdog Module 1.1.0+ Release notes
Resources
- IncomingIAXTrunk 2.01+ Release notes
Actions
- STARTFAXAPPLICATION 3.10+ Release notes
Installation
The FAX Server installation is explained in this section. When the installation is finished you will be able to receive faxes on your local fax extensions. Sending faxes will also be possible but you will need to install a fax client.Interfaces
Configure as many IncomingIAXTrunk resources as channels selected when installing the fax server, default is 4. The following fields have an impact on the Fax Server operation. In this example we will demonstrate with 4 IncomingIAXTrunk.- Example: Resource ID name IIA00001 to IIA00004
- User: iaxmodem1 for the first IncomingIAXTrunk, increase the last digits for the following IncomingIAXTrunk resources. Example: iaxmodem1 to iaxmodem4. If you have several fax servers running in the same cluster, start always with iaxmodem1 for each sop.
- Secret: iaxmodem
- Incoming Context: NoRestrict
- First Codec to use: (ulaw or alaw). Only use one codec. Choose the codec that will avoid transcoding along the way.
- Register: no
Modules
Install the "Fax Server" and the "Mail Server" module on the correct SOP through the SMP web interface. Be sure to check the dependencies.- Fax Server module configuration
- Number of fax channels: this is the number of connections between the communication server and the fax server. 4 is the default value. (Baseline 1 only supports 4 channels)
- Domain domain where the mails can be sent to. Example: 'company.com' without the quotes.
- Filetype if you receive an email the fax it will be in the format you defined here.
- Caller ID Name: you should insert the desired display name. It will be displayed on top of every fax.
- Caller ID Number: you should insert the desired display number. It will be displayed on top of every fax.
Callflow assignment
- Add a static profile Fax
- Add a status Dispatch to the profile Fax.
- Assign the profile Fax, status Dispatch to a simple call flow that calls the primary phone of an extension. Use the version defined in the requirements of 'STARTFAXAPPLICATION' in the "Application Selector" field.
Create the local fax extension
- Add an extension to the directory, this will be the local fax extension. Set the callflow of that extension to Fax.Dispatch. Configure a valid e-mail address, this address will receive the faxes.
- When using the optional email to fax feature, you can define the caller id number in the Fax Number field. This number will then be added to the fax header. (Since STARTFAXAPPLICATION 3.12 & Fax Server Module 2.2.5)
- Associate an external number to the newly created internal extension.
- Apply changes.
- The extension is used as login credential.
- The pin code is used as password credential.
- The email address:
- Will be used to receive notifications when you send a fax.
- Will be used to receive faxes.
Restart
Restart the SOP. In a High Availability environment don't forget to restart the standby server as well.Logs
A log of send and received faxes can be obtained on the SMP. These logs are generated by the fax server on the SOP. In order to visualize them on the SMP you will need to add a task to synchronize them on the SMP, and then you can run a report on the data.User acceptance tests
This section provides a list of functional test which can be executed in order to verify the installation of the FAX server. Define the test objectives, and select the tests or part of the tests relevant in your usage context. Starting point:- SOP with a PSTN connection
- Fax Server Module
- One local fax extensions
- An external FAX connected on the PSTN network.
- An external number configured on the SOP that points to the internal fax extension
- Test fax paper
Receive fax on mail box
- On the Fax device connected to the PSTN send the test fax paper to the the external number defined on the SOP.
- Check if the email address defined for the local fax extension receives the fax as an email.
Optional features
HylaFSP to fax
The HylaFSP is a client application that runs on your personal computer and is compatible with the Escaux FAX Server. It allows you to send fax documents from your computer. You can find the HylaFSP administration guide here.Third party client to fax
Third party fax clients, including but not limited to Winprint HylaFAX, are not supported by ESCAUX. Nonetheless, some of our customers have reported a successful deployment, considering the network and firewall requirements.Email to fax
Introduction
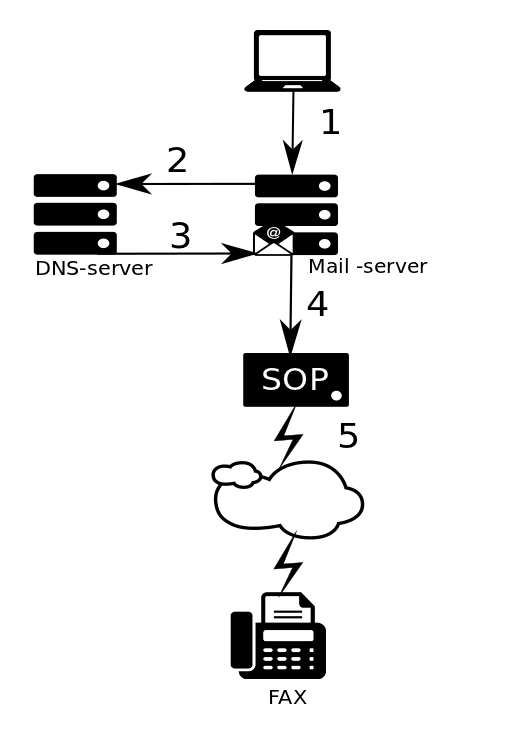
Email to fax allows you to send a fax by sending an email to a specific destination. The contents of the mail and/or the attached files will be sent via fax. The following scenario explains how email to fax works, it will show how it integrates with your infrastructure. Lets imagine that you have a local fax extension 999. And that you want to send a fax to the number 010242598. You open your favorite mail client and type in the content of your fax, since 1.10.0 version of the FAX server, your mail can be in the HTML format. You can also attach PDF files.You send the mail to 0010242598@999.fax.yourcompany.com. (Attention An additional zero is needed because its an external number)When the mail is sent, your mail client will contact your mail server and sent the contents of the mail to your mail server. This step is represented by the number 1. Your mail server is in charge of sending the mail to the domain name
fax.yourcompany.com. It will query your DNS server for an IP, this step is represented by the number 2. Your DNS server must answer with the IP of the SOP where the fax server is running. This is represented by the number 3. Your mail server sends the mail using the SMTP protocol to the SOP. This is represented by the number 4.
The SOP will extract the destination number from the email address. It will also extract the local fax extension number and use its outgoing fax account to send the fax.
A notification mail will be sent to the mail address of the local fax extension.
Benefits
- You can use a simple mail client to send a fax, no need for a physical fax machine.
- If you have a multifunction printer with scan-to-email, you can use it to send faxes.
- You can customise the caller ID printed on the header fax per virtual fax extension.
Requirements
- A SOP with baseline 2 installed. Does not work with baseline 1.
- Your mail server should be able to contact the SOP on port 25.
- Rights to alter the DNS records used by your mail server.
- Basic knowledge of DNS is needed.
- Fax server installed with a local fax extension being able to send faxes.
- Modules/Resources/Actions indicated below :
- FAX Server module >= 1.10.0+
- Mail Server >= 1.1.3
- STARTFAXAPPLICATION >= 3.1.0
Configuration
Before starting the configuration please ensure that you match all the requirements.DNS Server
As you have seen in the introduction scenario, your mail server will have to resolve an address similar to '999.fax.yourcompany.com'. You need to configure your DNS server to do so. Since there are many different DNS server we recomment to refer to your DNS server documentation to do so. Keep in mind that you may have multiple local fax extensions. The domain name will be dynamic depending on your local fax extensions. If your DNS server supports wildcards you could use something like '*.fax.yourcompany.com'. Keep also in mind that your must use MX records in your DNS server.Modules
- Mail Server Module 1.1.1+
- Email to fax DNS: This should match the DNS record you configured in your DNS server.
- Example1: If you configured
999.fax.yourcompany.com -> 172.16.32.254, you should put '*.fax.yourcompany.com' without the quotes. - Example2: If you have used
*.fax.yourcompany.com -> 172.16.32.254you should put '*.fax.yourcompany.com' without the quotes. - Example3: If you have used
*.fax -> 172.16.32.254you should put '*.fax' without the quotes.
- Example1: If you configured
- Email to fax DNS: This should match the DNS record you configured in your DNS server.
- FAX server module 1.8.4+
- Caller ID presentation: Caller presentation information to be inserted in sent faxes. The value is a comma separated list containing the caller name and the caller number.
User acceptance tests
This section provides a list of functional test which can be executed in order to verify the configuration of email to fax. Define the test objectives, and select the tests or part of the tests relevant in your usage context. Starting point:- SOP with a PSTN connection
- Fax Server Module 1.8.6
- Two local fax extensions
- An external FAX connected on the PSTN network.
- An external number configured on the SOP that points to the internal fax extension
- A PC with an email client
- One or more configured fax domains
Send a fax as an email to an external fax
- Create a new mail, type some content.
- Next mail it to : [destination]@[local_fax_extension].[fax domain]
- [destination] is the external fax number
- [local_fax_extension] is the local_fax_extension you defined on the sop
- [fax domain] is the domain you configured on your dns, that points to the sop.
- Check if you receive a confirmation mail
- Check if the fax arrives at the external fax device.
Send a fax as an email with a PDF attachement
- Create a new mail, add a PDF attachement.
- Next mail it to : [destination]@[local_fax_extension].[fax domain]
- [destination] is the external fax number
- [local_fax_extension] is the local fax extension you defined on the SOP
- [fax domain] is the domain you configured on your DNS, that points to the SOP.
- Check if you receive a confirmation mail
- Check if the fax arrives at the external fax device.
Send a fax as an email with multiple PDF attachements.
- Create a new mail, add 3 PDF attachements.
- Next mail it to : [destination]@[local fax extension].[fax domain]
- [destination] is the external fax number
- [local_fax_extension] is the local fax extension you defined on the SOP.
- [fax domain] is the domain you configured on your DNS, that points to the SOP.
- Check if you receive a confirmation mail
- Check if the fax arrives at the external fax device.
Send a fax as an email to an other local fax extension
- Create a new mail, type some content.
- Next mail it to : [local_fax_extension1]@[local_fax_extension2].[fax domain]
- [local_fax_extension1] is the first local fax extension you defined on the SOP.
- [local_fax_extension2] is the second local fax extension you defined on the SOP.
- [fax domain] is the domain you configured on your DNS, that points to the sop.
- Check if you receive a confirmation mail on local fax extension 2 email address.
- Check if the fax arrives at local fax extension 1 email address.
Limitations and remarks
- When sending a mail containing text and adding files in attachment, all contents will transmitted using one fax transmission. The text and attached files will be appended in one fax message, in this order:
- text
- attached file 1
- attached file 2
- etc.
- The only supported file types are PDF. If you want to send other types of files using email-to-fax, please convert the files to PDF first, and then attach the PDF file to your email.
- The maximum supported total size of the mail message is 10Mb.
- The original mail header (To, From, Subject and Date) are printed on the first page of the received fax. (Limitation removed since Fax Server 1.10.0+)
- Your mail body can contain HTML since Fax Server Module 1.10.0+. Only simple markup is supported, conversion is executed with the help of the html2ps library. (e.g image in the email won't be sent,
- If you are using the email as a login credential, you make sure it is not duplicated, two local fax extensions must not have the same email address. If you use the extension, you can use duplicate email addresses in your local fax extensions.
- Landscape is not supported. To obtain the best results when using landscape, please use a print to fax client.
- Only A4 is supported. If you send a A3 pdf, the pdf will be truncated and the fax will be sent partialy (it won't be mentionned in the confirmation message)
Other resources
Copyright © Escaux SA